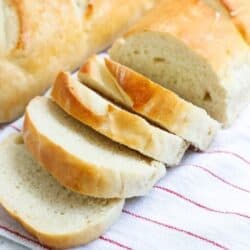
This no knead Dutch oven bread is the perfect artisan loaf for beginners! With just 4 simple ingredients and 5 minutes prep, you can make homemade bread with a tender crumb, golden crust and best of all it can be baked for dinner tonight!
Unlike traditional homemade bread, whole wheat bread or homemade bagel recipe, there’s no kneading required to make this version in the Dutch oven.

Table of Contents
No Knead Dutch Oven Bread
You may have never thought of making bread in a Dutch oven, but trust me, it’s easy, hassle free and has incredible flavor. With a no knead Dutch oven bread, you simply give the dough a quick stir, let it rise, shape into a ball and then bake in the oven.
This bread is similar to artisan bread, however it is cooked in a Dutch oven instead of on a pizza stone. Cooking it this way gives it a crusty outside and makes the bread soft and tender with airy holes in the center. It only take 5 minutes prep, you don’t need bread flour and there is no kneading!
What is No Knead Bread?
It’s bread you don’t need to knead! Normally, bread dough is kneaded to form gluten. With no knead bread though, the dough is very wet and sticky and this leads to gluten being developed all on it’s own!
There is no need for any equipment or mixer, you just combine the ingredients and then let it rise. There is no need even for a second rise, it’s easy and hassle free! It’s different than white bread with a more shaggy appearance similar to a sourdough. No knead Dutch oven bread is dense and fluffy and looks like you might have picked it up at the bakery.
Why Use a Dutch Oven to Bake Bread?
You’re probably wondering what makes baking bread in a Dutch oven so special. Because the pan is enclosed, it creates extra humidity and evenly distributes the heat. The bread begins to steam, which creates a super moist and tender inside. Then the lid is removed the last few minutes of baking to create a crispy golden crust (without drying out the center).
It’s the easiest way to make an artisan-style bread that yields a loaf with a crackly crust and irresistible flavor.
Recipe Ingredients
This cast iron Dutch oven bread requires only a few ingredients plus warm water and then it’s hands off while it rises! The beauty of this loaf lies in its simplicity.
- Flour: All-purpose flour is my first choice of flour for this recipe.
- Yeast: You use either active dry yeast or instant yeast. Measurements will be slightly different.
- Sugar: This helps feed the yeast.
- Salt: Adds flavor to the loaf.
Variations
- Bread flour: Bread can be used instead of all purpose flour. It tends to give this Dutch oven bread a slightly higher rise.
- Added whole grains: You could replace up to 1 cup of the flour with whole wheat white flour, but do not make any other substitutions. This bread is best with all-purpose flour.
- Cornmeal: For a more rustic appearance, before baking sprinkle your Dutch oven with cornmeal.
- Mix-ins: Try some Parmesan cheese, fresh herbs, or roasted garlic for a fun variations.
How to Make Bread in a Dutch Oven
No knead Dutch oven bread recipe is simple to make with no kitchen gadgets required! Just mix, rise and then bake in your Dutch oven.

- Proof yeast. Proof the yeast by adding the flour, sugar ,salt and yeast in a large bowl, then pour the warm water on top.
- Mix dough. Mix together the dough until a shaggy dough forms. I like to use a dough whisk, but a spatula or wooden spoon also work great.
- Rest and rise. Cover the dough with plastic wrap and let rest on the counter for about 8 hours, although it can ready to bake in as little as 3 hours.
- Shape and bake: Turn the dough onto well floured surface and use your hands to quickly shape into a French boule (round ball). Cover and let rest for 30 minutes. Carefully slide your dough into your hot Dutch oven. Close the lid and place pan in oven. Bake for 35 minutes, then remove lid and bake an additional 10 to 15 minutes. Let cool and then slice and serve.

Baking Tips
- Dough texture. After mixing, the dough should look shaggy and slightly sticky/wet to touch. If it’s too sticky to work with, add 1-2 more Tablespoons of flour.
- Rise time. The longer it rises, the more chewy and flavorful it will be. It can rise on the counter for up to 24 hours or in the fridge for up to 1 week. If you’re short on time, you can bake after rising for 3 hours.
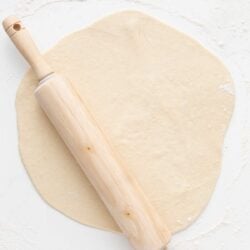
- Flour your hands. Because of it’s sticky texture, make sure to generously flour your hands before shaping the dough. No need to punch it down, knead or roll it out. Simply use your hands to gently shape it into a round ball.
- Hollow insides. To test if it’s done, knock on the bread loaf. It should sound hollow inside when knocking.
FAQs
Any type will work, however you’ll get the best results when using a heavier Dutch oven with thick walls. The heat holds better in this type of pan, which means your loaf will cook evenly and get perfectly crispy. This recipe is best with a 4, 5 or 6 quart dutch oven.
Yes, score the bread before baking with a bread knife by making 1-3 lines across the top that are about 2-inches deep. It will help the bread rise better and create more craters in the crust.
For both preheating your Dutch oven and baking, your oven will need to be at 450 degrees F. About an hour before baking, you’ll need to heat your Dutch oven pot so that it’s hot. Preheat the temperature to 450°F and place your Dutch oven (with the lid) in the oven. Let it heat in oven for at least 30 minutes.

Serving Suggestions
This easy no knead bread recipe is a favorite! Everyone who tries it loves it. It’s amazing slathered with butter, goes perfect with a warm bowl of soup or just dip it into olive oil with some balsamic.
It tastes great when used for a chicken salad sandwich! Here are some favorite recipes to pair with this artisan no knead bread:
Storing Dough and Baked Bread
If you had good intentions to bake your bread at night but ran out of time, simply store the dough in the refrigerator up to 1 week! When you are ready to use it, bring it to room temperature, let it rise again, then proceed with baking it in your preheated hot Dutch oven.
For best results, store the Dutch oven bread in a paper bag so that it doesn’t soften. Do not store in a plastic zip top bag, as it will trap moisture and make the crust soft and soggy. The paper bag let’s more air in, keeping the crust crispy and delicious.

Ready to make more homemade bread recipes? Try this breadstick recipe, homemade french bread or bread bowl recipe.
More Homemade Bread Recipes
Browse all
HUNGRY FOR MORE? Subscribe to my newsletter and follow on Facebook, Pinterest and Instagram for all the newest recipes!

Dutch Oven Bread
Video
Equipment
Ingredients
- 4.5 cups (585 grams) all-purpose flour (more for dusting)
- 1 Tablespoon (15 grams) sugar
- 2 ½ teaspoons (14 grams) fine sea salt
- ¾ teaspoon (2 grams) active dry yeast (or 1 teaspoon instant yeast)
- 2 ¼ cups (17.8 ounces) warm water (105°F)
- cornmeal , optional
For serving: Butter and/or Jam
Instructions
Make dough:
- Place the flour, sugar, salt and yeast in a large bowl. Then pour the warm water over top. Then you can use a dough whisk, spatula, wooden spoon or your hands to mix together. Stir until a shaggy dough forms and the dough is combined. The dough should be wet and STICKY, but add a Tablespoon or two more flour if it's too sticky to handle.
- Once the flour is all mixed in, cover with a towel or plastic wrap spayed with nonstick spray. Leave on the counter and let rise for 8-24 hours. If you're short on time, you can bake as soon as 3 hours (I prefer to make in the morning and bake in the evening). You can also refrigerate it for up to 7 days.
Shape:
- Generously flour the counter and your hands (use about 1/4 cup). Then turn the dough onto the counter. The dough will be sticky. Do not punch it down, knead it or roll it out. Gently and quickly work the dough into a French boule (round ball) by pulling the ends into the center. Then place into a glass bowl. Lightly dust the top with flour. Cover and let rest for 30 minutes while the oven preheats.
Preheat:
- Preheat the oven to 450°F about 1.5 hours before serving. Place a 4-6-qt dutch oven (with the lid on) into the oven for 30 minutes to get hot.
Bake:
- Remove the dutch oven from the oven and sprinkle some cornmeal into the bottom of the pot or a piece of parchment paper. Then carefully pour the dough into the pan. Use a bread knife to add 1-3 lines across the top if desired. Cover with the hot lid and bake for 30 minutes, or until it's starting to turn golden. Remove the lid and bake an additional 15-20 minutes or until golden brown. When you knock on the bread, it should sound hollow.
- Allow the bread to cool on a cooling rack atleast 30 minutes before slicing (the middle will finish cooking while it cools, so make sure to give it time to rest).
Notes
Nutrition
Nutrition provided is an estimate. It will vary based on specific ingredients used.
Did you make this recipe? Don’t forget to give it a star rating below!
Categorized as: Bread, Yeast Bread

Jamielyn Nye is the founder and recipe creator at I Heart Naptime. She is also the author of the I Heart Naptime Cookbook. Here you will find easy family-friendly recipes for every occasion.


Can it be doubled?
Hi Glenda! If you doubled it, you’d need to cook each loaf separately in the Dutch oven. Happy baking!
This was so easy and delicious! My kids were so impressed!
Fantastically easy recipe producing even more fantastic bread, just amazing! I ve baked it after only 3 hours and after 6 hours but the results are equally the same and the aroma … wow!
Love this💔
Very easy and straightforward bread recipe plus a great result!
The bread turns out nice, but not a pretty brown. Any suggestions?
I’ve made this bread a few times and its my husbands new favorite. It also works.grest.making French toast. I will.be making this again and again in the future. It.so.easy and simple. Thanks.so.much for sharing.
I’m so glad you enjoy the bread Valerie!
Made this bread, flavor and texture inside was perfect. Top crust nice and crispy, but bottom crust kind of thick and a little tough and chewy. Any ideas on how to fix bottom crust, or is that the way it should be? Great recipe for a beginner like myself. Thanks
Hi Michelle, I’m glad you enjoyed the dutch oven bread. The bottom is a little thicker than the top, but it could have been if there was too much flour added (especially if it was left on the bottom I like to dust off). I like to add a piece of parchment paper as well into the pot.
I made it two times with bread flour, followed everything else in the recipe exactly and it turned out amazing both times, but now that I changed to all purpose flour like the recipe calls for and following everything else exactly the dough ends up way too moist every time. it rises at first but when I take it out I’m not even able to make the boule because it just flattens and I end up with a a bad loaf any advise?
Hi Max, I’m glad you enjoyed the recipe with bread flour. It’s hard for me to know without being there. It definitely is a stickier dough than normal, but if it’s too sticky to handle, I would recommend adding an extra Tablespoon or two of flour and letting it rest longer. Make sure to flour the counter when shaping the dough as well. However, is bread flour is working best for you, you can always use bread flour. I switch it up or I’ll do half and half sometimes as well.