Pantry organization storage ideas, tips and tricks to get your space organized in the new year.

Table of Contents
DIY Pantry Organization
One of the things that sold me on our new house was the kitchen (post coming soon)! I also loved the fact that it had a walk in pantry. I’ve never had a pantry before, usually I just stored everything in cupboards, under the bed or coat closets (which you can definitely make pretty and functional too).
I knew with this pantry that I wanted to keep things organized and make sure every item had it’s own container. I’m going to take you through the steps of how to organize your own space and make it work for you.
How to Organize a Pantry
- Take measurements. Be sure to measure the size of your pantry so that you can maximize the entire space and find containers that will work for the shelves.
- Remove all items. Remove everything from the pantry and wipe it down so that you can start with a clean slate.
- Group items into sections. Group all pantry items into sections, i.e. baking supplies, snacks, canned goods, etc.
- Start pitching. Get rid of anything that has expired. This is also a good time to pitch anything you know you won’t use and that is just taking up space. The goal is to have a functioning pantry with items your family will eat. Remove packaging before adding items to the container, recycle the big boxes if possible.
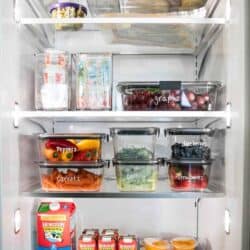
- Add items to storage containers. One section at a time, start adding the items into your pantry storage containers. Try to find containers around the same size as your items. You can group multiple items in one container. For example I put all my sauces in one container.
- Organize containers in pantry. Place storage containers in your pantry. You want to organize these based on what’s most convenient for your family (i.e. snacks on the bottom shelf for your littles, things you don’t want them to get up top).
- Make sure everything has a place. Even if you’re storing your food in a cupboard, you want to make sure it has a place.
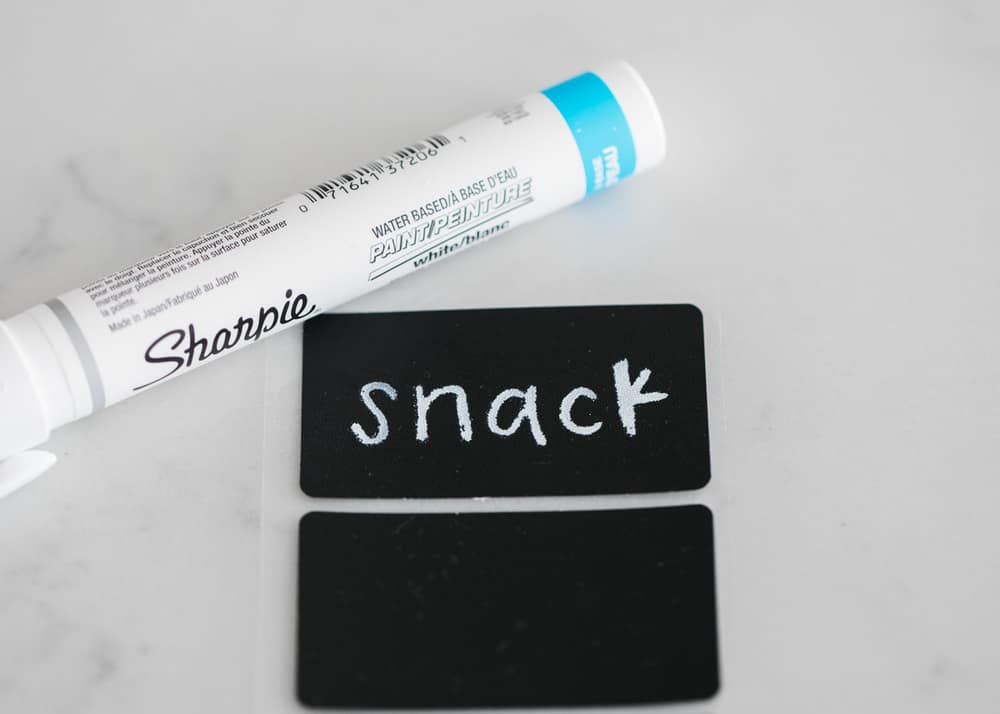
- Add labels. Once you have everything in place, now you can label the containers. This has made it super easy to keep our pantry stay organized. I loved using my white sharpie to write on the labels.
- Write the expiration dates. Use a white sharpie to write the expiration date and instructions on the bottom of the container. It will wash off with water and a scrubbie. You could also cut out the nutrition label and tape it to the bottom if desired.
- Store extra’s up top. Have a bin for extra’s that don’t fit in the containers. Then when it’s running low, you can easily refill.

Pantry Storage Containers
- Clear Containers: For my clear containers, I used these BHG food storage containers from Walmart. They work great and are the cheapest that I was able to find without losing quality. These are great for things like pretzels, crackers, nuts, pasta, etc.
- Cereal Containers: For my cereal containers, I did splurge and get the OXO cereal dispensers. I didn’t love that my kids couldn’t hold the bigger containers, so these smaller ones are perfect.
- White Bins: I found the white bins from IKEA. They are the Kuggis box (the majority of them are the 10″ and the ones up top are the 14×21″. I love these because you can’t see through them and they are super easy to wipe down.
- White Buckets: For bulk items, I used food safe containers with a gamma seal lid. I have the 3.5 gallon size (because that fits best in my pantry), but if you want to hold a 25 pound of flour then you’ll need a 5 gallon bucket. Again, just make sure it is food safe. You can find these at Home Depot, Lowes and some stores like Winco.
- Jars: I used these Ball glass jars with white storage lids to store nuts and seeds. They are the perfect size to fit a whole bag and keep them nice and fresh. I found these later, or I probably would have added more to my pantry. They are so pretty!
- Can Organizers: I’ve had these can organizers for several years. In my last house I had a book shelf in a closet and stacked them in there. It worked!
- Turn Tables: turn tables also make a great addition to store things like honey, spices and sauces.
- Baskets: baskets are also a cute and functional container. Just make sure not to put loose food in them, only packaged items.
Pantry Labels
I used these chalkboard labels from Michaels on the white bins. Then on the clear containers I wrote directly on them using this white sharpie. It makes it look like a chalk pen, but it won’t come off. I also used that sharpie on my containers. It will come off the containers with water and a scrubbie.
Most craft stores have all kinds of labels in different colors and sizes. We even have some of the basic pantry organization labels available as a free printable. I love these cursive labels that you can buy with the items written out as well.
How I Labeled my Bins
Several of you requested for the names I put on the bins, so I thought I would update this list.
White Bins
- Pasta
- Sauces
- Condiments
- Salad toppings
- Stock cans
- Produce
- Nut butter
- Bread
- Breakast
- Mac & Cheese
- Snacks
- Dried fruit
- Apple sauce
- Baking
- Vitamins
- Chips
- Extra (this is a big bin I keep up top with extra food that didn’t fit)
- Paper goods
Clear Containers
- Noodles
- Rice
- Cocoa powder
- Flour
- Oats
- Powder sugar
- Chocolate chips
- Marshmallows
- Chia seed / flax seed
- Granola
- Cereal
- Pretzels, etc.

More Ways to Organize
Categorized as: DIY, Kitchen Tips
Jamielyn Nye is the founder and recipe creator at I Heart Naptime. She is also the author of the I Heart Naptime Cookbook. Here you will find easy family-friendly recipes for every occasion.

Beautiful pantry thank you for sharing. If you don’t mind me asking where did you get the white bins?
From Ikea :)
Where did you get the shelves? Our pantry is same shape & size
The white shelving came with your house (it looks like it’s painted MDF).
This is Beautiful! I’ve been looking for a while and this is finally the pantry I will try to follow. Thanks for your tips and for sharing where you got your items.
You are so welcome, Kia! Happy organizing :)
Must be nice to have a pantry – especially one the size of my bathroom!
Love your pantry!! Where did you get the big buckets on the floor? It looks like they have screw on lids? That’s what we’re wanting for big things like flour and rice.
Thank you, Jaime! I got them off Amazon, here is the link: https://amzn.to/32kotnZ. I have the 3.5 gallon size (because that fits best in my pantry), but if you want to hold a 25 pound of flour then you’ll need a 5 gallon bucket. Just make sure it is food safe. You can find these at Home Depot, Lowes and some stores like Winco.
Please try going to your local bakery. They have containers that their icings and such come in. they have small and large ones. They are food safe also. Our local bakery was happy to get rid of them. Great looking Pantry! LOVE!
What a great tip, Tereasa! I didn’t know that. Thank you for sharing :)
This blog post was so hopeful! Thank you.
You are so welcome, An!
Oh my gosh, this is beautiful!! I don’t know where to look first— eye-candy everywhere!! 😄😂. I have spent so much time memorizing the pictures of this pantry—you are an Organizer Extraordinare!!
Thank you so much Bethany! :)
Hi! I love organizing too and I found your blog really helpful. Wondering where did you get the can dispensers? Thank you!
Here are the can organizers I used: https://amzn.to/334fTtJ
What size of clear containers did you get for the flour, powdered sugar, and nuts? It looks like they are all different sizes but I’m not sure what size to get. Thanks!!!
Hi Abby! These are the containers I use: https://www.walmart.com/ip/Better-Homes-Gardens-3-Piece-Flip-Tite-Food-Storage-Set/320995374?irgwc=1&sourceid=imp_W3p2onwUaxyLWUJwUx0Mo3b1UkE3hKUhQSQOQs0&veh=aff&wmlspartner=imp_116548&clickid=W3p2onwUaxyLWUJwUx0Mo3b1UkE3hKUhQSQOQs0&sharedid=&ad_id=565706&campaign_id=9383
I’m trying to figure out what sizes of the clear containers to order. I can’t tell if those 10 ones you have stacked (pasta, rice, nuts, etc) are 4.5 cups or 7.5? And the chocolate chips, powdered sugar- what size? And then the biggest clear ones (flour)?
Hi Abby! The smaller ones are 4.5 cups and the larger ones are 10 cups. Here’s a link: https://www.walmart.com/ip/Better-Homes-Gardens-3-Piece-Flip-Tite-Food-Storage-Set/320995374?irgwc=1&sourceid=imp_W3p2onwUaxyLWUJwUx0Mo3b1UkE3hNUJQSQOQs0&veh=aff&wmlspartner=imp_116548&clickid=W3p2onwUaxyLWUJwUx0Mo3b1UkE3hNUJQSQOQs0&sharedid=&ad_id=565706&campaign_id=9383
Great ideas! I’ll def incorporate these ideas in my new place. I had a question about appliances: toaster, waffle maker, blender, can opener…
Where do you suggest I store them? Right now they are on one of my shelves.
Ideally, I would place all of my appliances in large drawers to hide them away. If that is not an option, I think on a shelf is great! I try and keep as much off my kitchen counter as possible! :)
Hi i was wondering where you purchased the can organizer from??
Amazon! Here’s a link: https://www.amazon.com/Shelf-Reliance-Pantry-Can-Organizers/dp/B07Q4FJ7GH/ref=as_li_ss_tl?keywords=can+organizer&qid=1574268023&sr=8-10&linkCode=sl1&tag=iheartnapticr-20&linkId=b7d92a87137c608f1a859ca89924b800&language=en_US
where did you get your solid adjustable shelving for your pantry?
It’s from shelf reliance :)
This is wonderful! – My project this week. Thank you as well for shopping tips. I want to incorporate a wine rack and liqueur storage on higher shelves and some items that I have to store – such as that lemonade dispenser (used twice a year) waffle grill kinda of items.
Would you mind sharing the approx dimensions of your pantry? And how much space you’ve got between shelves? I’m trying to visualize a pantry remodel to enlarge my current closet pantry and it would be so helpful to know what size yours is. It’s GORGEOUS 😍
Thank you.
Hi Carla! The pantry is around 8×5 ft and it’s about 14″ in between each shelf. The shelves are 15″ deep. Hope that helps! Good luck with your pantry remodel.
I just ordered all of my storage containers, most from your website with the exception of BHG containers are at this time not available at Walmart. Thank you, I absolutely love the matching, coordinated containers with a crisp, visually discernible display. Whew!
Matching containers brings me so much job! So glad you were able to get some new storage containers!
This is amazing! Thanks for all the links/sources! I have already been to Walmart today and purchased some of those bhg containers because of this post. Do you happen to know what size containers you used for your flour and sugar (the clear containers that look to be bhg containers) I couldn’t find any that seemed to look the same size as your picture. Thanks so much!
Hi Kristine! Thank you for your comment! They are the 3.5 gallon BHG containers.
This pantry is everything!! It has become my new quarantine project lol. I have a question about the same containers that Kristine asked about (the three large ones next to the powdered sugar, chocolate chips and marshmallows). I also tried to look for the 3.5 gallon BHG containers and haven’t had any luck. Do you have any suggestions or maybe a link to those ones… I just can’t get over how beautiful this pantry is! Thanks so much for being such an inspiration!
Hi Gina! It looks like they may be sold out. OXO carries similar containers!
I came across your post on pintrest. Love a lot of your ideas. Your organized pantry Awesome!
Cant wait to redo- my small pantry.
thanks look forward to seeing more things come from you.
Aurora Miller
Outstanding ideas. I miss my huge pantry I had in AVondale but with the pantry I have now in Seattle I have done several of your suggestions.
I’m so glad you can use some of the suggestions!