DIY Chandelier Cake Stand
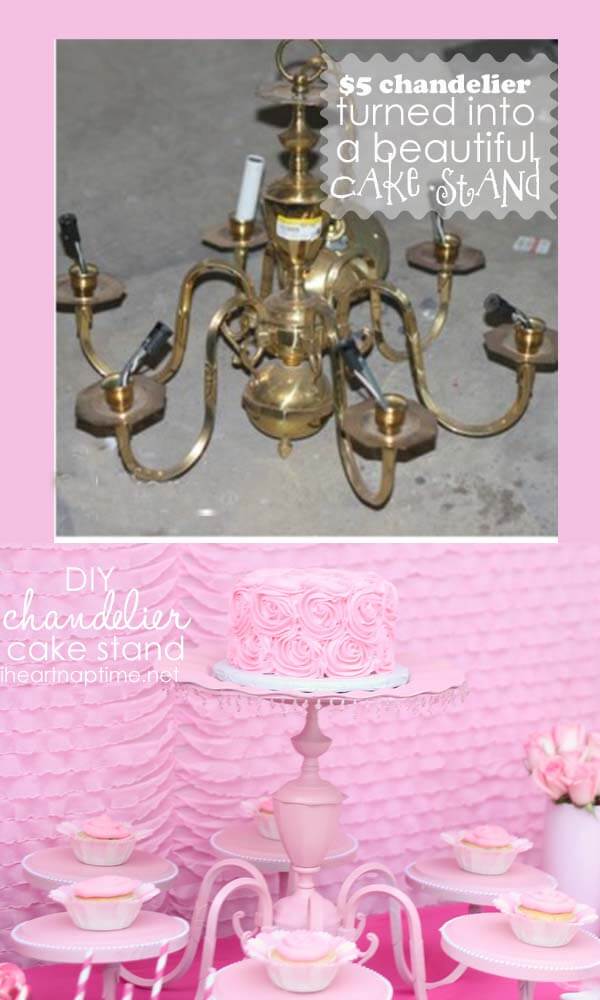
Isn’t she puurdy?!
I’m SO excited to share my latest trash to treasure DIY cake stand with you guys. I found this old chandy at goodwill on 50% off Saturday for $4.99. I didn’t need another chandelier… but I couldn’t pass it up! Seriously how could you for five bucks?! Well it sat in my garage for about 6 months… until TWO days before my daughters first birthday party (post coming soon) when an idea sparked.
I remembered seeing this one and as I was trying to come up with an awesome centerpiece I had one of those AH-HA moments. I love those moments…don’t you?! Where all the sudden you’re like “why didn’t I think of this sooner?!” The parties theme was ‘Pretty in Pink’ and I knew the chandelier would go along PERFECT!! I looked through my “stash” and this is what I came up with…
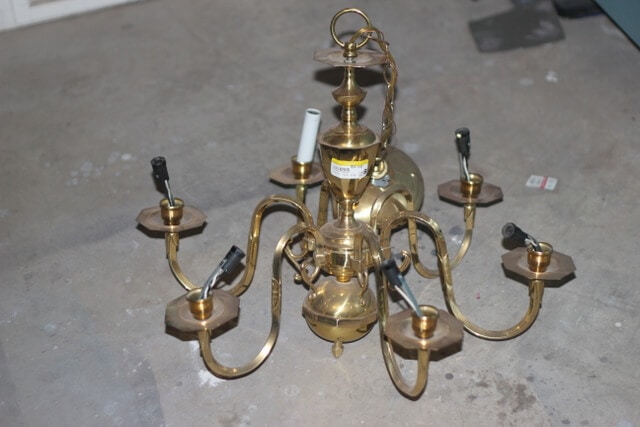
This is how the chandelier looked before…yikes!!
{ DIY Cake Stand }
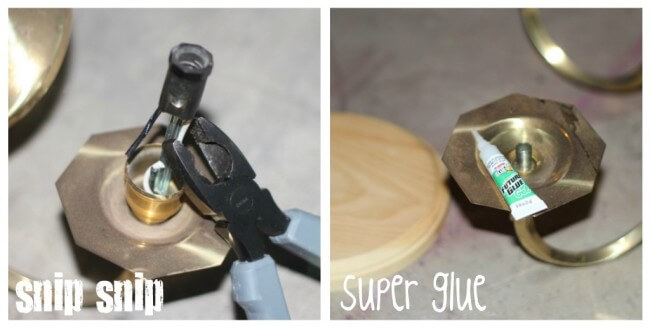
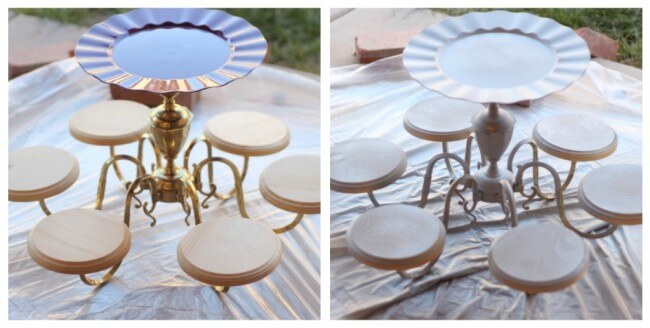
The first thing I did was snip off all the wires with wire cutters and unscrewed the top. Next I super glued these wooden circles (found at Michael’s) onto the legs. Then I glued a curvy plate to the top (found at crate and barrel for $1.99).
Once the glue was set I took it outside and gave it a good coat of primer. Then I spray painted it with a dusty light pink. Once it was all dry I thought it needed just ONE last touch. 🙂 I found some pearl trim in my stash (found at HL for $1.99) and glued it around the edge of the wooden circles. L-O-V-E! It was ready for the party!!
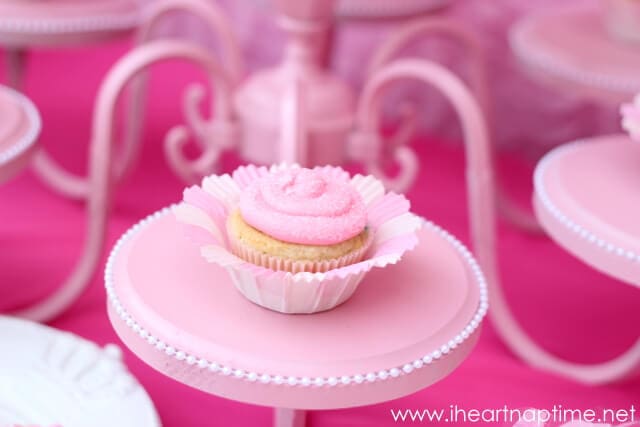
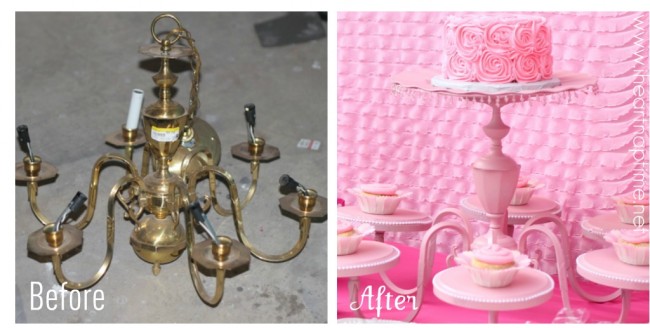
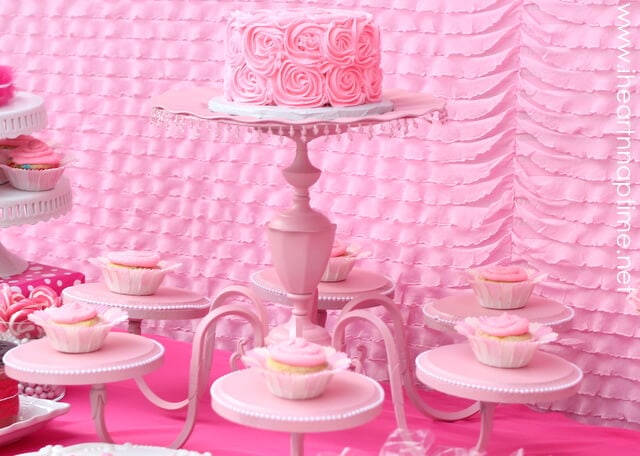
Can you believe the difference?! This may be my favorite before and after yet! I absolutely LOVE how it turned out!! And it looked even better with that gorgeous cake (by Sugar Dreams) on top!!
This chandelier cake stand added the PERFECT touch to the dessert table (can’t wait to show you the rest)! I’m already thinking of what color to spray paint it next… 😉
So what do you think?!
**UPDATE: To vie the whole party go HERE.**

Me encanta!Que idea.Bsos.
That is adorable I love it!! You are so clever!!
*~*Jilly*~*
this is awesome! what a really clever idea!
Oh my! This is absolutely amazing!! How creative! I pinned this immediately!
Beautiful! I love love love yours and the pearl detail around the wood plaques. So girly and pretty. Great Job. winks, jen
Now I”M having one of those “why didn’t I think of that?” moments! Way too cute!!! Love it!
evie
Gorgeous! What a fabulous idea!!
I love it! What a beautiful touch to the party! Can’t wait to see the rest of the pictures 🙂
<3 Bethany
http://www.happyhomemaker.me
http://www.letterstoourlittleone.blogspot.com
I love this idea! How perfect!
Thanks Amanda! It turned out to be the perfect cake stand.
OK! That is genius and gorgeous! Way to go girl 🙂
What a great idea!! good job it’s perfect! Can’t wait to see the rest of your girl’s party!
Crazy amazing!!
Thanks Michelle! It was so fun to make!
Gorgeous! WHat a great idea!
Thanks Kara! xo
I love this so much!!!
Thanks Alissa! You’re so sweet! xo
GIRL!! You are so talented! I woul have never thought this in a million years. lol!! I am inspired and think I will be heading to my local thrift store(s) to look for one. This adds a perfect touch to any party. I am truly amazed! Great Job.
Ah thanks girl! You just made my day! You’ll have to let me know if you find one- I want to see how it turns out! 🙂
I found a free one at the restore and my husband thought I was nuts, but I brought it home. The neighbor lady and I painted it, planted flowers in the glass light shades and put a platter on top for a bird bath. She had an old stand from a bird bath that was broken so it went on top of that. During the summer we all get to enjoy watching the birds, especially the hummers. If I come across another one the cake stand is next. ?
Sounds like a beautiful project! 🙂
This is a great idea!! It turned out so cute!!
Thanks Amanda!! xo
awesome and beautiful and soo very girly! love it!
Thanks Meredith! Was definitely going for girly! Loved all the pinks! Thanks for commenting! xo
Turned out gorgeous!
Thanks Amanda! xo
This is SOOOOOOO cute!!! Absolutely love the transformation! Very clever!
Ah, thanks Katie!! You’re so sweet!
That is gorgeous! Love the pink, so pretty!
Thanks Jenna- I Love pink too! Makes everything so pretty! 🙂
What a GREAT idea…Wish I were that creative!!!!!!
Thanks Joan! 🙂 xo
The cake stand seems a great idea for old chandelier. The color pink is really suited to blend and complement the pink cake and pink frost cupcake. The pearl looked also nice too. I love how you turned a piece of old item into a new item. Thanks for sharing the before and after photograph.
Thanks Stephan, I appreciate your kind words. I love a good before and after! 🙂
I think you have an eye for hidden beauty. This is a seriously remarkable transformation! What a lovely Birthday suprise and one not likely to be forgotten. It’s just so delectable (and in my favourite colour too)!
Thanks so much!! I really appreciate your sweet comment. xo
Wow! It’s perfect! I love it, thanks for sharing. Now I’ll be on the look out for chandeliers at the second hand store.
Thanks Selena! Definitely keep your eyes open! xo
This is awesome! Now where do I find one to refurbish for $5 too? Thanks for the inspiration.
Thanks Synthia! Check your local goodwill or garage sales… I see them all the time in AZ. Good luck! xo
What a terrific upcycle! Love this makeover! Such a creative use of the ubiquitous brass chandy. Thanks for sharing.
Ah thanks girl!! I love upcycling! Thanks for commenting. xo
OMG! This is so adorable.
I see chandeliers all the time at thrift stores, and keep passing on them—until now!
Thanks Doreen! Definitely don’t pass them up–so many fun things you can do with old chandeliers!! 🙂
Ummmm….wow! Such a great idea! Love it! The party looks amazing!
Thanks Amy!! It was so fun making it! 🙂 xo
Now that is gorgeous…..have just seen some old chandeliers in a new light…wow wow wow!!!
Thanks Deb! So glad I could give you some inspiration. Thanks for commenting! xo
OMG I LOVE IT
now I am going to look all over for a chandelier
Ah thanks Cindy! Just keep your eye out in your local thrift stores, this is the 5th one I’ve bought. 🙂
So cute!
Thanks Jen! 🙂
wow that’s so interesting
the cake is beautiful and so creative things
thanks for share the idea.
I love this. Where did you get the cupcake wrappers?
Oh I just gasped! I adore this!!! Beautiful!
Love this idea! I just happen to have a silver chandelier in my storage bld. I might just have to borrow this idea. Very creative.
I LOVE IT!!!! SO CLEVER AND I LOVE THOSE AH-HA MOMENTS TOO!!
Wow, you came up with a Masterpiece!! Out of all the reasons I imagine a chandelier could be used for -this tops it! 🙂
OMG, i LOVE IT!! I actually have a chandy almost identical in my basement. My daughter is a pastry chef, so I know she would get alot of use out of it. Thanks alot for sharing this amazing before and after!! Sue
This is amazing! What a creative idea.
This is ADORABLE and makes such an awesome table scape. Seriously, how many of these ugly light fixtures (besides the one in my dining room, right now…said with embarrasment) do you see at the Goodwill and Restore. Great job!
This chandelier cake stand is the bomb! I am totally impressed – first with even the idea to do something like this with something like that:) and secondly – how absolutely beautiful it turned out! I absolutely LOVE it!!! What a great job!
This would be beautiful on a dessert table! Thanks for sharing!
What an In-Gen-ious Idea!
I love it!
Catherine
What an incredibly fabulous idea!!!! Brilliant!
Wow! I just don’t even know what to say. I am so amazed that you came up with this idea. Sooooo creative!!!
This is amazing and beautiful! Congratulations!
Your DYI dessert server is ABsolUTely FANTASTIC!!!
What a thrill on those ah-ahhh moments…
Thanks so much for sharing with us, you perked me up!
Happy and Safe Holidays to you
This is the cutest idea! So original. I bet your daughter loved it. Visiting from Roadside Rescue.
I have a link party every Friday-Sunday, I would love if you would stop by and link this up, I think so many people would love to see this idea!
Um, I totally am CASEing this idea–thanks so much for the tutorial!!! 🙂 Pinning this! 🙂
This is beautiful!
This is so beyond awesome!! I will NOW be looking for a chandelier!
Girl- you are killing me with this cuteness!!!! i am so buying one next time I see it at goodwill….lol GORGEOUS!!
THIS is fabulous! I love, love, love it!! Found you Sugar Bee Crafts!!
It’s beautiful! And very unique.
Hi, I saw your post on a linky party and I just had to stop by and tell you how adorable this was! Thank you so much for sharing! I am now your newest follower from http://www.sweetenedbykagi.blogspot.com and I hope you will follow me too! I look forward to your future blog posts 🙂
Kagi
OMG! This is so fantastic! I just love it! You could use this for anything, not just cakes! Great job!! I am visiting from Vintage Wanna Bee!
What an amazing idea! I love love love it, and your blog.
Thanks for posting.
Buffie
http://papercuts4u.blogspot.com
Wow, I am in love with this. This is the meaning of looking outside the box and it definitely works
That is BEAUTIFUL! I love anything pink!!! I want that for MY birthday party!
This is adorable. I love the soft pink color. And so creative to make it out of an old chandeleir. We have a few of those sitting around from where we have moved.
What a creative idea!! It looks beautfiul! I wonder how many colors it will be spray painted in the end? lol Thanks so much for linking up to The Creative Spark. I’ll be featuring this on my Sunday Sparks. Enjoy the rest of your Sunday!
Jenn 😉
That is Crazy! Crazy Beautiful!!!
This is fantastic!! When I saw the original one someone made I thought it was a great idea. I love how yours came out 🙂
What a sweet idea! I had to feature it at Scribbles and Swirls the moment I saw it. Thanks for the inspiration!
~ Tami
Oh my gosh! This is absolutely a wonderful and beautiful idea….I have one of these sitting out in my garage as we speak. I’ve ben wondering what to do with it…. thanks for the wonderful idea.
Girl, this is pure genious ! I have an old brass chandelier almost identical to this one that has been in storage for years. Guess what I’m gonna do with it ? You got it ! I have a few of my own twists that I want to add, but
love your inspriration !
Would love to hear what you changed. I have one in my garage but I have boys so this all pink one will not work well.
Jamielyn, Oh does that chandy look familiar. Just like one we had in our formal diniing room and sold at a church yard sale for very little. Your cake stand looks great and I’m so glad that Tami directed me to your blog. You have me as a new follower. Hope you visit my blog, too. Thanks for the fun visit. Helen
How Absolutely Adorable! Makes me want to head to Goodwill and find one to make for Christmas Eve Party!
Thank you for sharing such a cute make over!
Wow, this is just stunning, sharing on our blog!!
Chriss
This is so inspirational and dare I say it, TOTALLY AWESOME!!!! What a fantastic job. Simply said, I love it.
Thrift store here I come!
I can’t wait to see how it would work for us. My daughter’s 13th birthday is coming up, Hmmmm.
Such a beautiful and creative project!
So creative! It turned out just beautiful!
very beautiful…i love it..
OMG! I am DOING this! I’ve had a chandelier just like this WAITING for something! THIS IS SO PERFECT!
I love this idea……….always liiking for great ideas. You are creative and I hope you will continue to post your ideas.
I ABSOLUTELY ADORE THIS CUPCAKE STAND! I normally don’t comment on blogs but this is absolutely gorgeous and creative!!!!
OMG. This is absolutely GORGEOUS and oh so creative. I must try it. P.S. I love that you found it at Goodwill! Such a great idea. Congratulations on being featured on Kara’s Party Ideas also!
Hi there! I got your point but why one should consider sharing this one? =)
Hi there!
Just had to say how much I love this cake stand. Totally inspired me, so I hope you don’t mind me sharing a link to your blog on mine 🙂 http://justadd3kids.blogspot.co.uk/
Aww, this is so sweet! Thank you for this fabulous idea! Now all those lonely chandeliers at the thrift stores will be bought up and given a new glammy job! Love it! Michelle
Ah thanks Michelle! This has definitely been one of my favorite projects. You’ll have to let me know if you find one to glam up! 😉
thesis the most awesome DIY centerpiece I’ve ever seen! My daughter’s birthday is coming up – I’m headed to Goodwill now! 🙂 Thanks for sharing this.
Thanks so much! I loved making that. I’d love to see if you end up making one. THey make great centerpieces!
How creative and beautiful is that chandelier cake stand! Great job!!
I LOVE this. You are so creative!
Wow, wow, wow! I love it! Thanks so much for sharing!
I just recently stumbled upon your site. I just love your cakestand!!! It’s so creative. I’m on the hunt for an old chandelier! Thanks.
I was wondering how you were going to accomplish this one???? Great idea! I am having a Tiered Display link party at my website Homa Style starting Wednesday, August 29, at 8 am {Arizona time}. I would love to see your creation at the party.
Semplicemente meraviglioso! Adoro il tuo stile.
Awwwwh, taht’s SO amazing!!! I’ll try it, sure! (sorry, my english is not very good)
But how is this lovely cake stand – standing?????
It’s standing on the arms/ legs of the chandelier. The curvy part. 🙂
i really love your work and innovation by recycling and turning the chandelier into a superb cake stand. nice!
This is a GREAT idea! I can’t wait to scour my local thrift stores for a dated chandelier to transform myself!
Hey there! Just wanted to let you know we featuring you in our Favorite Find Fridays post tomorrow over at Whimsically Homemade. We’re using one of your pictures and are linking back to you. If that’s a problem let us know and we’ll remove it immediately. Thanks for your great inspiration!
um – this is absolutely amazing!!! im googling 1st Birthday Party ideas for soon to be 1 year old (12/23/12) baby Nora. Totally doing a PINK theme since I have 2 boys before her 🙂
I love this kind of inspiration. You did a beautiful job.
Eleanor
I showed this to my daughter this morning and then we went to Goodwill. Guess what!? 50% off Chandelier for $4.99!! It’s gorgeous as is, but will be painting it to match her wedding colors. Thank you so much for the inspiration and instructions!!
I’m so doing this for my Kate’s first birthday in two weeks!! I’ve found one that looks almost identical to yours but I need help! How did you cut off the the ball this at the bottom so that it will stand up strait??
Hi Jessica! My ball un-screwed? If not I would try borrowing someone’s saw that cuts through metal. Good luck! xo
Fabulous job!
Perfect for a fairytale princess party…a really inventive idea, take a little peak at. I’ve added it to some of the best cake stands to make on my party blog. Stacy
Thanks for featuring it Stacy! So many cute cake stand ideas!
This is so adorable.
Thank you! It was so fun to make and have used it for many parties! 🙂
I search for everything on the web and many times end up on your site. Love your ideas and especially your name!!
Thank you for your comment Doroth! I’m happy to hear you end up on my site. 🙂 Hope you have a great weekend!
This is unique. Leave it to a Mom
Thanks Mary! It turned out to be the perfect cake stand. 🙂
I love this <3 I bought everything already to make it just one question though: what did you use for the hanging things that are hanging off the plate?
Hi Diana! I just found a beaded trim from Joann’s that I glued on! 🙂
Hi! I have my own chandelier that I’m working on so I was searching the internet for some answers… I love your take!! One question- how did you get it to sit level? Did you take the bottom “bulb” off all together? Thanks!! 🙂
Hi Leslie! Yes, I took the bottom piece off so it would stand up flat. 🙂
very creative love it Would be Awesome for Wedding Cake Beautiful.
Dear Jamielyn Nye; Even though the chandelier to dessert server idea
does NOT solve world hunger . . . . it is still GENIUS!! So fun. Thank you for the great idea!
Grahamcracker Anderson
Thanks Cheryl! It was such a fun project and I was so happy with how it turned out! 🙂
I love this idea. I know how you feel when something great comes together out of a bit of nothings. I’m new to your website and am glad to find it. I’m looking forward to seeing your other ideas. 🙂
Welcome Charlotte, I’m glad you stopped by! This was one of my favorite trash to treasure projects. Such a fun project!
Wow! Do you know how surprised I was to see this idea. It is great by the way! But, the funny thing is I have this light fixture hanging in my Dining Room! I have had it for years – in fact it has traveled from house to house!! It still looks as beautiful as the day I purchased it. I “dress” it for all the Holidays! Thanks again for the creative idea but, I will be looking for another light fixture to do that to!!!
Check your local thrift stores, they always have one or two lying around! 🙂 It definitely is a fun party centerpiece!
My sister found this like 4-5 months ago and I am getting married soon. We went out and bought a chandelier a few weeks ago, and thanks to you by providing us with inspiration, will be using this stand at my wedding!!
This would be beautiful at a wedding! Congratulations! 🙂
I have an old chandelier that I was just going to throw out but I love this!!! What kind of glue do you use? And did you put anything on the bottom to make it stable?
I used E6000 for the glue and I didn’t put anything on the bottom to make it stable. 🙂
Love it. I have a duplicate Chaney in my garage plus a double decker one, also brass. Been waiting for inspiration.
Really Fresh Idea! i really need this for my next event project, thanks Nye
this is one of the most unusual and prettiest i’ve ever seen. can’t wait to make my own
Hello I love what you did with the chandelier I bought the exact same chandelier but mine’s have a little bit more arms than the one you posted but I would like to know how did you remove the bottom from the chandelier?
Hi Julia! I didn’t have to do anything with the bottom of the chandelier, but I did have to screw off the top.
What size disk did you use, top and around sides?
Hi Joyce! It has been years since this project and I didn’t write it down in my notes, I’m sorry! I would guess 6″ wood plaques for the cupcakes.