
Ruffled Lace Flower {tutorial}
Thanks for stopping by! To get the newest posts subscribe or join us on facebook.

We’ve got some HAPPY news! Looks like the kids are feeling all better. YaY! This little miss was all ready to get dressed up and run around outside today. She was definitely happy about the new flower I made for her too. 😉

I did a TV segment yesterday featuring hair accessories, so I thought I better post them for everyone else to see. 🙂 I love these flowers. They are OH so girly, and so fun to make!

They are so simple to make and look so cute on little girls. I even wear them in my hair too! I wish I had taken a better shot of that beige and turquoise one above… it’s my fave!

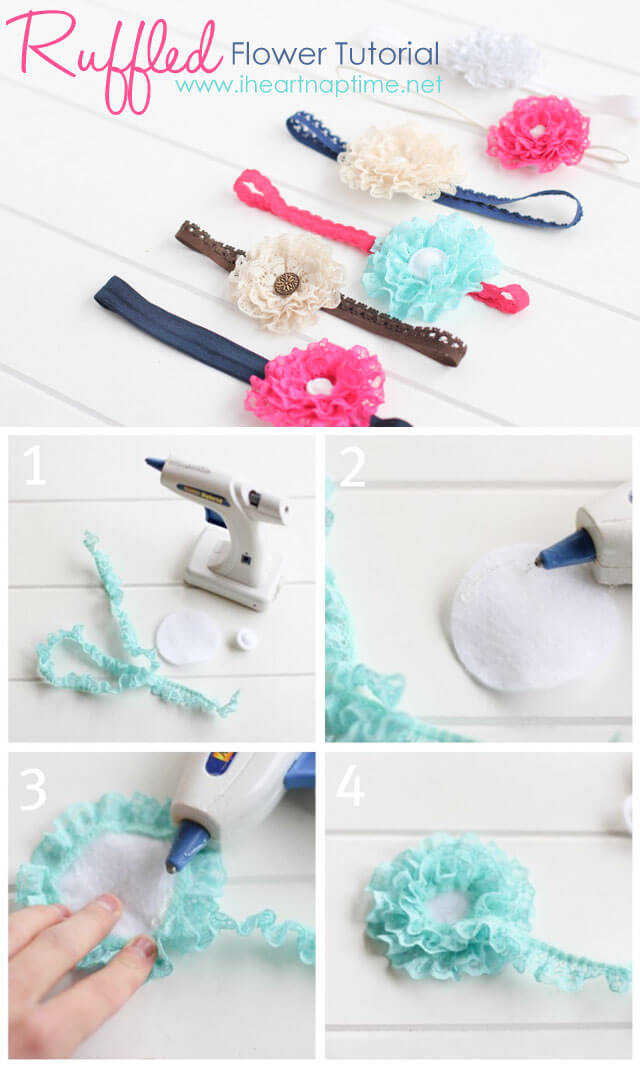
Ruffled Lace Flower
Steps:
1. Cut out a 2in felt circle and about 20 inches of lace trim. The lace trim can be found at most fabric stores and comes in many different colors and sizes.
2. Apply glue around one corner. Place the lace trims raw edge directly on the glue. Keep gluing (about an inch at a time) and follow the curve with the lace, pressing it down as you go.
3. Angle the lace down slightly and keep gluing around the circle till you reach the center and have a full flower.
4. I cut my lace here, so I could leave room for a button.

Then I glued the button in the center and applied stretchy elastic to the back. You could also add a clip or pin. There’s so many different things you could do with these flowers. Attach them to a purse, put them on pillows… get creative!

They sure look pretty cute on Miss Emmalyn, don’t you think?!

What a cutie! Girls are so much fun!
Hope you enjoyed the ruffled lace flower tutorial. I’d love to see, if you make them! 🙂
{hugs!}

Oh that is soooooooooo cute!!! I want one for myself lol.
Love!
I saw the broadcast today and it was great! Thanks so much for sharing!
SO cute! I love these flowers! And yes, they look adorable on miss Emmalyn! But how could they not?!
So cute! LOVE THESE!!! 🙂
These are just too cute and your little girl is precious! How fun to have done a tv segment on these. Why didn’t you share the link so we could all see it? I’d love to watch it!
I have to make some of these! They are so adorable and seem so easy to do! Thanks for the tutorial.
Those flowers are so cute, but Emmalyn is adorable.
Thanks for sharing! I’ve always wanted to know how to make the cute headbands all the little girls wear (even though I don’t have girls .) The shoes she’s wearing are really cute too.
Where did you get the fun colored lace at? Love how bright they are!
The little girl is adorable. I am going to try these ruffled flowers on my cards:)
Adorable! Glad everyone at your house is feeling better Jamielyn! Take care:)
those are so sweet!
These are so cute. I only have a grandson but I bet I could find a cute little girl to make one for. thanks for the great tutorial.
loooooove!
What a beautiful baby! The head bands are cute too. I wish I could get craft shows in Ohio. There use to be some but I have’t seen any for a while.
would these fit if they were made entirely out of strtech lace vs. knits? that’s the style of my current favorite store-bought panties. (Hahahahaha, as if anyone ever thought there’d be a need to identify particular panties as store-bought versus others. hahahahahaha)
How cute and it looks so easy too!
Super cute! Congrats on the TV segment! Smiles, Jill
Cute, cute! Yes girls are so much fun to dress!! Happy weekend!
So cute! I’m going to Hobby Lobby when my little girl wakes up from her nap :)!
so cute,, hoping to make grandgirls some this weekend.. I mentioned and linked back to you on my blog about this.
I’m a new follower. I love your ruffled flowers and tutus, but especially beautiful is your little girl Emmalyn! Give her a hug for me!!
These headbands are so cute! Where do you find the lace elastic for the headband?
I love this! I have to try these for my sweet L.
Sooooo cute. I hope I get a girl one day… 🙂 Until then I’ll probably make these for other people’s babies!
So cute! I love making headband for my baby, especially when they are easy and fast. Where did you get your colored elastic?
Gorgeous. I love them. I’ll have to keep those in mind, next time I need a flower for a project.
Thanks for sharing
Greetings from Germany
Catrin
I love how simple this is. I have 3 girls and we go through a number of hair accessories. Thanks for the inspiration. I am pinning this. Visiting from Show and Tell Saturday. Vicky from Mess For Less
Those are so fun and cute. The blue color is so pretty. Thanks for sharing how fun and easy these are to make.
where did you get the elastic bands, they are so cute!
Ruffles, lace, flowers… is there anything sweeter? Super cute headbands! Nice job! 🙂
Seems simple and easy enough – SUPER CUTE!!
These are so wonderful! I’ve been looking for more ideas for hair bows to make for my friend’s daughter. These would be perfect! Great tutorial too!
These are super-duper cute, Jamielyn!
Love how simple yet pretty they are!
And your little miss is a CUTIE-pie!
Love this post!
I love these headbands. Definately will be making this for my daughter and myself! Thanks for the tutorial!
Super adorable! I need to make a zillion of these pretties!
Oh I LOVE it SO much. Hope you can link this up at my turquoise lovin’ party going on!! http://www.sweetlittlegals.com/2012/01/turquoise-lovin-21.html
These are adorable!! I love how simple too:)
The colors are beautiful and the lace flowers are so sweet and feminine!
These are just adorable!!! I have a baby girl coming in April, and these are on my to make list! Just pinned!
Oh how “I heart” these headbands!!! I would like to invite you to share this post with our readers for Fun Stuff Fridays.
Hi,
This is sooo helpful! I have a little 4 month old girl so I wanted to try and make one! Thanks 🙂
One question though, where do you get the stretchy elastic? Whenever I look at the craft stores I never seem to find any!
Katie
Sooooo gorgeous!!! I’ve pinned this to my must do’s!
Thanks so much for sharing 🙂
Love! So cute! I would like to know as others have asked, where you got those adorable elastics? 🙂
These are adorable! I’ve seen several over comments asking the same thing I was wondering, but didn’t see an answer posted. Where in the world did you find the cute lace elastic for the headband?? I cannot find it anywhere but would love to make some! Thanks!
*other… darn auto-correct… 😉
Love the idea of these, but I had some real trouble with it! Maybe it was the type of lace I bought but I could not get it to lay flat for the life of me! Finally I took a thread and needle and hand sewed a loose stitch through it and ruffled it more. Then I was able to get the same look. These were tougher than they look but worth it!
What is the headband made from?
Thanks for this great tutorial – I just made my first one! The glue is drying now, and I can’t wait to try it on my little cutie!
I want to know about the adorable headbands as well! I’ve looked all over for it with no luck!
I cant find that lace trimming anywhere!! Does anyone know where I can find it?
I love these and have already started making some. I am wondering though where you got your colored lace. I am having trouble finding some I like.
thanks!
Hi!!!
I LOVE this flower, it is so gorgeous and so easy! Thanks so much for sharing!
I do have a question if I may – where did you get your bright pink and turquoise lace from?
I’m in Australia and it is near on impossible to find anything that isn’t white, red, black, baby blue. baby pink or cream. Boring!
Thanks so much!! xx
Where do you find the stretchy elastic? I haven’t been able to find it anywhere 🙁 Our hobby lobby doesnt seem to carry it and I couldn’t find it at Micheal’s either. These headbands are adorable!!
Thanks!!
Hey Tammy! You may have to try Etsy, there are TONS on there. http://www.etsy.com/search/supplies?q=stretch%20elastic%20headband%20wholesale&view_type=gallery&ship_to=ZZ&min=0&max=0
Where can you buy pretty headband elastic like you have above?
How wide of trim do you usually use?
CGirl You’ve got me thinking about the Red Dirt Roads now! In Oak Barn!Funny last Saturday when I was sneittg up at the trunk show I was hanging a skein of Red Dirt Roads in Oak Barn and thought to myself maybe I should set that aside for myself
I love the cute flower you made. I can’t wait to try this.
LOVE these flowers. Where do you get the stuff to make the headband part?
Thanks so much for sharing! Fantastic tutorial 🙂
Ok so I am IN LOVE with these. I don’t have a baby girl yet but I would love to make some for other’s baby girls or some for me when I have a baby girl ONE DAY (fingers crossed!) but I have a problem… I went to JoAnn’s and looked in what seemed like the lace/ruffle section but I didn’t see anything that looked quite like what you used. (also SUPER lacking in cute colors). I’m not sure if I was looking in the wrong place or the wrong store altogether. So my really stupid question is, what exactly is it called that I am looking for, as in the lace to make the flower and the stretchy kind for the headband?
Sooooo Darling!!!! Love them. Can I ask where you get your lace and elastic???
Ok ,so, I love these lace flowers!! Was directed to your site from this being pinned and cant wait to have time to look around some more. But, the main reason for my writing is that my sweet girl’s name is also Emmalyn. This is the only other time I’ve seen it spelled the same way, so I just had to comment. Love it!
Ah so fun! I love the name! I had never heard anyone with it until a few weeks ago. Yay for Emmalyn’s! 🙂
These are just to cute.
Thanks Debbie! 🙂
I am about to make these right now. I absolutely love them!! 🙂 Thanks for sharing! <3
So cute! I never would have thought this up myself! THanks for sharing, i can’t wait to try it out for my little Makenna! 🙂
Hi, I was lead to your blog from pinterest. Can you please share where you purchased your lace trim? I have looked everywhere and cannot find any.
Thanks!
adorei a idéia !!!!!
Parabéns !!!!
Zizi
Do you mind if I make and sell these?
Sure! 🙂
Did you use 5/8 inch or 1 1/4 lace trim ? SO cute ! Thanks 🙂
The trims I used were about 1/4 inch – 1/2 inch. Hope that helps!
Where did you find that lace?? I can’t find any that thin!
I found mine at SAS fabric in Phoenix, AZ! I’ve also seen some at Hobby Lobby and on Etsy! Hope you can find some! 🙂
Love it!
Thanks for sharing these instructions! Your steps are easy to follow!
Thanks Sally! These flowers are really fun to make, enjoy! 🙂
Love this! Wear did you find the elastic for the band? I like it so much more than the plain ones!
Hi Karen! I found them at a fabric store in my town called Saas, but you can order them on Etsy as well! 🙂
Just wondering if that is a hot glue gun you are using, or what type of glue?
Yes I am using a hot glue gun to make these flowers! 🙂
This is adorable. I just have a question: I don’t have any children but I want to make this for a one year old, about how long should the elastic be that goes around their head?
Hi Lianne! I am not sure how long it should be for a one year old. If my daughter was younger, I would go and measure it around her head, but she is older now so it would be different! I hope you got it figured out!
I was just wondering how you get your lace to lay flat?
Hi Nicki! I used a pleated lace that layed down pretty well when I glued it. You could probably iron it if it won’t go flat! 🙂
HI! Love this tutorial! Was wanting to leave you a private message but didn’t know how! Found your photo being used by someone else as their own!
So cute! Sorry if I missed this somewhere but curious what size lace trim you used for this flower? An inch? Also, about what size is her lace headband? Maybe 1/4 – 1/2 inch?
Hi Jessi! I don’t remember the exact sizes, but I believe the trims I used were about 1/4 inch – 1/2 inch.
I’m definitely making this for my baby girl. I’m sure it will be sooo cute on her 🙂
Where did you get the lace trim?
I found mine at SAS fabric in Phoenix, AZ! I’ve also seen some at Hobby Lobby and on Etsy! Hope you can find some! 🙂
I was scrolling through different tutorials and came across this one. I love the headbands and especially her name. I just had a girl and named her Emmalyn. Thank you for the easy tutorial.
Such a beautiful name! I’m glad you enjoyed the tutorial.