
How to make chalk paint
How to make chalk paint using just only one ingredient …makes it so there is NO sanding or prep work before paint your piece!
So I’ve heard about the glorious chalk paint for a few months now and decided to see what all the hype was about. If you love the shabby look you will l-o-v-e chalk paint. It gives you a nice chalky finish and makes distressing a piece of cake. You can buy chalk paint (annie sloan and bb frosch chalk paint powder are ones I love), but sometimes it’s nice to be able to make your own too.
 and distress furniture on iheartnaptime.net")

One thing I love about chalk paint is it can be used on any surface. AND {bonus} there’s no need for sanding or priming your piece beforehand. Anything that saves me less steps–>I’m there! 😉

I looked up the chalk paint price point and it is about double regular paint. If you’re like me…you try to think of way to do it cheaper. Here’s how to make chalk paint at home.
With a little research and talking with a few friends I came up with this formula. I played around with different measurements and found this mixture to be the best consistency.

How to make chalk paint-
Supplies:
- Paint (I used ‘white raisin’ by Sherwin Williams)
- Plaster of Paris (powder)
- Plastic container
- Water
- Furniture wax
- Paint brush
- Vaseline
- Cloth
- Medium sandpaper (120 works good)

The first thing I did was paint the edges black. I did this because I wanted the distressed areas to show black and not brown. I put the black paint anywhere I wanted to distress.

You can see here how much paint I added.

Then I applied Vaseline over the black paint. This will make the paint easily come off when it’s time to distress.
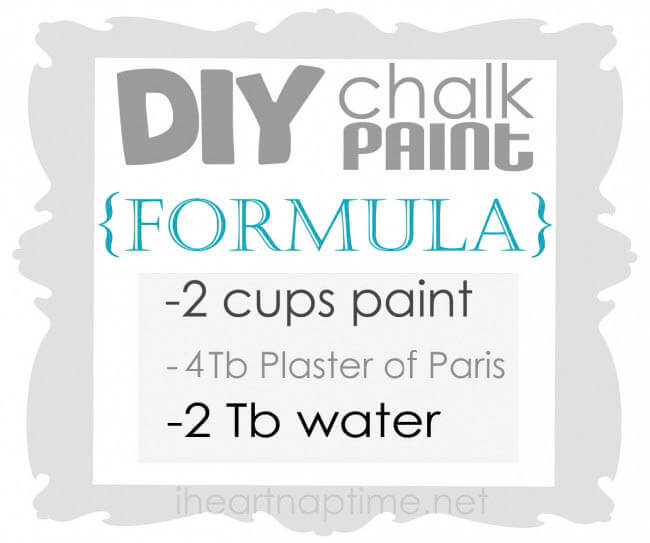

For the chalk paint I mixed FOUR Tb Plaster of Paris and 2 TB water in one container. Then I added 2 cups of paint in the other container (okay, so I estimated). Once the plaster of paris mixture was a smooth (thick) consistency I mixed it in with the paint. If it’s still thick add another tablespoon of water!

Then I gave my nightstand 2 coats of paint. I let it dry about 2 hours in between each coat. Yes I know it says let it dry for four…but I’m too impatient. 😉 Please note: the paint is pretty thick, but it will dry really nice.

The next morning when my paint was completely dry, I lightly sanded the edges (using 120 paper). Since I did the vaseline technique the paint litterally just wiped off in those spots. This is why it’s important to not get too Vaseline happy. Lol! I may have on one side… just sayin’.
The Vaseline technique really did work great. I didn’t have to sit there for an hour and sand my edges. It only took me about five minutes. It also gives the piece a textured look, which I love.

Once I distressed my edges, I protected the piece with a layer of finishing wax. To do this grab an old cloth and wipe a thin coat on the furniture. Let it soak in for about 30 minutes and then wipe it off. You can see my little helpers hands in there too. 😉
 and distress furniture on iheartnaptime.net")
That’s it! Are you dying over this yellow paint color?! I’m adding yellow accents to my room and cannot wait to show you how it’s all coming together. Yellow is such a happy color. 🙂
 and distress furniture on iheartnaptime.net")
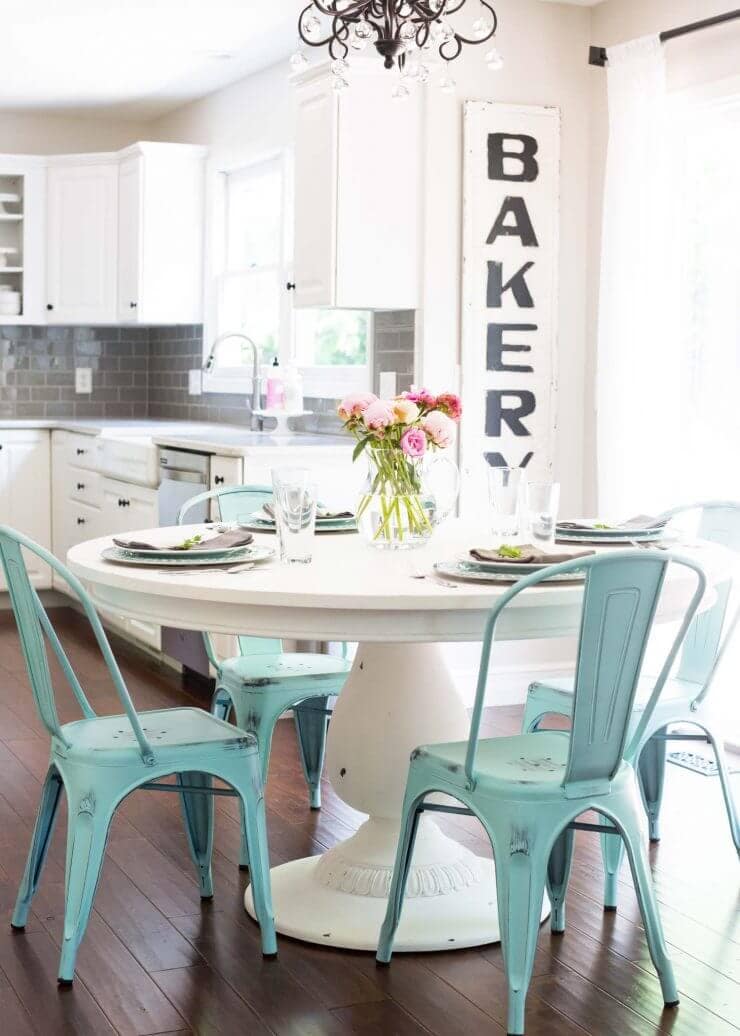
I seriously love a piece of furniture with curves! I found this night stand at Goodwill for$5. Look at her now! I’m still dying over the yellow paint! It’s the perfect yellow.

To see a few more of my furniture makeovers using chalk paint…
So have you tried chalk paint? If not, will you be trying it?
Have a great day! Come back soon! 🙂
** UPDATE:
To answer a few questions:
1. I used Latex (water based) paint with this recipe. I have not tried oil based paint. Flat and Satin finish works best.
2. Make sure to store the plaster of paris in a ziplock bag… inside. If this bag is left open it wont work as well the next time around. Trust me, I tried!
3. Make sure the plaster of paris and water is SMOOTH before mixing it into the paint. It may take a few minutes to stir out all the clumps. You can add more water if it is too thick.
4. Between coats put a lid on your paint and your brush in a ziplock bag. You don’t want the paint to harden. Stir occasionally to keep the paint a good consistency.
5. Whenever my paint starts to get thick I another TB or two of water and stir.


I LOVE this Jamielyn! I want to try!
your piece came out great. typically I buy the chalk paint but will have to try making it myself.
Thank you so much! You’ll have to let me know if you try it. I’d love to see the difference.
Thank you SO much for this “recipe” – I’ve been wanting to try my hand at the chalk paint craze, but couldn’t justify the price. This will be perfect! I pinned it so that I can remember the recipe – thanks again!
I had no idea about this chalk paint but thanks to the article I’m beginning to learn. I got to do it myself soon.
So cute! you are one talented momma! I think what i am the most impressed is how you run this blog. You have such great photos and I love the dedication you have for it. I need advice when ever you feel like giving it. I only have 1 kid and I struggle with doing parties and blogging them. You have 2 kids and do so much!
Okay I have a question for you. I have bought and use DA chalk paint and when you use their paint they say you have yo use their wax whuch I did. Both expensive, but better with coupons for both. I read yout post you only put the wax on the edges? So you don’t need to wax the whole piece? Also wondering about the min wax, where dud you purchase your from? Thanks for taking the time to show us your steps. Linda
Hi Linda! I rubbed Vaseline just around the edges to give it the distressed look. I rub the min wax over the whole piece! You can find it at Lowes or Home Depot! 🙂
I’ve used chalkboard paint for a couple of different things and it’s awesome that you can make your own! I just used non-sanded tile grout instead of plaster of paris and that worked fine too. I used it to paint the lids of some glass canisters in our kitchen, and I also painted a few flowerpots for our indoor herb garden and then used chalkboard paint for the labels. That way I can label the canisters and the pots and change them if we ever use them for anything else, it’s great!
I’m not sure, since I haven’t used either; but I don’t think “chalk” paint is the same as chalkboard paint…
“Chalk” paint is for furniture, etc Chalkboard paint is just for making black chalk boards for kids/everyone to draw on, write on, etc…does that help? 🙂
YOU ROCK, I heard of this technique from Tausha at SNAP. Then we all went to IKEA, and Desi decided to give me this darling clearance shelf for $6.00 bucks, for my craft space. SHE is a sweetie. I totally want to so this chalk paint to it. Thank you for the detailed tut. like i said YOU ROCK! xo, jen
sorry totally want to “do”..
This turned out fabulous. I have tried ASCP and decided I want to try this method, but I have a few questions. I have heard that this method of paint spoils quickly – do you know how long it lasts? Have you tried it without the vaseline method? (I ask because ASCP sands very easily) Does the P of P change the color of the paint at all? Thanks for your help!
Thanks Patti! I’m not sure about the spoiling. I painted this about 2 weeks ago and the paint still looks good. I would guess that adding a little water and stirring it back up would make it good as new, but I’m not 100% sure how long it lasts. I have tried it without the vaseline and it still sands pretty well. Also, I did notice the P of P made the paint a tiny bit lighter. Not a huge difference though. Hopefully that answers your questions. You’ll have to let me know how it goes. Have a great day!
i`m from south africa and saw this paint recently.so glad to use your recipe.i have cain furniture on my stoop outside and furniture gets wet from rain.can i use paint there and seal het very good with wax afterwards?
Hi Wilna! I don’t know if this would be the best recipe for furniture that gets wet. You may want to try using a paint that is made specifically for outdoors!
Annie Sloan Chalk paint can be used on outdoor items. The just need some cure time, 24-72 hours. But DO NOT use wax on items going out doors as the sun will melt the wax.
how much did you have left over? i’m wanting to paint a table smaller than the one pictured and am wondering if cutting the recipe in half will be plenty?
Hey Kat! I had about 1/2 cup leftover. I’m sure 1/2 would be good for a smaller stand. xo
Thanks so much!!
I want to try this! Thank you for this idea. I am going to share it on my facebook page. 🙂
i’m lovin this–a lot! I’d heard the vaseline before, I like this method;)
I’m so inspired! I have just the project I want to use this on. Thanks for the great tips!
I have only two colors of Annie Sloan paint because of the price, I can’t wait to try this method! Thanks so much!
Nice job… turned out Beautiful!!! I really want to give this a try but I am so chicken (Big Sigh)! Thanks so much for such a detailed tutorial – It really helps give me confidence to go for it!
AJ@queenofmynest
Lovely! I’ve been wanting to try using Vaseline, but have worried about getting it on my brush. Did you have any problems with it smearing as you painted?
I was a little worried about that too. However the paint is a lot thicker than normal paint, so it kind of just lays right on top of the Vaseline. It may smear a little, but not enough to ruin the outcome. Hope that helps. 🙂
Thank you for the great tutorial. I was wondering how well the paint kept? Can you keep it like regular paint in a container with a tight lid? Or does it need to be completely disposed of? Can’t wait to try this techinique!
I love this! I really need to try to mix up some chalk paint. It really does wonders on a piece!
Love it, going to do it this weekend!
Hey Jamie,
thanks for this! I’d seen others make it, but I must have missed the part about adding the water to the plaster of paris FIRST to make it smooth. I’d made some chalk paint and wasn’t sure I liked it. Now I think I will give it another whirl. I’ve got a piece of furniture that’s asking for it. 🙂
Great post, thanks for sharing your tips and formula! Question: do you think this would be a good painting technique to use on bathroom cabinets thqt get a lot of use? How durable is it and can it be easily wiped clean? Thanks!
I’m curious if you plan to write on the table with chalk? Just wondering if you were trying the chalk paint for its texture or if you plan on using it for its chalkboardiness (yea, I make up words, lol). Have you tried writing on it with chalk? How well does it work?
Love the piece chalk paint or not, btw. Thanks for the great tut!
LOVE this post–we are in the process of painting/distressing furniture so every and any tidbits help!~
LOVE this shade of yellow! Is White Raisin the shade of yellow? I am a “yellow person” anyway and know exactly which piece of inherited furniture will get this treatment! Thanks bunches for sharing!!!
did she ever say what color yellow this is?
White raison! 🙂
LOVING this! Pinning it! Thanks for the amazing tutorial!! Can’t wait to try this!
I’ve tried a different recipe for chalk paint, but I think I’ll try this one next time. The consistency of yours looks better than mine did. I can’t wait to try the paint and vasoline trick too! Thanks for the great tutorial. Have a FAB weekend!
I tried this last night and I LOVE it!! But I didn’t have any vaseline so I used vicks baby rub and even this morning the pieces that I made smell like menthol!! Oh well, at least they look cute. I love your night stand!
Hi ! It is really great tutorial. use a candle instead of vaseline. It go perfect. A lot of nice persons in this blog
This is so awesome! I am so going to try this! for Months I have been going back and forth on buying chalk paint, now I can make my own! Wahooooooo!
You are brilliant! Thanks so much for this recipe! I have just the project in mind that could use some chalk paint.
I want to try this! Thanks for sharing your recipe. I noticed that you used a satin finish for the paint. I was wondering if it would make any difference if you use a semi-gloss or a flat paint. I’m just thinking to use up some paint I already have.
This is awesome! Thanks so much for sharing!
Great post and gorgeous piece. Just thought I would offer a suggestion instead of the Vaseline. I just use any old candle and draw with it on the areas you want to rub back. It works great and doesn’t smudge. A light wipe over with sandpaper and the paint comes off where the candle wax is. So use sparingly and draw the marks you want to show. Easy and effective. Thanks for the inspiration. Xo Ali
Just did my first ASCP project yesterday and I am forever hooked on chalk paint.
What I love most is NO PRIMING AND THE QUICK DRY. (ALSO THE SMOOTH FINISH)
Thank you for the recipe. Never explored to see if there was a recipe.
Although the ASCP is quite pricey, I will say that a little goes a long way.
I bought a quart for this large project, but, for a smaller project, the $10 sample size jars would
probably work fine. Thanks for sharing all of your great ideas.
Okay, I LOVE this!! Will definitely give it a try this week when I paint the coffee table I picked up at the swap meet this weekend! Thanks, girl!! Great job! XO
Oh my goodness, I have this exact same table sitting in my garage waiting to be painted! I’m so excited to see how great yours has turned out! Makes me want to get out there and do some painting now! Thanks for your tips!
could you please tell me the name of the yellow paint..it is beautiful!
LOVE LOVE LOVE IT! I really want to try this ASAP. 🙂
So I used your formula and have a very gritty paste. I have now added a lot of water and still have a gritty mess. Any suggestions ?
I just bought a metal bed that I wanted to antique, I live in Texas and today used her mixture! What I did was keep painting the entire thing and by the time I was done withe the first coat it was already dry all over. It was also 105 here roday though! … And the bed looks awesome!!! Even my husband was impressed! Wish I could figure out how to post the before and after pictures.
SO glad you loved the paint mixture! It works great,huh?! I’d love to see a picture. You can e-mail it to me here: [email protected] Have a nice Sunday!
Me too! I followed the directions and when I mixed the plaster and paint together, it immediately hardened. I kept adding water until I had the consistency mentioned, but when I went to paint it on, it was gritty and dry chunks kept flaking from my brush. My paint looked smooth and it wasn’t dry when I put it on the brush…What went wrong?!?!?
Hi Kara! Hmm… My only guess is that it wasn’t mixed enough before combining with the paint. I make sure there are no grits left before I combine with the paint. If there is some bumps, I will add a little more water and keep stirring. Then I will slowly stir into the paint. I hope that works next time. I really love chalk paint, but it definitely takes a little practice playing around with the mixture. good luck!
how do you remember where you put the vaseline on all the areas..does it show through after you paint? This may be a dumb question, but i’m curious..
It doesn’t really show through after you paint it, but you can feel it when you rub your hand along the edge because it will be soft and the paint will come off easily! Hope that helps! 🙂
maybe mix it with a whisk?? I use a whisk to “mix” my dry ingredients when baking. It’s supposed to act like a sieve and blend the ingredients really well. Just a thought that it might help. :))
How do I not know about this?! I’m so going to try that and you are almost making want to run to DI right now to find something to test it out on…Thanks for posting your recipe :).
Kim
{Poppy Seed Projects}
Wonderful tutorial & I love how pretty your nightstand turned out! Thank you for the great information cannot wait to try it 🙂
Tanya
Love it! Will it seriously work on any surface? (As in smooth not-real-wood cabinet doors?)
WOW! I am so trying this. Great post! 🙂 Thanks.
OMG! Super cute! I love the color too.
I just used this technique and color on a large armoir and WOW do I love it. You are right, this really is the PERFECT yellow!!
I swear I commented on this before…Can you actually write on it with chalk?
Love the post! This one is by far the most detailed I’ve seen. Trying it this week!
Jamielyn, this is genius. Thanks for sharing.
Thank You for posting this. I too have some furniture I have been wanting to paint with chalk paint. I have also wanted to use the AS dark wax for a patina over the paint. I was reading on one website where it told to put the clear wax on first then apply the dark wax and rub it out to the desired effect. If you wanted the wax to be lighter to add a little of the white paint into it first. So that made me wonder if you could color the furniture wax that you used with paint also?…hmmmm!?!
I loved your sweet site. Did want to mention that I heard this could also be done by using grout instead of plaster paris. I read it somewhere and did not remember how much of what. Have you ever heard of that method? It would help to make different shades in one step????
Awesome and cannot wait to try it!
Thank you so much for this tutorial, Jamielyn! I tried this yesterday, and really liked it! Your table is just darling, and I agree, yellow is a happy color!
This looks so easy! And I too, love happy yellow! That’s what drew me to the post – the yellow, versus the technique 🙂 But now that I’ve read this, I’m going to try it!
Can you use chalk paint to paint over laminate?
I totally tried this on my roll top desk. Thank you for a great recipe! It was fantastic. Chalk paint is soo fun. I’m going to send my readers here for the tutorial this Thursday.
Hi Jamielyn,
I am wondering what TB stands for, I figured it was table spoon, but when I did the mixture the paint instantly turned extremely thick (like plaster). I tried a few more times, each decreasing the plaster of paris, and still each it turned hard and unpaintable.
I think this is a great idea and would love any advice you could give me to help make this work.
Thank you
Melanie
Hi Melanie. Yes I used tablespoons. What kind of paint did you use? Some paints are thicker than others and may need a little water.
When mine got a little thick I would add a little more water and stir (about every 10 minutes). Hope that helps. I really love painting with chalk paint.
Yes thank you!! Its wonderful!!
Wow you have opened a whole new door in my decorating life:)
Melanie
I just wonder, can any kind of paint be used in the recipe? I generally use acrylic, but I’m wondering if something higher quality might be better? ~Rach~
Hi there –
Just wanted to stop by and say thank you thank you for the chalk paint recipe! I recently tried it on this: http://megschmitt-neveradullday.blogspot.com/2012/07/one-ginormous-hutch.html
and it worked AWESOMELY!!! Thanks so much for sharing!
Yay! So glad you liked it. Your hutch turned out beautiful! Sharing it now. 🙂
Thanks for sharing!!
I have been looking for a recipe for chalk paint! I am so excited and I can’t wait to try this! I had surgery a week ago to repair a torn meniscus in my left knee. As soon as I can heal from it I will be giving a dresser a much needed facelift! Thanks so much!
I have tried the recipe several times now but cannot seem to NOT end up with grainy paint. HELP!!! What am I not doing or doing wrong? I have tried every way I know how to add the water to the powder. How do you mix it? Do you use something special to mix it up with? Would appreciate your help as this is making me crazy and I’m usually quite capable.
I just finished putting the first coat on a child’s rocker. I also used White raisin by Sherwin Williams. My paint mixture keeps getting thicker and thicker. I added quite a bit more water to paint the bottom section of the rocker (i painted the top section a couple hours ago). Still, by the time I was finished, the mixture was pretty thick again.
Is it supposed to dry in ridges quite a bit? It dries so fast here in OKC these days with over a 100 degrees outside, so I have places looking not so smooth where I went over again before it was completely dry. I guess that can’t be helped with chalk paint. This is my first time trying chalk paint and making it myself. I do like the crackling look the vaseline is making already, before I’ve sanded it off.
Just waiting for this coat to dry now to do another coat. Will probably have to add like 3-4 TB more water to the mixture by then.
I think I saw on Pinterest where somebody made their own chalk paint. This is GENIUS! I love the idea, however the cost of Annie Sloan paint is through the roof, not to mention there are no “stockists” in Virginia Beach.
Question. Do you find that is chalk paint leaves fewer streaks than a flat latex? Have you used polyurethane instead of the wax on the chalk paint?
I have several pieces to repurpose, however I want to do some fact gathering before I get started.
Thanks,
Laura
Laura, I found a stockiest in Newport News in the Oyster Point Center, called Sisters Unique. Went today to buy AS wax and brushes, and ended up signing up for a workshop as well. I did buy a sample pot of ASCP too just to see how it compares to making the recipe paint.
I have been wanting to try out chalk paint too, but the price!!! Ugh. I will be using this tutorial for a little side table we were given that needs some major TLC. Thanks!
I’d love to see how it turns out! You can share a pic on facebook when you’re finished. Have fun painting!! XO
Love your tutorial. to make the paint lift off just as easy and fool proof use a white taper candle to rub on the edges you want to distress. it wont get picked up in your paint brush when you paint over it and it will release the paint just as easily. Just a suggestion.
Thank you so much for sharing your explicit instructions for chalk paint and how to distress furniture! Just curious – what kind of black paint did you use in the first step? Thanks again!
Great info. You do such beautiful work. By the way…. I LOVE THE YELLOW!!!
What type of paint did you use for the black underneath?
OMG! The trick with the vaseline is so so great!
I was always annoyed that it didn’t worked the way I wanted, when I distressed furniture – but this could be the solution! Great!
Thanks for that!
Nice work! I am experimenting with making my own chalk paint… what should the paint consistency be after the plaster of paris is mixed with the paint?
Thanks so much! It looks lovely….
Saw this posted on pinterest. You are brilliant. We’ve been trying to find a few pieces like this color for months for our family room. You now have given us options to make our own. Love it! The fact that you created your own “recipe” is amazing. I’m a fan.
Hello! I have a question regarding using chalk paint directly on a wooden chair that has varnish. Can I still paint directly on my piece without primer? I would love to skip that step too!
Thanks for your help!
So excited to try this. Thanks for making clear and simple directions!
Love you for this post!! I was just looking at Annie Sloan’s chalk paint because I keep hearing about how great chalk paint is for furniture!! It’s insane what you can pay for chalk paint! I also found out that Sherwin-Williams has an online tool called Chip-It where you can turn any picture into paint chips and then print out the specks of the chip and go to any store and get it made. I will definitely be doing this!! If you want to check out the Sherwin-Willaims link, it is letschipit.com. There is a little tuturial and then have fun Chipping!!
Awesome! Thanks for the link… I’ll have to try that! Have a good one!
This is very helpful. Thank you!
THANK YOU!! I am going to price out the ingredients, but I think you just saved me about $60!!! Thank you!! Oh, and the table is GORGEOUS! $5?!! Amazing!
You’re so welcome! The table was a total score! Love it! Can’t wait to hear how yours turns out!
I do not have plaster of paris–could I use a grout or cement powder instead ?
You could use un-sanded grout. I have heard of people using that. Just slowly stir it in. You don’t want the paint to get too thick. You may only need 1 TB with that. Good luck!
Thank you for the chalk paint tutorial. I just made, and used my first batch. I found that when it dried, the surface had a grainy feel to it. Is this the way it should feel, or did I do something wrong?
Can you help me with this. I love the paint, but not the feel.
Thank you, Michele
Hi Michele, It shouldn’t have a grainy feel… more of a soft flat feel. Almost like a chalkboard. The paint may have needed a little more water. Whenever mine starts to get thick I add a little more water and stir. You could try lightly sanding it (200-300 grit) to take away that grainy feel. It also could be the wood. It’s hard to say with out seeing it. If you apply the wax it should help take away that feel as well. Hope that helps!
I wanted to use the chalk paint on some chairs but I would like to paint the chairs black. Would this work with Black paint? The chairs are white right now.
I also will need to do parts of the table which are also white but the center of the table is a granite that is black grey and white. What is your thoughts on this?
Currently the chairs and table are pretty worn from use. The original paint has chipped and the finish is getting pretty shabby. Any suggestions will be greatly appreciated. Thanks
Martha
Hi Martha! If the paint is chipping I would sand the table until it is smooth. You can do this with black paint. Then I would just make sure to tape off the spots you don’t want to paint and give it two coats. Good luck!
Thank you for this! I didn’t want to the expensive price for chalk paint!
You’re so welcome! 🙂
Thanks soooo much for sharing this! I am sooo making this tomorrow! And to think I almost shelled out $50 for this stuff!
Thanks!
Claire
I do this all the time. You did a really good job of showing how to do it. Enjoyed your post!
I used your tutorial to do my desk! LOVE the way it turned out…you can see it here 🙂
http://southerngirlsecrets.com/2012/09/14/my-new-ish-desk/
Thanks!!!
Great tutorial, I’m just in the middle of using chalk paint for the first time on a little dresser.
I consider myself a professional painter and specialize in children’s furniture. I cannot wait to use this procedure and want to thank you for sharing this information. I also want to add, that as a plumber’s daughter, don’t clean your brushes and let the water drain down the sink. Throw the water out the back door. It should save you problems later with clogged drains!
Thanks so much for sharing. We recently bought our first chalk paint, wax and the crackle application and it was pretty expensive. Any ideas to do this for less is a great idea as far as my mother and I are concerned. We love a bargain and this will be just like getting a bargain on our chalk paint every time! Thanks!! 🙂
WOW……CAN’T BELIEVE HOW GREAT THIS WORKED!! I’M DONE SPENDING $40 A QUART FOR ANNIE SLOAN PAINT. PLUS I LOVE THAT I CAN USE MY FAVORITE BEN MOORE COLORS. PAINTING UP A STORM TODAY THANKS AGAIN
Thank you so much for the beautiful tutorial! I’m definately going to try this out. I have been wondering why so many people rave about chalk paint…now I hope to find out! 😉
This is so cool! Doing This!
thank you so-ooo much! you just save me a lot of money!! chalk painting can be very expensive and now with your recipe I can indulge myself in painting away!!!! You Rock!!!
Thanks for the chalk paint tips.
A friend introduced me to chalk paint, but I haven’t gotten over the sticker shock enough to try it out. I’m so excited to try your formula and share it with her.
I tried the DIY version, and very time I sanded, I’d get down to bare wood again in some spots and just couldnt get it as smooth as I wanted, so i never got to the waxing part. My hubby said we need our garage back so…I went and bought the Annie Sloan paint today. Holy Moly, wish I’d have done that from the start! What a difference! It sands, by HAND, so easily! I couldn’t even get my finish that smooth using the power sander with my DIY version. Glad it worked for some of you, but I’ll be buying the real stuff from now on.
Hi Jamielyn. I love this idea. Especially the easy shabby part. I had all the items except the miniwax. (I see it all the time so I better get some) But, I wanted to try just the plaster of paris, paint & water mixture on a small scale before I committed to a larger scale piece. I am finding that it dries very fast & it is crumbly. What did I do wron? Love the vaseline idea. I’m not sure if it will work on the piece cause it was already black. It wait. Love to hear if you have any suggestions on my mess 🙁 . I will not give up. Thanks so much. Angela
Question… Love the look and the concept ..I am doing this now…followed all your steps and things were going great until I was on my last section. I stirred the pp paint mixture as I went so as to not let it get too thick and bamm it got so thick like peanutbutter YIKES, added more and more water finally started to thin out but it changed the texture of my paint on my small piece of furniture. Should I add more paint to the PP paint mixture. What went wrong???? Thanks Susan
found my own answer from Southerngirlsecrets.com Lowes messed me up and gave me paint with primer, which I never ever buy….Primer in the paint southerngirlsecrets.com said she found that out the hard way too…. i will try this again without the primer in the paint…. thanks Lowes…. 🙁
This is beautiful! I’m gonna try it on my buffet. Thanks!
Thank you! I used your mix and it worked perfectly. This was my first attempt at using any type of chalk paint. And certainly won’t be my last. Thanks! 🙂
Heard about this from a woman shopping at Goodwill! Plan on using it on a dressing table and chair. Thinking about a pale sage green. Can’t wait to try it!
This is the color I need for our bedside tables! My grandmother gave them to me several years ago (there was once even a small rocking chair, but I think we sold it…), and they were a lovely, mid-70s avocado green. Eh. I stripped one of them, and stained it a lovely mahogany, and there it sits today – a coat of stain on it with no poly on top. But, this post just may be the motivation I need to get them both matching! Love your blog!
Thank you!
I’m so thrilled to find this recipe because I’ve been wanting to try Chalk Paint for forever. So I’m on my first coat which isn’t completely dry yet but because I have zero patience i scratched my nail over a dry spot and the paint came off like butter. So now I’m wondering whether I added enough PP or what? What makes this paint adhere without a primer or sanding? Did I do it wrong?
Great tutorial and the table looks wonderful!! I love it!! Ready to try it myself now!! Thanks for sharing and hope we can follow each other with great inspiration! Hugs & Smiles
Hi, I have heard so much about Annie Sloan chalk paints, but they are so expensive! I am so happy to find your recipe!! I have the perfect table waiting in my garage. Can’t wait to try this.
Thanks!
Hey you!!!
You do great work!!! Good for you!!! I’ve been buying old furniture from Goodwill and refinishing for about 100 years!! You keep going!! Hey idea–find a “bombay” like chest stripe it vertically with off white and light light teal stencil some beautiful off white star fish on it, glass like knobs!! beeeeeeee-utiful. just came to me now and thought i’d share with you. you seem like a girl with guts and moxie so get ’em kid!!!!! you are exceptionally talented!!! e-mail me if you need any advise kk? have fun!
cheryl
What color yellow did you use for the table? It is gorgeous.
Most people dont know that vaseline is an incredible distressing tool. Ive used it for over 25 years. It can be wiped off and doesnt have to be sanded at all. Also the new “CHIPPING CREME” that runs 25.00 is the same as vaseline but vasline costs 1.00 at the dollar store. Save your money girls and lets keep savin each othe money.. Elmers glue same as Crackle.. =)
I love, love, love, this. I’m in the process of stripping an old rocking chair, I’m going to try this. Would this work for a dining room table top? Would it hold up to heat and dampness from tea glasses?? I have a friend who wants me to re-do her dining room table and chairs. I’m so glad I found you.
I love you! Thank you for sharing this! There is only one place in town (guess I’m lucky anyone in town has it apparently) carries THE chalk paint and I don’t know for sure but I think it’s pretty expensive. I want to paint an $8 tray and don’t want to spend more time and money on it than I have to. At any rate, I am pleased I can make this stuff and begin my new hobby!
When you give directions on amounts, Tb is tablespoon?
Looks great!! I just finally made some chaulk paint and love it!! Thanks for sharing your tips and projects!! I’m inspired to do MORE!!
Do you put the finishing wax on the whole piece of furniture, or just the parts you sand for the underneath paint to come through??
Hi Jamielynn, I am thinking about doing a kitchen table, can you tell me how this has held up?? I am wondering if it can take wear and tear very well
Hello,
I like to know how much paint you have used for this piece of furniture??
Have a nice sunday…. ;o)
Regards from Regina
I used about 2 cups of paint. Hopefully that helps!
Hello, I had a question. Do you have to use the paint right away, or would I be able to store it once the plaster of paris is mixed into it?
Hey Brooke! Yes I try to use it right away. If you let it sit too long, it will start to harden.
Hi, I noticed when I put the furniture wax on my shelf that the paint was coming off . Has anyone tried to apply it with a brush instead . Just wondering if that would work better.
Thanks Angela
Hmm.. what kind of paint did you use and what kind of surface was it? I haven’t tried with a brush, but it might be too thick.
Hi , I used sherwin williams latex paint. I did paint over a already shiny painted surface . Should I have sanded it first ?? I thought with the chalk paint you could paint over already painted surfaces. FYI just love your website and crafty ideas!
Thanks Angela
Hi, and thank you for your post! I can’t find a retailer that sales the chalk paint in my area, so this is just perfect! I do have a question about the waxing process – what is the name of the wax that you use and how do you apply it to your piece? Thanks a bunch!! – Shana
Hi Shana! I used the Minwax finishing wax. I wiped it on with a cloth and rubbed it in lightly. Hope that helps! 🙂
i’ve been chalk painting for about a year now…..i’m hooked. i still want to try the unsanded grout in place of pop. i use hot water to help dissolve the pop. never tried the vaseline technique….i just paint ( 2 coats )…then sand the “wear” areas. then i use a stain in the “wear” areas, rubbing it off as i go…i also use the stain in recessed areas & corners, for a more primitive look..finally i work the wax on with a brush. i find less wax is wasted, ’cause you can use the same brush over & over…just wrap it in plastic…& you can actually use chalk paint on upholstered furniture…..yep, it’s true. but that’s a story for another day…happy painting !!!
Hi Barb, May I ask where did you get a brush to apply your wax??
Hi Barb, can you please tell me how you painted on upholstered furniture. I have an old chair that I was going to do over & would like to try painting it if I could. Thanks
Beautiful! I love that you didn’t over distress, which seems to be popular on etsy right now. I have what may be a silly question: Does the paint have to be flat? I have tons of satin left over I’d like to try on an antique table to match my bedroom, but I don’t want to waste my “touch up” paint if it won’t work. Thanks!
I used satin, it worked out great!
This is great! I have had a dresser that just won’t spray paint very well. No matter how much priming and sanding I do, it just looked so bad! I tried this and loved it. However, do not use the Rustoleum brand paint, even when following the recipe to a T, it turned into a HUGE cement clump! Seriously, I tried it twice and wasted a whole quart! Behr brand works great! I am a spray paint enthusiast turned chalk painter now! Thanks for the tutorial.
Has anyone ever used chalk paint on panelling on walls? My home was built in the late 70’s and has medium dark panelling in the livingroom. Wanting to change it and thought this might look great and not take very long.
Can you use this on tile? I hate my bathroom tile and want a cost efficient change- ideas?
I just found your blog through pinterest, and I had to make some of this right away! I refinished a simple buffet and it has turned out SO NICE. Thank you thank you thank you for posting this!
I am so excited I found your blog! I have a project that I want to do and I know it will work best with chalk paint and I haven’t done it b/c I don’t want to pay the money for the chalk paint. I’m going to try this out this weekend and see if I can get it to work. I’m so itching to get started! Thanks for sharing this!
Can’t wait to see how you like it! Have a great weekend! 😀
If anyone is worried about Vaseline on their paint brush do try rubbing the areas to be distressed with a wax candle instead. Apply the paint and then lightly sand as described in the tutorial. I am curious to try the Vaseline method, I have lots of distressed furniture projects going on this week.
Did mixing in the Plaster affect your paint color? I would think that it might lighten it… ? Love the table!
I didn’t notice a difference in color. It may lighten up your color a little bit if you were doing a black though.
I am just about to try this on a laminate tv stand that us in my daughter’s room. For the paint, I got two of the samplers from Home Depot, which should give me almost 2 cups. That made my paint cost only 6.50 or so. Lowes has a lot of Spring color samples right now. Hope this works!
Awesome! Let me know how it turned out. 🙂
I want to know how you found that awesome table at Goodwill for only $5!! All the Goodwill stores in my area are actually quite expensive. I just left one (about an hour ago) and paid $5 for a tiny glass candy dish!
Awesome!! $5 is a GREAT deal! Score! 😀
Good evening! I featured your tutorial in the Pastels edition of my blog series, Get Your Color On! Love the buttery paint you used on this table. I have to try out chalk paint, but will surely reference your blog when I do!
What color paint did you use to get this beautiful yellow color?
White raisin by Sherwin Williams 🙂
OMG my mother still uses those end tables. I am going to try this, thanks for the info.
Hi,
I am using two colors, off white and a yellow. My question: Should I put 2 coats of the off white and follow with two coats of yellow and then sand for distressed look or is one coat of white followed by two coats of yellow enough?
Hi Tina! I think two coats of white and then one of yellow would be enough. I would try that out and let it dry and then add another coat of yellow if you wanted it darker. Good luck!
Hi, I am wondering what the consistency of the paint is after you added the plaster of paris? I used your formula, but I’m using a cheap exterior flat paint and my paint is still thin and isn’t covering what I’m painting like I think it should. I’ve added more plaster of paris and its still nothing getting thicker. Thinking of starting over!
It is more of a thick pasty paint. Almost like Elmers glue. You don’t want it to get too thick, or else it will harden… but it definitely is thicker than normal paint.
Hi, I love your chalk paint formula! My only question is I am a little OCD, lol so I measure everything. The paint came out as you said but was a little harder to distress more so than the Annie Sloan I have used. Do I need to maybe add a little more water or would adding more plaster of paris make it a little more “chalkier”? Thanks so much for sharing this saving me a fortune! 🙂 ~Happy Junkin~
Hi Debbie! Depending on how thick your paint is I may add a little more plaster of paris. You can also try sandable grout. Happy DIY’ing!
I LOVE how that turned out. Just did a little side table with yellow chalk paint the other day – my DIY recipe is slightly different, I may have to give yours a try next time. Love the tip about the under paint colour and vaseline. Thanks,
Krista
What color yellow did you use?? Love the shade.
Hi Linda! I used white raisin by Sherwin Williams 🙂
Well, not sure what I did wrong but the p of p made my paint the consistency of gritty play dough! I followed the recipe measurements and the more I stirred the thicker it got. I added water and added water and still ended up with a gritty too thick mess. Help! What went wrong?
Oh no! So sorry to hear that! That happened to me once when I did not store the plaster of paris in a zip lock bag inside. 🙁 It’s best to use a new bag. Hope that helps!
I am just wondering if you still get the paint brush lines??? I used your formula perfect, except I am using and all in one paint… with a primer??? could that be the difference?
J,
Other chalk paints boast that sanding prior to painting is not necessary. Do you think your recipe can go on without sanding? I’m hoping the answer is yes!
Yes, I have done it without sanding and the piece is still holding up great a year later. 🙂
Great! I picked up my Plaster of Paris today! I’ll let you know how it goes! Thank you so much!
I love that yellow! I bought some yellow paint for our kitchen but I think I like this better! Also, did you just use regular black acrylic paint?
Thank you! Yup, I just used regular acrylic paint found in the little containers at the craft store, but any paint will work. 🙂
I’m thinking of using this on a piece for the kitchen. Do you think it is durable enough for it? It is going to be a dresser converted into a work top and storage.
Yeah it will be durable enough! Just make sure to seal it will polycrylic or a wax! 🙂
I love distressed furniture and being newly unemployed…this certainly fits the budget. Thank you for sharing!
I agree, distressed furniture is gorgeous and fun to do! 🙂
LOVE this recipe! I painted a beat up old radio cabinet in dark blue, and it came out adorable! Almost done with a dresser in creamy off-white. I’m just waiting for the wax to dry. Sooooo much cheaper than ASCP, and I can mix my own colors. Thank you for sharing!
Those sound like beautiful pieces! I agree, so much cheaper and fun to choose! 🙂
This tutorial is fantastic. You made it seem so simple and easy to do. I tried my first project today using your formula. The first coat went on perfectly, then I tightly closed up the plastic container with the chalk paint while I waited between coats. When I opened the container, it looked like I need to add some water as it had thickened quite a bit. But when I added the water it immediately turned into a hard mess and there was no way to make it smooth again. Have any idea what I did wrong???
I’m glad your first coat went on perfect but I’m sorry about the second coat!! Plaster of Paris does tend to harden with it is exposed to air after about 30 minutes. When I did this piece, I did it in small batches and then remixed paint in between coats! I hope that helps! 🙂
Thank you.
My other question is about clean-up. Since the paint has plaster of paris in it, what is the best way of cleaning brushes, containers, etc.?
I washed them with with warm water and soap! If that doesn’t work, you can try using vinegar!
I do very small projects and am wondering if I can use white paint and add the craft paint (water base acrylic – like Ceramcoat) before adding the mixture of Plaster of Paris and water, or could I even add the mixture straight to the craft paint?
I haven’t used it with craft paint before, but you’ll have to give it a try and let us know how it goes! I think it should work! 🙂
I was wondering if this can be used on walls and if it is washable.
Love it.
Hi Belinda! I probably wouldn’t use this recipe for walls, it is best for furniture!
NICELY DONE!! love the YELLOW (:
Just tried this – Love it ! One question though .. I purchased the same minwax paste and I used a piece of a new white cotton T-shirt to apply the wax and I was able to see lint all over . The paint I used was black but I didn’t expect the lint issue. I had to use Polycrylic instead. Have you ever experienced a lint issue using the wax on a dark piece ?
Hi Annette! I haven’t had any problems with lint, you could also try using a paper towel! I hope that helps! 🙂
it wasn’t lint most likely. the wax has a hazy look until you buff it up. more buff, more glass like finish. wax looks more old school poly.is stinky, lots of cleanup. an old t shirt or cheesecloth as an applicator. buff it for several minutes. wax brightens and enriches colors of paint. use it on a practice piece to understand the thickness. also to answer other questions ppl had, chalkboard paint isn’t chalk paint. unsanded grout doesn’t set up quickly like plaster. doesn’t clump either. mix splash of water in with splash of powder. mix. slowly mix the paint into the grout mixture until you get the thickness you can paint with. if it seems to think on your first strokes, dip brush in water and keep going. it won’t be smooth and that’s the point. no point of chalk paint if you want to make it shiny after. recite does make the paint stick to anything. also, Vaseline needs to be cleaned of completely before any finish goes on. candle wax I’d good and doesn’t have to be cleaned up. if give a toooootlly diff look. practice first! rub Vaseline ask over your hands and touch the item in normal places. your first piece will look like a leopard. repaint the spots that are too pattered and prefect. fingerprints in Vaseline look like a disease once painted. be sure to smear a bit.
This may be a dumb question, but what does the wax do to the furniture? Does it make it soft (like you can push a fingernail into it) or harden the paint? I tried a chalk paint recipes a couple months ago but hated the “chalky” feel of the paint afterwards. I didn’t put any kind of finishing layer on it, though. Is there a difference between waxing and using polyurethane, for example? Thanks for the great tut pics!!
I have wanted to learn how to paint furniture for a long time and found some outlets who sold the calk paint and was surprised at how it expensive it is. Especially just to try it out. This is a great way to learn how to do it.. I also went to the salvage store and pick up used cabinet doors for about two bucks just to try and they came out great. Next step an old table I bought used.
Hi I tried the recipe and for some reason it turned out very clumpy, I tried to get it out but didnt work. Any clue what I might have done wrong? Thank you.
Sorry you had trouble with it Wendy! The recipe seems to turn out different in different climates. I always mix the plaster of paris with the water until it is smooth and then mix it with the paint. You could try adding a little more water if it is clumpy. I hope it works better next time!
Impressed. Have been using the expensive stuff…gonna try this.
I am a little confused here. Your recipe calls for 4 tbl of plaster of paris and 2 tbl of water. Next to the 4 cups of paint, that looks like 2-3 cups of plaster. So how much plaster do you actually use?
I used 4 Tb. of plaster of paris, it looks like more because I was mixing it up, but it is only 4 Tb! 🙂
Love that yellow. What one is it? Great post, didn’t know about the finishing wax
I went to Lowes and matched ‘white raisin’ by Sherwin Williams! The finishing wax definitely adds a nice touch to it and holds it all together! 🙂
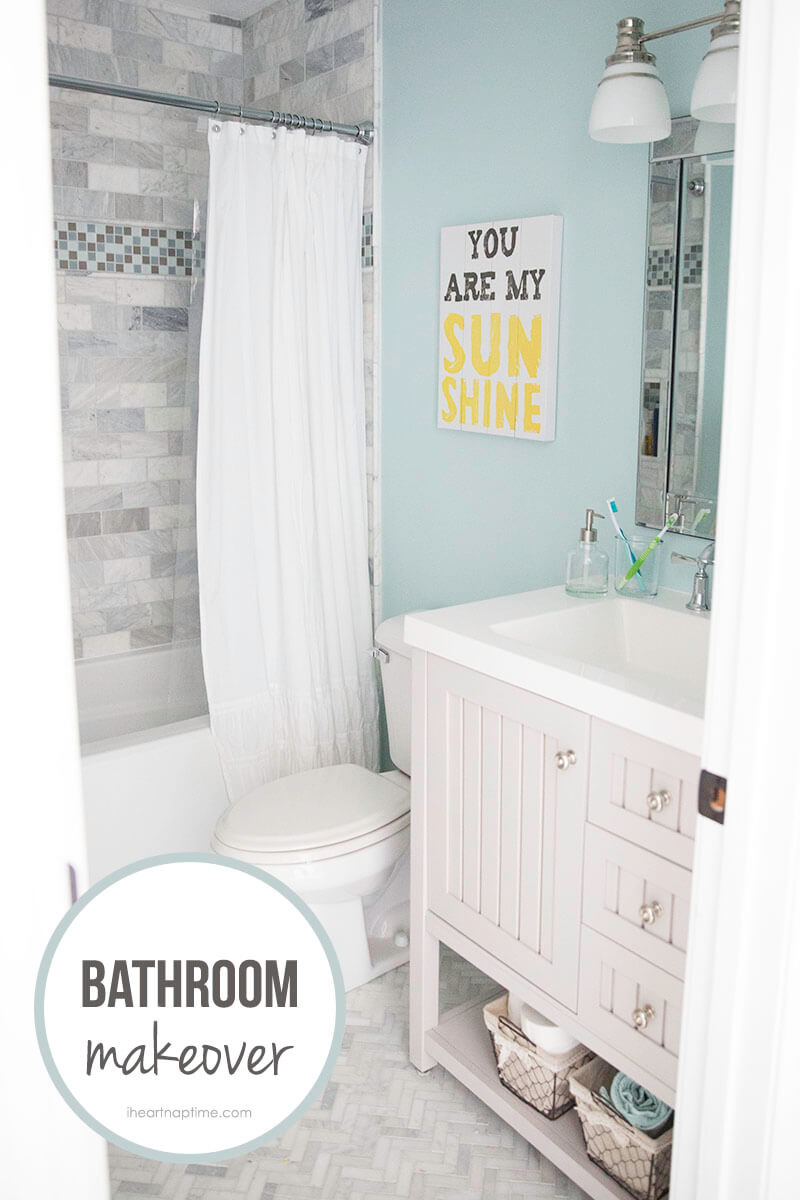
My favorite recipe for chalk paint. I used it last week to make a vanity. I added a link to my blog about our trailer bathroom remodel.
Your bathroom remodel looks great! I’m glad you like the chalk paint recipe!
Thanks!
Hi! I just saw your blog today and decided to give this recipe a try….the paint is now drying, and it looks great. I bought a sample size 4.75 oz of paint and reduced the P/P and it worked great – just added a teaspoon of water a couple of times as it thickened up. Will sand on it tomorrow, and try the waxing. Thank you for much for this great tut and photos!
I’m glad you gave it a try Beverly! I hope your project turned out great! 🙂
You just made my day. I’ve been painting old furniture for years, after seeing all the chalk paint projects lately I really want to try it, but the cost is is so high, so I started looking for a recipe to make it…and there you were.
I’m glad you found the recipe Julia! I had been wanting to try it too but the price seemed too costly so I decided to make my own! It definitely has helped with all the chalk paint projects I make! 😉
Thank you for all the visits to my blog itsomuchfunwatchingod.blogspot.com. I appreciate it! If you follow me you can see what I do with my time (when there is enough tiime to post it! – and you can translat it to a language you know – or want to know!) I’ll be using more of the chalk paint, for sure. My dining room table is a rebuild that will have chalk paint legs and a decoupage top. Can’t wait to get that started. This time maybe I’ll actually use the vaseline technique.
Again, thanks for visiting!
This is so cute and so much fun! I am in the process of doing a little side table for my mom’s office. I was hesitant about the Vaseline but it painted over it easily. I’m so excited to see the results!!!! Thank you for this amazing tutorial!!!!
Sounds like a fun project, I hope it turned out well for you Heather! 🙂
I’ve been fooling around with chalk painting for a year now. And the more I read and see the better my piece’s get. Always looking for new information.
I tried out a bunch of different chalk paints as well! I’ve stuck with this recipe for a while and have loved it! The chalk paint look is so cute!
Loved your tutorial! The table turned out beautiful!! Do you ever use a dark wax?
I haven’t before, but I have seen people that have and it looked really great! 🙂
I just tried this today!! Although it wasn’t quite thick enough so I had to add an additional 1 tbsp of PP, it was easy to figure out! I put three coats on to achieve the real white I was going for over dark wood. It was beyond easy to use and my piece looks unbelievable (if I do say so myself 🙂 Thanks soooo much for this, I am moving on to a huge buffet tomorrow, a project that I have been putting off out of fear of chalk paint!! Not any more:)
I’m so glad your piece turned out wonderful! I love chalk paint, it is so easy and cute!!
I just finished remodeling my ENTIRE kitchen with chalk paint! The cabinets went from old, dingy oak to a gorgeous antique white. Here are some pictures, along with tips if you’d like to try it yourself!
-Anne
I love chalk paint! Your makeover turned out beautiful! Thanks for commenting Anne.
I want to get a glossy black finish on my table.could I use chalk paint first then cover with gloss? This would prevent me from having to sand. What do you think?
Dana
Yes I think that would work! Just make sure to let the paint dry all the way before you add the gloss.
I have just used this idea on a few dressers I had.I Used a mint color.
I am now letting the paint dry for a few hours so then I can distress.
I am also going to go over them with a quick stain in a slate grey color.
Itll make it look a bit dirty and distressed.
IM EXCITED!!
Questions though;
Have you mixed up too much paint or even tried it on a full gallon to see if it would store like normal paint? I know the plaster will want to harden but the parts of plaster to the parts of paint are super small.
Second, are you just using a natural colored wax?
Do you know of a clear wax?
Thanks.
Hey. Im from Denmark and havent found the recipie in danish anywhere. So i have a few questions. The paint you mix with the plaster, is that wallpaint or for funitures. The plaster – what is the ude of that normally. Sorry my bad english. Have a Nice Day.
The paint I use is latex paint that is used for painting walls! Hope that helps! 🙂
Hi Tyler! I have tried to store it before but it doesn’t work because the plaster of paris makes it harden after a few hours! I used a clear wax. It is the Minwax brand. Hope that helps! Good luck with your dressers!
The best recipe ever! So easy, followed your directions and the consistency was perfect. I stirred it a few times during use so I didn’t need to add any water. I covered my container and was able to use it again the next day for the second coat. I did the tables in the white raisin and it really looks wonderful. Used a candle instead of vaseline and it worked like a charm…minutes to distress. Thanks for the tutorial!
Thank you so much for your comment Joyce! I am so glad it turned out so well for you! I love using chalk paint, it is so much easier than having to sand! 🙂
Unfortunately after I wrote this post…I realized that I grabbed the wrong can of poly to use on my piece!!! I used the fast drying oil instead of the polycrylic! In my defense…it was 6am when I started!!! So after speaking to someone at Mimwax (i was in tears)…I decided to sand the piece as best as I could and start again. I am so upset at myself because they looked beautiful! Will report back with the results. I also washed my NEW purdy brush in water/soap not knowing I used the oil poly. I am still mad at myself!!!
Used your recipe on an old desk….looks great! Used a paint sample and divided the recipe, no worries by doing that. Going to stencil something on top and wax it. Can’t wait for it to be finished! 🙂
Sounds beautiful! Thanks for stopping by Patty!
Gorgeous piece. I just love pale yellow, and have been wanting to try this on a little table I have in my living room because I really need more light colors. Thank you for the tutorial for a beginner like myself. X
Thank you Jayme! Good luck on your little table piece, hope it turns out well! 🙂
Thanks for this tutorial – I have thought of using Chalk paint numerous times but due to bad joints in my hands have put it off time and again. Now my bookshelf (rescued display shelves from local chemist – large but very useful!) is in desperate need of re-doing and you made it look soooo simple that I just have to try it and as I have my son staying with us for a short while I KNOW he will take over if my hands can’t cope 🙂 You have inspired me at just the right time…THANKS – love the colour too.
I love this chalk paint recipe, it definitely makes it easy to refinish a project! 🙂 Good luck with you bookshelf, I’m sure it will turn out beautifully!
Loved the yellow chalk painted table…I will be trying this for sure !!!…So pretty !!!
Thanks for stopping by Shirley! Chalk paint is the best, I hope you like the recipe! 🙂
Loved your piece!!!! Thanks for the “hints” can’t wIt to try it ! 🙂
Thanks Deborah! Happy painting! 🙂
This is the BEST recipe and “how to” I have seen! I used it to do an older king size rice bed and WOW ,it turned out beautifully! I can’t THANK U enough for sharing this! Genius formula and saved me so much $$$! Thanking U sooo much!
Thank you Bootsie!! I’m so happy you had such great success with it…it definitely is a cheaper option and turns about beautifully! Thanks for leaving such a nice comment! Xo
I want to use the chalk paint on a kitchen table. Because of high usage (we eat AND homeschool on that table) I am concerned with it being durable. What do you think? Should I take any special steps to insure it doesn’t get destroyed?!
Hi Cindy! I think that it would work well, you would just want to make sure to sand it, do 2 coats of paint, and a top coat–maybe a wax seal or polycrylic paint. Also, make sure to let it cure for at least 24 hours! 🙂
This is amazing. I can’t wait to try it! I’ve been using a dremel for years bc chalk paint was so expensive I refused to buy it.
Question – Is that a specific Black Paint? What’s the brand, I think I see “American?”
That’s how I felt, it was always too expensive to buy! Making your own is definitely much cheaper. 🙂 Yes, I used Americana Pure Black.
Great Stuff…
I have used your awesome recipe to paint my kitchen table/chairs, kids table/chair set, piano and coffee table! Thank you SO much or sharing!! I have used Van’s wax (on Amazon) and it is fabulous. This has been very durable. I will say I used a higher sheen paint for my kitchen table and we wash it with a damp cloth every day!
Your comment made my day Aubrey! I am so glad the chalk paint recipe has worked so well for you and that you have painted so many beautiful things in your home! Thanks for commenting! 🙂
How much will the two cups of chalk paint cover? I have a 5drawer dresser that I would like to try this on. I am not painting drawer fronts same color. Will this one recipe be enough? Thank you
Hi Maryann! This recipe should be enough, but you may need to double it. I would mix up one recipe first and add more later if you need to. I’ve used this recipe to cover a small dresser and it was plenty for me. 🙂
Thanks so much for this good idea. I bought a cute coffee table a couple of years ago but it didn’t go in my living room, so I put it out. I just joined a local online auction and now am shabbying it for auction. I will use your chalk paint on my next project. I am a 77 year-old widow who likes to stay busy with fun stuff, and now may make some money with it.
This chalk paint recipe is definitely an easy and fun one! Hope you enjoy shabbying up your coffee table! 🙂
Thanks for the chalk paint recipe. I can’t wait to try it.
You’re welcome! Have fun! 🙂
I heard w latex paint, it will eventually peel up? Does that happen ?
How does it lean up & where?
I meant how does it clean up?
Hi Rhaina! Mine hasn’t worn over time, but it is a possibility if you buy cheaper paint. I just wash mine off with a damp rag!
I followed your recipe to chalk paint a small wood chair for an arts festival project. But sadly, it dried gritty. I noticed mid way and remixed the small jar of paint — but still has an all over gritty finish. Not sure where I went wrong; hoping for suggestion to salvage what I’ve done & do it right on the next piece. Help please!
Hi Mimi! This paint shouldn’t dry gritty. I am thinking that when you mixed your Plaster of Paris with water, it wasn’t smooth enough! Next time, make sure your mixture is really smooth (and thick) before you mix it in with the paint! Hope that helps!
Do you sand the paint lightly once it dries before you wax?
Hi Rainee! I don’t, I only sand it on the edges to distress it!
Hey everyone, I know someone who makes their own chalk paint also. She uses a hand blender (I don’t know if I can post a pic) and it makes the mixture very smooth. They sell them pretty cheap and can help get the right consistency. I’m trying this tonight!! Thanks so much Jamielyn
how wipe-able is this?! I have 2 little one’s and would love to use this on a hutch in my dining room, but know the little fingers will be all over it. Does it wipe down pretty easy!?
Hi Ashley! I also have 2 little ones and mine have always held up well and they wipe down easy! 🙂
Can this be used on fabric? I have a chair that I do not want to recover, but painting would be wonderful.
Hi Sarah! I’ve never tried this recipe on fabric, but I would recommend using fabric paint from the craft store if you want to paint fabric! 🙂
I am just getting in to this fun, I have seen colored wax like black, brown, white, by using a colored wax is that for making it look distressed?
Hi Brooke! I usually use the black or brown wax. Yes it is for giving it the distressed look! 🙂
LOVED your finished product, and your pictures of the process helped so much!!
Now I have a question for ya…I made my own chalk paint following your recipe, which turned our perfectly so thank you, but what if the color is brighter then I wanted? Is there a way to tone it down??
Hi LaAna! You could always add a little white paint to tone it down! 🙂
Have you tried making chalk paint using red paint? I used this method with light colored paints and it worked great. I recently tried red paint and the white of the plaster of Paris made the red more like pink. Any suggestions?
Hi Tracy! I haven’t tried using red, but I would suggest buying a darker red paint so that it lightens to a lighter red! Also, if you prime it…use a gray primer! 🙂
Hi Jamielyn, I just used your recipe for chalk paint. I have a couple concerns. I have a large piece of furniture so I tripled the recipe. However the plaster was smooth in consistency but when I let it sit for a minute (literal) it hardened and I tried re stirring and added a little more water it did help. However once I added the paint it was really hard blending the plaster and paint and I got big and small chunks in my paint. I also feel the paint color lightened too. In addition to the paint not covering in two coats, I’m feeing like a failure.I’m not sure what I did wrong. Any suggestions? Thanks
That happened to me and I learned you mix the plaster and immediately add it to the paint. Which means you have the paint ready to go before you mix the plaster. There can be no wait time for it. It stays smooth in the paint.
Hi! I am so sorry you had trouble with it! I know how you feel about projects not turning out how you expected, that happens to me all the time! I usually do my chalk paint in smaller batches if I have a large piece of furniture. To keep the paint from hardening, I have found that keeping it in a tupperware with the lid on seems to help. 🙂
I thought when you used chalk paint, you did not have to sand the piece to prep it for painting? I see in some of the posts that you recommend sanding first. Is that for those pieces of furniture that are used often? Thanks
Hi Kathleen! The only time I sanded was the next day after the piece dried, I lightly sanded the edges where I had added the black paint and vaseline to get the distressed look! Other than that, no sanding is necessary! 🙂
I have a painted white book case – I think it’s a semi gloss paint. I would to distress it with this technique. Any suggestions since it’s already painted??
Hi Cathy! Unfortunately this technique won’t work very well since it is already painted white. Usually the black needs to go on before the white coat. You could brush black paint on the edges with a thin paint brush to give it the distressed look though. 🙂
I plan to do a large 2-piece china cabinet. Do I mix enough paint to do the whole cabinet at once? Or, do I risk the paint not matching and doing smaller batches?
Hi Patelane! I prefer to work with it in smaller batches because it can harden after a while. If you do make one big batch, make sure to keep it in a tupperware with the lid on it!
Hello, just wondering how what the recipe would be for painting a 4 ft wide x 3ft tall dresser? Also, is it best to use a brush or a roller for the least amount of (brush) marks.
Thanks~
a sponge brush works best
Hi Lisa! I’ve only done it with a brush, you can try it with a roller but it might be too think! I would suggest making two batches. 🙂
I have been using latex eggshell paint and it won’t sand. It just rolls up no matter how long I wait, even days. What kind of paint can I use for mixing? You make it look so easy. I have always stripped my furniture because I love wood. But I am trying the new process. Thanks.
Hi Debbie! I’m sorry you are having trouble, I always use a satin paint from Home Depot or Lowes for this chalk paint recipe and it turns out great. One tip I’ve found is to make sure the chalk mixture is really smooth before mixing it into the paint.
Hello!
Is Polyurethane or finishing wax better to use on a finished product?? Love it!
Hi Emina! Use the finishing wax! The polyurethane can turn yellow over time.
I like to antique some of my pieces ( I love the look ) and I am wondering how well the chalk paint would work with the antiquing. Thank you for your recipe i can’t wait to try it
Hi Debbie! The chalk paint works really well with distressing and antiquing! I usually use vaseline on the parts that I want distressed and it rubs right off at the end! 🙂
So glad to run across this article. I am in the process of attempting to refinish a piece I bought at a garage sale. I can’t wait to see the finished product.
Thanks for stopping by Jana! Hope your project turns out well! 🙂
Can you use this on laminate without sanding or prepping?
Yes you can! 🙂
Do you think I would need to do anything different for a kitchen table?
Hi Jess! Just make sure to seal it with a polycrylic or a wax! 🙂
I want to match a bookcase to my kitchen cabinets. They are off white with chocolate glaze. How do you suggest I accomplish this? What colors?
Hi Debbie! I think it would look pretty similar if you found an off white color and did the distressed look using black paint and vaseline! 🙂
This is a great tutorial and technique for vintage style painting. We hold chalk paint based classes at our store in SC and this is something we like to learn so we can pass it a long to our customers. Thanks for the information!
I’m using this recipe on a frame I wanted to distress. It should be finished tomorrow 🙂 I think I’ll post on my blog about how it turns out with a link to this. Thanks for the recipe! Your table is great!
I hope your frame turned out great! I’d love to see a link to your blog with a picture! 🙂
I did a top of a dresser and put one coat thin and know I don’t like it I want more of a older look can I just lightly sand and redo it?
Hi Diane! Depending on the color, I think you can just paint over it. If it is a darker color you may want to sand it a little. 🙂
Thank you sooo much for this info! Very informative. There is one thing that I learned though that I thought your readers might like to know. When I chose the paint to use for this recipe I went with Lowe’s highest quality paint. Valspar Reserve. DO NOT USE VALSPAR RESERVE PAINT when making a batch of this chalk paint. I guess the consistency of the paint is already overloaded and thick and you’ll almost immediately have a big semi-solid glob of plaster. I even tried increasing the liquid and decreasing the amount of plaster of paris. To no avail. I DID learn that the lower quality paint seems to work the best. I went ahead and went with Valspar’s 2000 Contractor Paint series (half the price of the “Reserve” paint) and it worked like a charm!
Thanks for the tip Catherine! I’m sorry that you had a bad experience with the Valspar Reserve Paint, I have never tried that brand with this recipe!
This is very nice, I love the color. You did a great job on it!
Thank you Dez! 🙂
When painting over paint you have added to stress you can see the added thickness from the extra thickness. Also, will paint remain where Vaseline applied when not sanded?
Hi Maury. Eventually the paint will chip off where you applied the Vaseline.
This is awesome! What kind of black paint did you use?
I used Americana Pure Black!
This recipe and technique is THE best I have used!!! Thanks so much!!!!!
Thanks Debi! I’m so glad you have had great success with it! 🙂
Absolutely fab!!! I’ve done a lot of furniture distressing but am soooo excited about
Using your chalk paint receipe. I too get all my pieces at goodwill or thrift stores you can’t beat it,love every time I go in and see what treasures I can find. Thanks so much for sharing. Love that yellow too!!!! Happy chalk painting!
June
Thanks for your comment June! I’m so glad you have had a great experience with this chalk paint, I love it! 🙂
I love this tutorial! I can’t wait to try it out!
I can’t wait to get this going…I’m moving so it might be a while. As a Great Grandmother I enjoyed seeing your helper’s little hands.
Thank you so much for this tutorial!!! My first attempt at chalk paint was perfect! I love my new piece of furniture, and couldn’t have achieved the wonderful results without your help!
I’m so glad it worked perfectly for you! Thanks for commenting Rachel, I’m glad you have a new piece of beautiful furniture! 🙂
Love this yellow! What is the name of the color?
Is it White Raisin by SW?
Yes! 🙂
Between my first and 2nd coats of paint, I got larger and small chunks in the paint, so the second coat didn’t go on as smoothly as I would have liked. I made sure that the plaster of paris mixture was completely smooth before I added it to the paint. And I used a ziploc container for the paint and snapped on the lid between coats. Any suggestions?
Hi Kathy! I’m sorry you had trouble with the chalk paint. You did everything right with making sure the mixture is smooth and sealing the paint in between coats. I have never run in to this problem before but my only thoughts are to try mixing up smaller batches so you have a fresh batch to use!
I just painted a dresser using this recipe. Have not done the wax yet (waiting for it to dry). The dresser is going to be my media center. What do you suggest to clean with? ( like dusting and whatnot)
Thank you!!
Hi Michelle! I usually just use a wet rag or soap and water. I don’t use anything too strong that would wear down the paint!
I can I print off instructions without printing 105 pages!
Hi Carolyn! You could print just the image with the chalk paint recipe! 🙂
I cant wait to try this I love to do things all the time ;
do you sand the pieces first or do you just apply the paint? I have been leary of not sanding but everything I read says with chalk paint no sanding is required.
I just apply the paint! Chalk paint is wonderful because you do not need to sand the pieces beforehand! 🙂
I have a horrible time choosing paint colors but LOVE the yellow. White raisin from sw?? I my not be creative and come up with cute stuff, bit I can copy others like nobody’s business!! Definitely copying this as its the color I’ve been looking for. As a chalk paint newbie, thank you out for the great directions.
The white raisin is definitely my favorite yellow! Good luck with your chalk paint projects!
I am loving this color. Can you tell me the name of it??:-)
White Raison! 🙂
Hi, I used this recipe and painted a magazine rack. I put the wax on but I can still scratch off the paint. What did I do wrong? Help
Hi! I’m sorry you had trouble with the chalk paint. Some pieces of furniture don’t work as well as others.
Very helpful. Thanks!
I’m eager to give this a try. I too love the idea of non prepping the project surface prior to the chalk paint application.
My one question is; did you make the black chalk paint as well as it’s going directly or use it straight from the can?
Thanks
I just used the black paint straight from the can. 🙂
Thank you SO much for this awesome post! I just finished one of our living room end tables, and I am IN LOVE with the way it has turned out! Thanks again!!!!
Oh I am so happy it turned out so well!! Thanks for trying the chalk paint recipe! 🙂
That’s it! Are you dying over this yellow paint color?! I’m adding yellow accents to my room and cannot wait to show you how it’s all coming together. Yellow is such a happy color. 🙂
Do you know how long the mixture will keep for? It will be sealed good in the paint container.
Hi Dayna! This recipe is best to use right away. I usually make just enough for my piece of furniture and then mix more if needed. 🙂
What type of black paint did you use in this project?
I just used the Americana brand! 🙂
How did this hold up? I am thinking about doing a lot of furniture soon and want to make sure that this stays nice. I have a few rocking chairs and an cabinet and am also interested in doing a chandelier.
Hi Beth! All the pieces I have made have lasted wonderfully. I would definitely recommend this recipe for the cabinet, but I have not tried it with a rocking chair or chandelier!
In response to Kathy White comment number #205:
I found that my paint did the same thing even though I mixed the plaster of paris powder smooth before combining. I found that adding small amounts of water (1 tablespoon) as Jamielyn suggests at the bottom of the post helped tremendously! After adding a few tablespoons I found that most of the chunks had dissolved or were not nearly as big. But it still turned out quite well even with the chunks left. Chalk paint (and even milk paint) is great but can be a whole different kind of beast. Don’t be afraid to experiment!
“Kathy White posted on October 4, 2014 at 5:32 pm (#205)
Between my first and 2nd coats of paint, I got larger and small chunks in the paint, so the second coat didn’t go on as smoothly as I would have liked. I made sure that the plaster of paris mixture was completely smooth before I added it to the paint. And I used a ziploc container for the paint and snapped on the lid between coats. Any suggestions?”
What color of yellow? Thanks
White raisin by Sherwin Williams 🙂
So happy to find this. Ok I just want to do one accent wall in the chalk style. So I think no need for the wax? And I was hoping for that whitewash look. Or even I may try a rosebeige color. Thanks so much, elana
Love that yellow, can you tell me the name .
White raison by sherwin williams!
It’s 2 am Dallas TX time. I’m supposed to be asleep for an early morning dentist appointment. But I’m full of anxiety bcoz I dislike the dentist. NOTHING personal TO ALL dentists, JUST ONE Of MY quirky phobias.
I just had to thank you for the chalk paint hack. I cannot tell u how long I’ve wanted to try chalk paint!! Your adorable yellow table turned out spectacular. I now can go to sleep happy!!
Tired and terrified in TX 🙂
Melanie
Good luck at the dentist! Hope you enjoy this chalk paint recipe. 🙂
I realized I never left a thank you comment years ago when I first used this recipe. Thanks again!
You are very welcome! 🙂
I used your formula for chalk paint and I have never looked back!!!! I absolutely love it and it saves so much money. The great thing is you can adjust as you go too making it last longer. Thank you so much for your wonderful tips and the formula that changed my days and nights!!!!
So the yellow paint is called ‘white raisin’? Am I understanding that correctly?
Yes! 🙂
I just bought chalk paint and wax today and wanted too use the vas eline tec nique want black paint to show through but after painting the yellow how did you know where youhad put theblack paint in order to sand off the baseline?
Hi diana! I took a picture of the piece before I painted it which helped! 🙂
IM SO IN LOVE WITH YOUR WORK ..THANK YOU FOR POSTING ..
Complimenti, sei davvero fantastica!!!!
Why can I not copy the tutorial for my file. I do plan on doing this again.
hi,
I want to use one of our furniture charity’s items for this. It is popular in England too. But I am really worried about painting over a polished surface. Won’t the paint peel off in the same way as with Vaseline?
I am going to use your recipe. Brilliant that you have it there and I don’t have to experiment!
Hi, Jamielyn, I’ve been dying to try the chalk paint for too long now. But I’ve recently been reading that the wax finish isn’t great for “sticky, greasy fingers” that leave marks that you can’t get off. With three kids under the age of 8, that could present a problem. I have some dining room chairs I’d love to try it out on, but I’m a bit trigger shy after the bad rap rumors. Any thoughts?
And thank you for your wonderful post.
Hi Jamielyn,
Love your ideas and I’m heading to the store soon to collect what I need. One question, the recipe stated “White Raisin” by Shetwin Williams but the paint depicted is Valspar-Can you tell me the name of the color?
Many Thanks!
Phyllis
Hi Phyllis! You can have Lowe’s or Home Depot match the color for White Raisin. That is what I did. 🙂
thanks for sharing! I’m working on my first piece today and am looking at other processes, I purchased plaster paint which is kind of pricey, so you recipe and idea with vasiline is such a great idea!
I’m going to be painting a60’s buffet that has some kind of laminate over the wood on the top side only. Sides and rest are wood. Many have suggested that I use the chalk paint because of that. My concern is the color I’m going to be painting it–a coral. In mixing oils or acrylics, if one mixes a corral with white, it becomes pink, not a lighter corral. So, should I just use a white chalk paint and then paint over it when dry with the coral paint? House is a coastal theme so any distressed would be white.
Also some sites say one should use acrylic paint or latex. I’m wondering whether one could also use gesso in lieu of the acrylic paint.
I mixed my PofP 5Tablespoons- to water. Mixed til it seemed mixed well and smooth. Then added 2cups of paint. Added 2 T Floetrol. Had to add quite a bit more water to make it thin enough to paint with. Mixed til smooth. The paint looks smooth but goes on quite grainy looking. It clumps up on my brush and seems hard to work with. I’m obviously doing something wrong. It sounds so simple when I read all the posts about using chalk paint. Advice?
Hi Linda! How did it look when it dried? Quite often these pains can have a grainy look but dry beautifully. 🙂
Great post!!! The piece turned out beautiful! Love this DIY paint recipe!
heyyy, its cute! thanks so so much, im looking how to make my old furniture looking vintage and shabby, found some sites but this one is best and as english is not my mother language, the tutorial with picture help me so much! thanks momma, u’re rock!!
i’ve allready bookmark this site as need to keep looking back to look for some other cool tut.
Hi Jamielyn
Your blog is wonderful, especially this one about making your own chalk paint. What a saving! Your furniture worked out beautifully.
I am so happy I found yr website. I am itching to chalk paint my junk market furniture but where I live (Cyprus, I.e. South of Greece,a little island) we don’t have suppliers for this.
Thanks
My sister painted her old furniture using this technique and it looks amazing!! My husband and I are trying this out tomorrow with ours! Can’t wait. 🙂
What is the color of yellow that you used? I haven’t been able to find a yellow that is not to bright.
I used ‘white raisin’ by Sherwin Williams. 🙂
I love the color yellow too and the table looks great!
Very pretty!!
Hi, I read your article on how to make chalk paint & am about to make & use your recipe.
With regards to the Minwax finishing wax I noticed there are a number of products they market. Can you please advise which product code was the one you used.
Many thanks Regards
Denis Roy
Hi Denis! This is the exact wax I used – the Minwax Paste Finishing Wax in Natural. 🙂
My daughter (recently married and in a new townhouse) just showed me a thrift shop piece she is painting with chalk paint. I love your explanation of how to use it and what it looks like in the end. Great job.
I really enjoyed your site. You provide excellent instructions and relevant photos without a lot of chit chat! I will continue to follow you! Thank you, Rebecca
What a great idea! Can’t wait to try this on the furniture in my daughter’s room!
Have fun! I love painting furniture with chalk paint!
I’m painting a night stand and shelving unit today using this recipe. I’ll let you know how it turns out. So excited ?
How fun! How it goes well! 🙂
This is great Jamielyn! I absolutely love that Bakery sign in the background at the end, think I need to be making one of these for myself sometime soon 🙂
Carly x
Thank you so much! That sign is one of my favorite parts of the kitchen! 🙂
Hi Jamielyn, Thank you for the great recipe for chalk paint. I’ve been wanting to try this technique on kitchen cabinets. Do you think it would for that application and can you use a polyurethane top coat instead of the finishing wax for more durability? I would appreciate your advise. Thank you and Happy Thanksgiving!!!
Hi! I think that sounds perfect! Many people have painted cabinets using this technique and loved the results. You can see some of their comments at the bottom of the post! 🙂
Maintain the spectacular work !! Lovin’ it!
I love that Yellow paint color, not sure if I have overlooked it but what color is that Valspar paint? I’m seriously into Buttery Yellow right now. I am also just starting to get into Chalk Paint. Thank you for the tutorial on how to make my own Chalk Paint. That table you painted is fantastic. I am excited to see your room with the Yellow. I also cannot believe that you got that awesome table for $5! Thanks for sharing!
Hi Amanda! It’s called White Raisin by Sherwin Williams!
Can you do distressed mason jars with this
I haven’t done it this recipe but I think that would work well! 🙂
I agree. Such a beautiful colour! I love the simplicity you are going for with your nightstand/ table and few, but perfect accessories. It is just like flea market style. Perfecto Brava!! P.S. Thank you for the chalk paint recipe and the Vaseline hack. I truly appreciate it. I’m off to make chalk paint and redo a very old cubby cabinet!😀