
This Dutch oven no knead bread is made with just 4 simple ingredients and 5 minutes of prep time, yet bakes up with bakery-quality results. This fresh homemade artisan bread is soft and tender with a golden crust.

This post may contain affiliate links. Read disclosure policy.
No Knead Dutch Oven Bread
This Dutch oven no knead bread is easy and hassle free with incredible flavor. Simply give the dough a quick stir, let it rise, shape it into a ball, and bake. Because it’s easier and less sour than sourdough, it’s the perfect from-scratch bread for beginners.
This homemade no knead bread is similar to artisan bread but cooked in a Dutch oven instead of on a pizza stone. Cooking it this way gives it a crusty outside and makes the bread soft and tender with airy holes in the center.
No Knead Bread Ingredients
- Flour: All-purpose flour is my first choice of flour for this recipe. Bread flour can be used, it will give the bread a higher rise. You can replace 1 cup of flour with whole wheat white flour.
- Yeast: You use either active dry yeast or instant yeast. Instant yeast rises faster, so I prefer active yeast.
- Sugar: This helps feed the yeast.
- Salt: Adds flavor to the loaf.
- Warm water: The idea temperature for bread baking is 105°F. Hot water can kill the yeast so ensure it’s the right temperature.
- Optional mix-ins: Try some Parmesan cheese, fresh herbs, or roasted garlic for a fun variations.
How to Make No Knead Bread
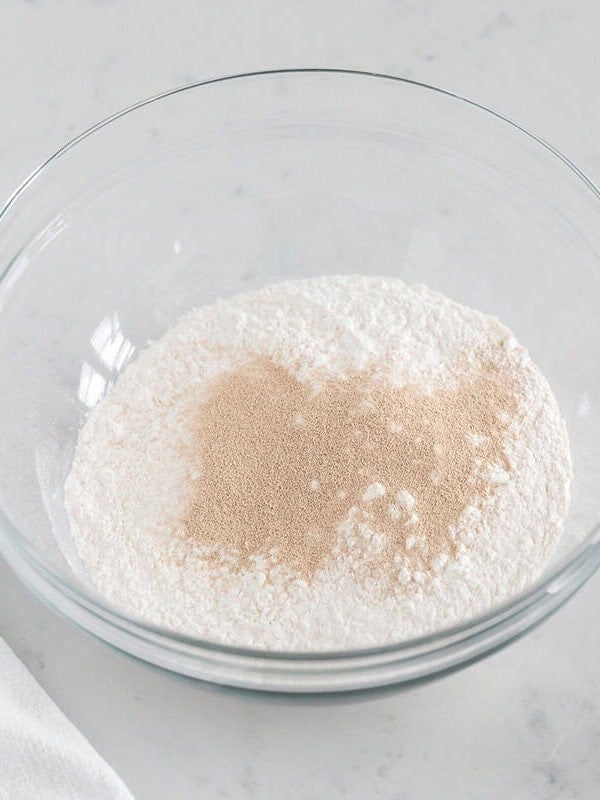
Proof the yeast by adding the flour, sugar ,salt and yeast in a large bowl, then pour the warm water on top.
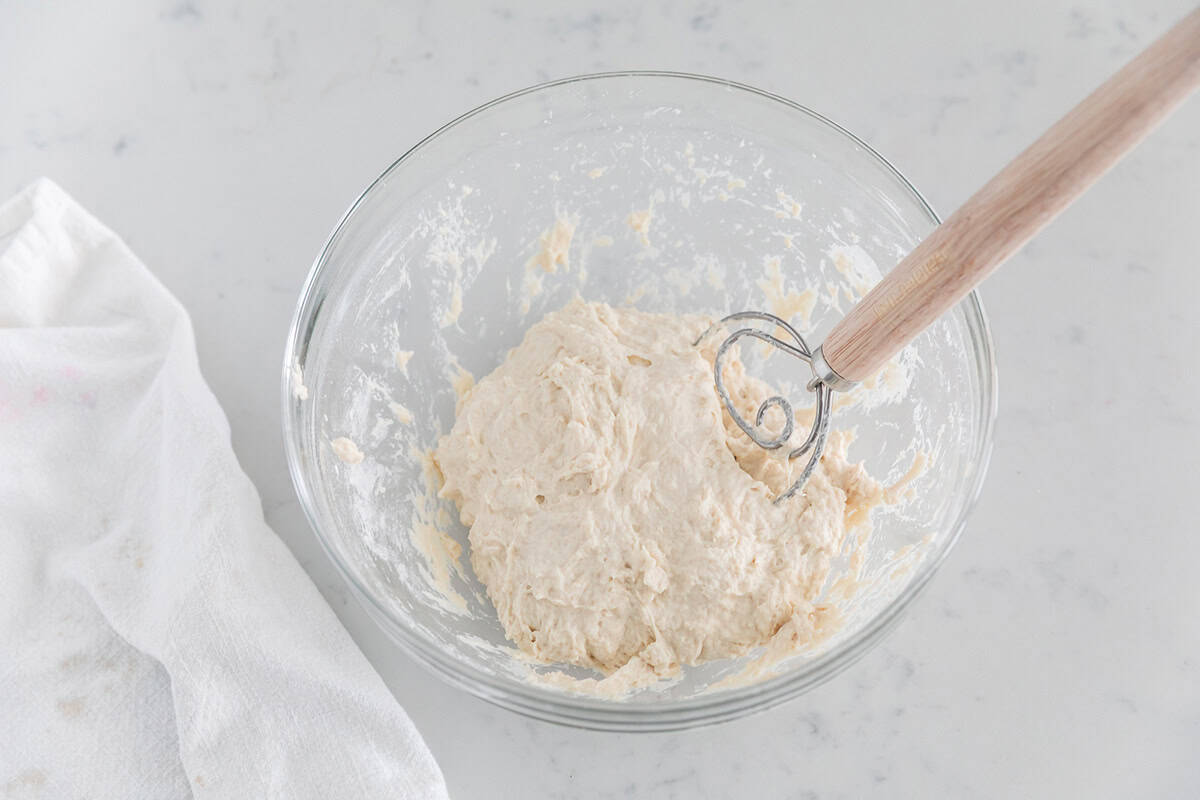
Mix together the dough until a shaggy dough forms. I like to use a dough whisk, but a spatula or wooden spoon also work great.
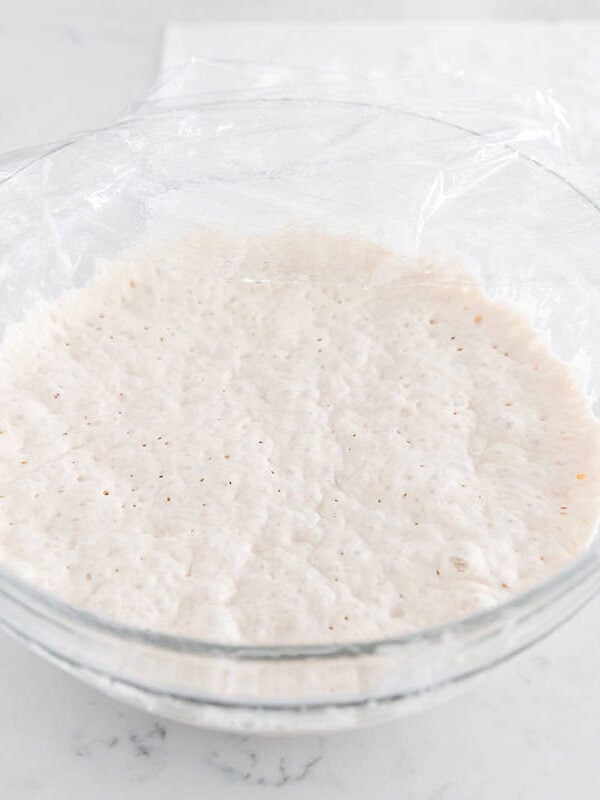
Cover the dough with plastic wrap and let rest on the counter for about 8 hours, although it can ready to bake in as little as 3 hours.
Turn the sticky dough onto well floured work surface and use your hands to quickly shape into a French boule (round ball). Cover with a kitchen towel and let rest for 30 minutes.
Carefully slide your dough into your hot Dutch oven. Close the lid and place pan in oven. Bake for 30 minutes, then remove lid and bake an additional 15-20 minutes. Let cool and then slice and serve.

Use a Dutch Oven with Lid
This easy no knead bread needs to be baked in a 4, 5 or 6 quart cast iron Dutch oven with a lid. A Dutch oven with a lid creates extra humidity and evenly distributes the heat creating a moist and tender bread. During the last few minutes, the bread is uncovered which creates a crispy golden crust.
It’s the easiest way to make an artisan bread that yields a loaf with a crackly crust and irresistible flavor.
Dutch Oven Bread Recipe Tips
- Dough texture. After mixing, the dough should look shaggy and slightly sticky/wet to touch. If it’s too sticky to work with, add 1-2 more Tablespoons of flour.
- Rise time. The longer it rises, the more chewy and flavorful it will be. It can rise on the counter for up to 24 hours or in the fridge for up to 1 week. If you’re short on time, you can bake after rising for 3 hours.
- Flour your hands. Because the bread dough has a sticky texture, make sure to generously flour your hands before shaping the no knead dough. No need to punch it down, knead or roll it out. Simply use your hands to gently shape it into a round ball. If you like a more rustic look, sprinkle Dutch oven with cornmeal.
- Preheating the Dutch oven. Up to an hour before you plan to bake the bread, place the Dutch oven in a hot oven to preheat. Heating the Dutch oven gives the bread the best chance for oven spring and creates a crisp crust on the exterior.
- Score the bread. Before baking use a sharp knife and make 1-3 lines across the top of the dough that are about 2-inches deep. The bread will rise better and obtain some crusty bits.
- Hollow inside. To test if it’s done, knock on the bread loaf. It should sound hollow inside when knocking.

Storing the Dough in the Fridge
If you had good intentions to bake your homemade Dutch bread in a Dutch oven at night but ran out of time, simply store the dough in the refrigerator up to 1 week to slow fermentation! I love to do this as cold dough is easier to work with to shape.
After it has been stored in the fridge just bring it to room temperature, let it rise again, then proceed with baking it in your preheated hot Dutch oven.

Ready to make more homemade bread recipes? Try this French bread, homemade white bread or bread bowl recipe.
More Bread Recipes

No Knead Dutch Oven Bread
Video
Equipment
Ingredients
- 4.5 cups (585 grams) all-purpose flour (more for dusting)
- 1 Tablespoon (15 grams) sugar
- 2 ½ teaspoons (14 grams) fine sea salt
- ¾ teaspoon (2 grams) active dry yeast (or 1 teaspoon instant yeast)
- 2 ¼ cups (17.8 ounces) warm water (105°F)
- cornmeal , optional
For serving: Butter and/or Jam
Instructions
Make dough:
- Place 4 1/2 cups flour, 1 Tablespoon sugar, 2 1/2 teaspoon salt and 3/4 teaspoon yeast in a large bowl. Then pour 2 1/4 cups warm water over top. Then you can use a dough whisk, spatula, wooden spoon or your hands to mix together. Stir until a shaggy dough forms and the dough is combined. The dough should be wet and STICKY, but add a Tablespoon or two more flour if it's too sticky to handle.
- Once the flour is all mixed in, cover with a towel or plastic wrap spayed with nonstick spray. Leave on the counter and let rise for 8-24 hours. If you're short on time, you can bake as soon as 3 hours (I prefer to make in the morning and bake in the evening). You can also refrigerate it for up to 7 days.
Shape:
- Generously flour the counter and your hands (use about 1/4 cup). Then turn the dough onto the counter. The dough will be sticky. Do not punch it down, knead it or roll it out. Gently and quickly work the dough into a French boule (round ball) by pulling the ends into the center. Then place into a glass bowl. Lightly dust the top with flour. Cover and let rest for 30 minutes while the oven preheats.
Preheat:
- Preheat the oven to 450°F about 1.5 hours before serving. Place a 4-6-qt dutch oven (with the lid on) into the oven for 30 minutes to get hot.
Bake:
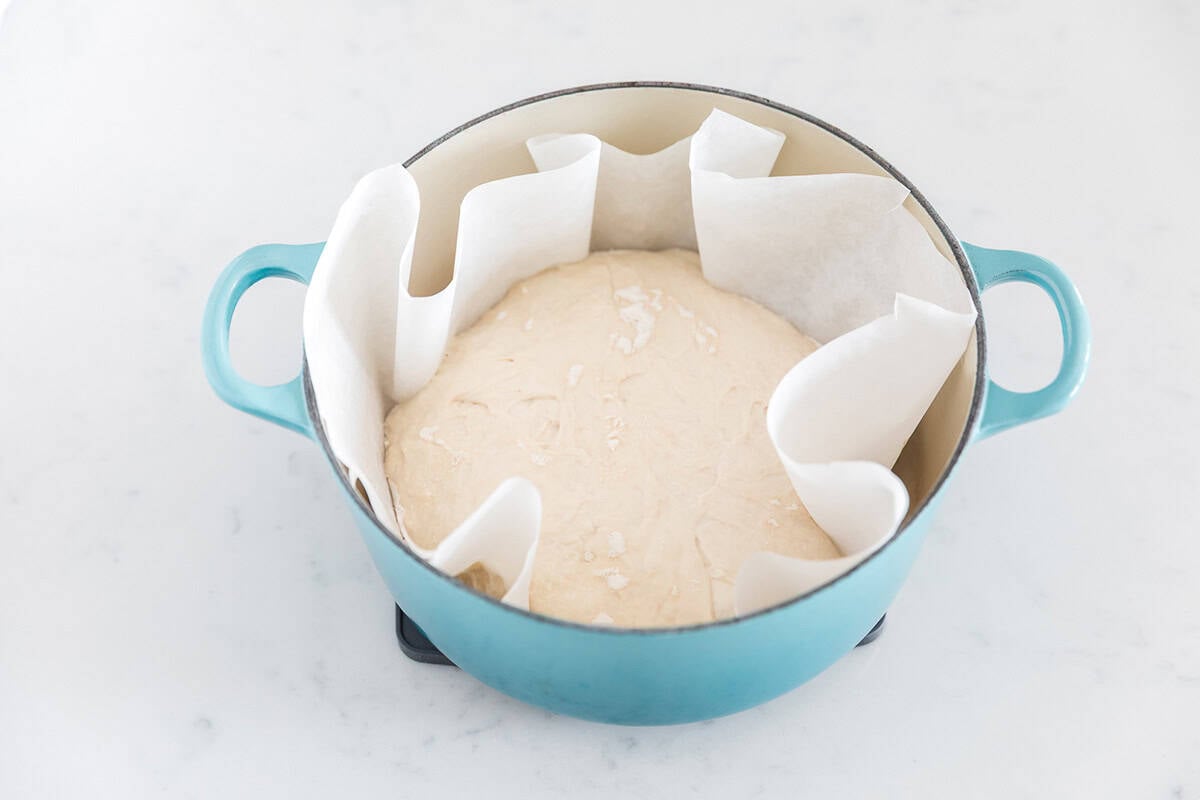
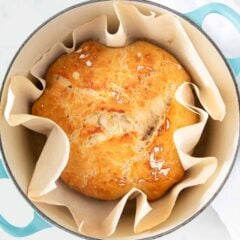
- Remove the dutch oven from the oven and sprinkle some cornmeal into the bottom of the pot or a piece of parchment paper. Then carefully pour the dough into the pan. Use a bread knife to add 1-3 lines across the top if desired. Cover with the hot lid and bake for 30 minutes, or until it's starting to turn golden. Remove the lid and bake an additional 15-20 minutes or until golden brown. When you knock on the bread, it should sound hollow.
- Allow the bread to cool on a cooling rack atleast 30 minutes before slicing (the middle will finish cooking while it cools, so make sure to give it time to rest).
Last step: Please leave a comment and rating after you make the recipe.
Notes
Nutrition
Nutrition provided is an estimate. It will vary based on specific ingredients used.
FAQs
This can happen if the dough is overhandled, under- or over-proofed, or lacks enough gluten development. Shape the dough gently, allow it to rise properly, and consider using bread flour for better structure.
Yes. You can bake it in a heavy oven-safe pot with a lid, or use a baking stone or sheet pan with an oven-safe pan of hot water on the rack below to create steam. The crust may be slightly less crisp, but the bread will still turn out soft and flavorful.
Store baked Dutch oven bread in a paper bag at room temperature for up to 4 days so the crust stays crisp. Avoid plastic bags, which trap moisture and can soften the crust.
Yes. If you won’t eat the bread within 4 days, freeze it whole or sliced. Let it cool completely, then store in a freezer-safe airtight bag for up to 2–3 months.

Shelley
This bread is so easy to make and I have never had a fail. It’s my go to recipe!
Sarah @IHeartNaptime
yeah! So glad to hear you love the Dutch oven no knead bread!
Debbie
So do you BAKE the bread at 350?
Sarah @IHeartNaptime
Hi Debbie, please review recipe card where it instructs to bake at 450°F.
Debbie
I did read 450 but I’ve always baked my bread at 360 so I was afraid that it was an error, my apologies, thank you.
Laurie Sanderson
I make this ALL the time.
Silvia Pokrifchak
Best bread ever and so easy. I have LaFee it many times and it never failed. Sometimes I add seal salt and dry herbs on top before baking. This bread is always a hit in my family. Everyone loves it.
Sarah @IHeartNaptime
So glad you love the Dutch oven bread!
Melissa
I keep trying to make this, and it ends up ‘okay’ but my main problem is that after leaving it on the counter, it’s still very loose and I’m not able to shape it at all, it’s kind of just blob. I’ve never been able to shape it into the French ball. I’ve tried bread flour and all purpose flour, more time and less time .. not sure what I’m doing wrong that it won’t hold a structure?
Sarah @IHeartNaptime
Hi Melissa, are you in a more humid environment? The environment can really play a factor in bread when it is proofing. If you haven’t tried it yet, trying reducing the amount of water by 1-2 Tablespoons. If that doesn’t work I would try just a few gentle stretch and folds to see if that helps form better gluten development.
Hannah
Can you leave out the sugar??
Sarah @IHeartNaptime
No, it feeds the yeast.
Palyn
Thank you for noting the size options for the Dutch ovens. I’ve consulted many, many online recipes for no-knead Dutch oven breads, and after an exhaustive search, yours was the first I came across that noted the size. I didn’t want to alter the recipe for my 3.5-quart Le Creuset Dutch oven, so I just made it as instructed and pulled off some of the dough, and the bread turned out perfectly. Thanks again for sharing one of the rare recipes for this type of bread that actually includes the suitable Dutch oven sizes. As Dutch ovens come in various sizes, it was a head-scratcher that so many similar recipes don’t include that critical information. A delicious and easy bread that will make even a bread-baking newbie feel accomplished!
Sarah @IHeartNaptime
So glad you found this Dutch Oven no knead bread!
Robin Keyes
Im LoVe n it, been making several times now, just made me a loaf for Easter🩷✝️🐰just taking out of the oven🤩
Sarah @IHeartNaptime
So glad you enjoy the Dutch oven bread!
Mary
As a first-time bread maker, I’ve loved the ease of this recipe. However, I was lucky that a friend gave me the recipe and a lesson, because I wouldn’t have known about the parchment paper from the instructions. The photo shows the dough in the Dutch oven in a parchment lining, but the instructions don’t mention this. After the second rise, I put flour on the parchment and turn the dough out onto that, then shape it, just using a scraper, not my hands. Then I lower the paper with the dough on it into the very hot Dutch oven and put it in the oven to bake.
Also, does the oven really need to heat for 1.5 hours before baking? That seems like a very big waste of electricity! I have found it works really well to heat the pan for 30 minutes.
Can you add the info about the parchment to the recipe?
Thanks for a wonderful recipe with consistently good results!
Mia
I agree! I don’t see a reason to heat the oven that long. I’ve made this bread a few times and I just put my cast iron pot and lid in the oven while it preheats. When the oven says it’s 450° I put the dough in the pot, place the lid on and bake as directed. It comes out PERFECT every time!!
Tatyana
Love it so simple and good !!! I add little more flour and less water and it’s perfect
Sarah @IHeartNaptime
So glad you love the Dutch oven bread!
Nancy Venezia
Has anyone made this with Gluten Free flour?
Alex
Yes! Dutch oven bread can be made GF, though yeasted artisan breads are one of the trickier GF conversions since the recipe relies heavily on gluten development during the long cold rise.
Best approach:
– Use a GF bread flour blend specifically designed for yeast baking (King Arthur Gluten-Free Bread Flour gives the best results — it’s formulated for structure and rise in yeasted GF recipes)
– Add 1 tsp xanthan gum if your blend doesn’t already contain it (this helps the GF dough hold its shape during baking)
– The dough will be more like a thick, sticky batter rather than a kneadable ball — that’s normal for GF yeasted bread
– Extend the rising time by about 50-75% since GF doughs rise more slowly
– The Dutch oven method still works perfectly for GF and actually helps since the steam creates a good crust
The result won’t be identical to wheat bread but you can get a very respectable GF artisan loaf!
Alex
GF Dutch oven bread works but needs a different approach than a 1:1 swap. For yeast bread, you want a GF bread flour blend specifically (not regular all-purpose 1:1), such as King Arthur GF Bread Flour or Caputo Fioreglut — these have more protein and structure for bread. The dough will look more like a thick batter, which is totally normal for GF bread. Key additions: make sure your blend has xanthan gum, and add 1 tsp apple cider vinegar to help with rise and structure. Bake covered the full time to trap steam, which is even more important for GF bread to get a good crust. The free Re-Whisk extension can auto-convert bread recipes to GF!
Shawn Riordan
What did i do wrong? I dollowed the recipe then left it covered overnight btu when i got up this morning it looked like a bowl of oatmeal😳
Sarah @IHeartNaptime
Hi Shawn, sounds like you needed some more flour. Also if your home was warm, it can cause the flour to absorb the water more quickly.
Karen
Does it matter what type of yeast to use? Quick-rise or active dry yeast?
Sarah @IHeartNaptime
Hi Karen, since this bread has a longer rise time I would use active dry yeast.
Jerry
I love this recipe! I made it with a store brand flour and it was good but when I made it with King Arthur bread flour it was incredible! I just mixed up a batch and for some reason I though it had a tbs. of olive oil and added it in, do you think it will be ok???
Sarah @IHeartNaptime
So glad you love the Dutch oven bread! Oh on the olive oil, we have tested it with adding, but it may work, let us know how it goes.
Jill Sundell
Loved it!!! Super easy!!
Trudy
Absolutely loved this, great flavor and made home smell wonderful, making again already!! Wonderful with meal!
Sarah @IHeartNaptime
So glad you are enjoying the Dutch oven no knead bread!
Caroline Murphy
My first time and it was a success! I can’t believe how easy this was. Result : a perfect loaf of bread !