
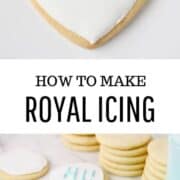
This easy step-by-step tutorial contains helpful tips to guide you through decorating cookies with royal icing for beginners! Use this royal icing recipe for outlining and flooding cookies for any celebration or holiday.

This post may contain affiliate links. Read disclosure policy.
Table of Contents
Royal Icing for Cookies
When it comes to decorating baked goods with frosting, I’ve shown how to frost the perfect cupcake and pipe on sugar cookie icing. I just recently experimented with a royal icing recipe and am sharing all my tips and tricks that I learned along the way.
With the holidays around the corner, I thought I would do a little royal icing 101 “class” for beginners. I have always seen those gorgeous iced sugar cookies in bakeries and wanted to make Christmas sugar cookies that looked like them as they are perfect for special occasions and everyone goes crazy over them.
While I am certainly no professional, I’m here to tell you that it’s easier than it looks. Learning how to make royal icing is simple and requires only 3 ingredients. Once you test using royal icing on cookies, you’ll get the hang of it in no time.

Ingredients
- Powdered sugar: Also known as confectioners sugar. If you’d prefer, you may sift it as well.
- Liquid: For this frosting, you can use fresh lemon juice (which I prefer) or water. The lemon juice will help break up the sweetness from the powdered sugar and adds a great flavor.
- Meringue powder: To make it easy you can add in meringue powder, however if you don’t have any you can replace with 2 egg whites. Meringue powder is what makes this different than a powdered sugar icing recipe.
How to Make Royal Icing
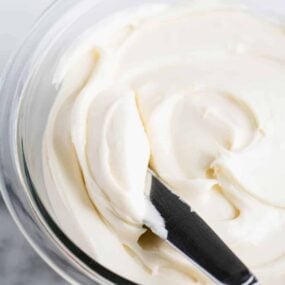
In a large bowl, beat powdered sugar, warm water and meringue powder until it forms peaks. This takes about 7-10 minutes on low with a standing mixer or about 10-12 minutes on high with a handheld mixer. The consistency should be fairly thick.
Outlining vs. Flooding your Cookies
Getting the royal icing recipe to the right consistency is the hardest part. It just takes time! My advice would be to buy some store bought sugar cookies and practice on those first.
As your confidence increases, make a batch of my favorite sugar cookies and go to town this holiday!
- Outline icing: This is the key to creating perfect royal icing cookies! You’ll first “outline” the cookies with the stiffer icing (it should not pour easily off the spoon). When you pipe it onto a cookie it will not spread.
- Flood icing: This has a thicker liquid texture similar to honey and should run off the spoon. The outline helps to create a border, so that the flood icing doesn’t run off the sides of the cookies.
How to Decorate Cookies with Royal Icing
Follow this royal icing tutorial for perfect cookies every time!

- Add food coloring. Once you’ve made the icing, transfer the mixture to bowls and add food coloring if desired. Then transfer the icing into a frosting bag.
- Outline the cookie. Next outline your cookie with a stiffer frosting and a fine frosting tip (I used a #2 tip). This border basically creates a dam to make sure the “flood” icing doesn’t go off the sides of the cookies.
- Add the flood icing. Mix in 1 teaspoon of water or lemon juice to your icing to make the flood icing. The consistency will be a thick liquid like honey. Then using a frosting bottle, spread the frosting inside the “outlined” cookie.
- Spread and smooth the icing. Use a small knife or toothpick to spread the frosting. You can also use the toothpick to pop any bubbles.
To add more designs on top: I haven’t played around with adding too many designs, but once the frosting is somewhat dry, you can use the stiffer frosting (in step #1) to pipe a design on top of your cookies.
How to Dry Royal Icing
It’s important to allow cookies to dry over night before packaging or adding more designs. Your cookies will not dry out as the icing acts a barrier to the air. It can also help to dry the cookies in front of a fan to keep the icing shiny.
I would not put your cookies with royal icing to dry in the fridge or freezer. The humidity and temperature change is not great for the icing.

Helpful Cookie Decorating Tools
If this is your first time making royal icing, I’d recommend picking up the helpful materials below. Most of these tools you can find at your local craft store too. Make sure to bring your coupons!
- Frosting bags
- Elastic bands
- Decorating tips
- Coupler
- Icing bottles
- Food gel coloring
- Small glass of water to hold the frosting bags in
- Damp paper towels
- Toothpicks
Storage Tips
This royal icing recipe will keep for up to 1 month. Simply cover the mixture with clear saran wrap and place in refrigerator until ready to use. Let sit out at room temperature until the consistency is smooth and ready to use.

Looking for recipes for how to use royal icing? Try Halloween sugar cookies, brown sugar cookies or lemon sugar cookies recipe.
More Frosting Recipes


Royal Icing Recipe
Video
Ingredients
- 4 cups powdered sugar (more if needed)
- 4 to 5 Tablespoons fresh lemon juice or water (more if needed)
- 3 Tablespoons meringue powder
Instructions
- Make royal icing recipe. Add 4 cups powdered sugar, 4-5 Tablespoons fresh lemon juice (or water) and 3 Tablespoons meringue powder in a large bowl. Beat on low for 1 minute and then scrape down the sides. Then beat on medium speed until icing forms a peak and is glossy. It will take about 5 to 7 minutes at low speed with a stand mixer and 10-12 minutes at high speed with a handheld mixer. It should be fairly thick (and not fall off the paddle). If it's too thick add a little more lemon juice, if it runs off then you'll want to add a little more powdered sugar.
- Tint royal icing. Once you've made the frosting, transfer to bowls for adding colors and then transfer into your frosting bag.
- Outline cookies. Next outline your cookie with a stiffer frosting and a fine frosting tip (I used a #2 tip). This border creates a dam to make sure the "flood" icing doesn't go off the sides of the cookies.
- Make flood icing. Mix in 1 teaspoon of water or fresh lemon juice to your frosting to make the flood icing. The consistency will be a thick liquid like honey. Then using an icing bottle, spread the frosting inside the "outlined" cookie.
- Spread royal icing. Use a small knife or toothpick to spread the frosting. You can also use the tooth pick to pop any bubbles.
- Dry cookies. Allow cookies to on the counter until icing has hardened.
Last step: Please leave a comment and rating after you make the recipe.
Notes
Nutrition
Nutrition provided is an estimate. It will vary based on specific ingredients used.

Carmelita Campos
Like the frosting you say it so easy I like it
Sarah @IHeartNaptime
So glad you love the royal icing!
Sonya
This recipe is amazing, worked brilliantly on my biscuits 👍🎉
I Heart Naptime
So happy to hear that! Thank you for your comment and review, Sonya :)
Lucy Jenkins
Thank you for the royal icing recipe I will be happy to try it for my Christmas cookies
Arlene
Can you add flavoring
Jamielyn Nye
Yes you can add flavoring. Some of them will change the color of icing though.
c.j mackey
very easy to make and use
Sophie Heath
Delicious! Super easy to ice the cookies with too!
Jamielyn Nye
I’m so glad you enjoyed them! :)
Renee Goerger
I used to be a professional cookie decorator so I know how important a proper royal icing is. This recipe is a winner!