

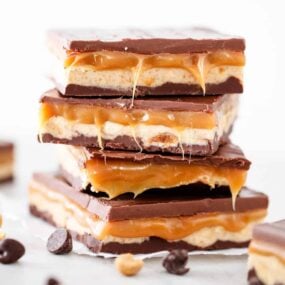
A homemade Twix bar is one of my favorite treats on this planet. Gooey homemade caramel is perfectly sandwiched between the classic Twix candy bar ingredients of a shortbread cookie and milk chocolate—every bite is perfection.
Just like my homemade crunch candy bar or PayDay candy bar recipe no one ever turns down a bite of this candy recipe, it’s ways better than store-bought!

This post may contain affiliate links. Read disclosure policy.
Table of Contents
Easy Twix Cookie Bars
If you find yourself digging around in your child’s Halloween bucket looking for a Twix bar year after year, this recipe and twix cookies are both must-makes. I’ll be honest and say these don’t taste exactly like the original—they’re softer, chewier and…just all around better. They remind me of my salted caramel butter bars, but with a chocolate twist, and a bit similar to this toffee candy!
Personally, given the choice, these homemade Twix bars knock the wrapped version out of the park, every time. A thick buttery shortbread crust, chewy caramel layer, and milk chocolate are divine. You should also make my Cool Whip candy, it’s like 3 Musketeers!
This recipe is also on rotation as a go-to party dessert. If you make it, you are practically guaranteed to have a unique sweet treat that no one else has brought, unlike a classic cookie or brownie.
Why You Will Love This Recipe
- Easy to make: While there is some cooling time between each step, no special equipment is required to keep this recipe simple.
- Classic layers: With three scrumptious candy bar layers of a shortbread cookie base, a gooey homemade caramel and then topped with chocolate, this homemade Twix bars recipe is irresistible!
- Gifting idea: If you want to upgrade the bars for an event or gift, you can individually wrap each one in parchment paper with a twine bow. Nothing beats a homemade gift from the kitchen!
Twix Ingredients
There are three main components to homemade Twix bars. Each one is pretty yummy on its own, but combined together they are incredible.

Find the full printable recipe with specific measurements below.
- Caramel layer: If you’ve never tried it before, you may be shocked at how different homemade caramel is from the version you can buy in the jar. It’s rich and buttery and just all around fantastic. As it is one of the most important Twix ingredients, I strongly recommend you make the caramel from scratch. It may sound challenging, but I promise it isn’t. It is well worth the effort.
- Shortbread layer: I think shortbread often gets the short end of the stick. While we all crave brownies or cookies, we rarely admit craving a buttery shortbread cookie. Admittedly, that’s probably because the store-bought versions leave much to be desired. The one that makes the base for the Twix cookie bars, however, is pretty amazing–are you sensing a theme here? :)
- Chocolate layer: Last, but certainly not least, a rich, melty chocolate makes up the top layer of the bar. It’s definitely one of the key ingredients!
How to Make Homemade Twix Bars
Creating the recipe is not challenging, but it does take a bit of time. Follow these easy steps for the most amazing bars!

- Make shortbread layer. The first thing is to create is your shortbread layer, which is done by mixing flour, sugar, and butter together and baking for 20 minutes.
- Make caramel sauce: Melt butter in a saucepan over medium heat, then stir in brown sugar, corn syrup, and sweetened condensed milk. Bring it all to a boil and cook for five minutes, stirring constantly. Remove from heat, allow to thicken, then pour over shortbread. Allow bars to cool so the caramel can firm.
- Pour chocolate layer over bars. Melt the chocolate. Pour it over the caramel layer and place it in the fridge to set.
- Slice and serve. Once your bars have hardened, slice, serve and enjoy!
“These are dangerous to have in the house :) I make them for parties and gatherings so that I don’t have to worry about eating the whole batch myself! They’re so delicious and easier than I anticipated on my first try! An awesome recipe, thanks!”

Expert Tips
I’ve gotten quite a few questions about this copycat Twix bar recipe—these tips will help you perfect the recipe every single time.
- It’s important to continually stir the caramel sauce while you are making it. If it isn’t being mixed constantly, the mixture can harden and become tough or gritty.
- Once you have all the layers assembled, they will need to harden slightly before eating. I recommend placing the bars in the fridge for 10-15 minutes to set it quickly.
- Because the layers are hardened, it can help to use a warm knife when slicing the bars. To get your knife warm, run it under hot water for a minute or so, then wipe it dry immediately before slicing.
- What kind of chocolate to use. The instructions call for chocolate chips. While traditionally a Twix bar is coated in milk chocolate, this recipe also works with semi-sweet chocolate or dark chocolate chocolate.
How to Store
These homemade Twix bars will stay fresh for about 2-3 days at room temperature if kept in an airtight container—that is, if you don’t eat them all before then!
This recipe can be made ahead of time and frozen. To do so, assemble as normal, then add an airtight lid to your container and place in the freezer. When you are ready to eat them, let the bars defrost on your counter until they are at room temperature.
FAQs
While you could use tempered chocolate for this recipe just using melted chocolate with a bit of vegetable oil not only works best but saves yourself a step!
While eating these homemade candy bars as is is the popular choice, you can also stir them into homemade vanilla ice cream, top a milkshake or stir them brownie batter.
There is a crunchy biscuit cookie layer, creamy homemade caramel layer and then a layer of chocolate.
The crunchy part in a homemade Twix bar recipe is a shortbread cookie! It’s the perfect balance and texture to the offset the sweet chocolate and gooey caramel.

Need more delicious dessert bar recipes? Try M&M cookie bars, Oreo brownies or sugar cookie bars!
More Delicious Dessert Bars


Homemade Twix Bars
Video
Ingredients
Shortbread Layer
- 1 ¼ cups all-purpose flour
- ¼ cup granulated sugar
- ⅔ cup salted butter , softened slightly
Caramel Layer
- ½ cup salted butter
- ½ cup light brown sugar , packed
- 2 Tablespoons corn syrup
- ½ cup sweetened condensed milk
Chocolate Layer
- 2 cups chocolate chips
- 1 teaspoon vegetable oil , or coconut oil
Instructions
- Preheat the oven to 350ºF. Line a 9×9 baking dish with parchment paper or spray with nonstick cooking spray.
Shortbread Layer
- In a medium bowl, stir the flour and sugar. Using a pastry cutter or 2 forks, cut the butter until it forms a crumb mixture.
- Press crumb mixture down evenly into the pan. Bake 18 to 20 minutes, or until a toothpick inserted in the center comes out clean. Be careful not to overbake. Let cool completely.
Caramel Layer
- In a medium saucepan, melt butter over medium heat. Stir in the brown sugar, corn syrup, and condensed milk. Bring to a boil and cook 4 minutes, stirring constantly. Remove from heat and stir an additional 2 minutes, or until it starts to thicken. Pour over cooled shortbread layer. Let cool until firm.
Chocolate Layer
- In a microwave-safe bowl, mix the chocolate and oil. Microwave on high 1 minute. Stir and microwave in 15 second intervals, until the chocolate is melted and smooth. Pour over the caramel layer and let set. Place in the fridge 10 minutes to help set faster.
- Once the chocolate has hardened, slice into squares with a warm knife. Enjoy!
Last step: Please leave a comment and rating after you make the recipe.
Notes
- It’s important to continually stir the caramel sauce while you are making it. If it isn’t being mixed constantly, the mixture can harden and become tough or gritty.
- Once you have all the layers assembled, they will need to harden slightly before eating. I recommend placing the bars in the fridge for 10-15 minutes to set it quickly.
- Because the layers are hardened, it can help to use a warm knife when slicing the bars. To get your knife warm, run it under hot water for a minute or so, then wipe it dry immediately before slicing.
- You can use whichever chocolate you prefer. The instructions call for milk chocolate, but this recipe also works with semi-sweet or dark chocolate.
Nutrition
Nutrition provided is an estimate. It will vary based on specific ingredients used.

Vi
My boyfriend and his friends are literally obsessed with your recipe. So delicious!
Sarah @IHeartNaptime
So glad everyone loves the homemade Twix!
Taylor
Hi, we love these Twix bars! We’ve made them twice and both times the shortbread layer was a little crumbly in spots so we cut the plan into pieces, some would fall apart & some would be a crispy cookie piece. I’m sure it has something to do with my flour/sour and butter mixture being too dry before baking as it did seem a little flour-y before I put it in the pan and pressed it together. Do you have any suggestions? Other than that, they are DELICIOUS!
Sarah @IHeartNaptime
Hi Taylor, try it with a little more butter, maybe around 3/4 cup (1 1/2 sticks) and see if that helps
Taylor
Nevermind I think I hadn’t let it cool long enough when I cut the first pieces because we set it in the fridge for 30 mins-hour for the chocolate to harden a little more and we were able to take the whole thing out of the pan in one piece/cut into pieces. The cookie part was crisp and solid so not crumbly at all! Probably just needed more time to chill and come together. Thanks!
Jamie Kay
I can’t thank you enough for this recipe. I can finally make something with carmel!!!!! These do not last long in my house. They make a great gift.
Sarah @IHeartNaptime
So happy to hear you love the Twix bars!
Audrey
I made these, they taste so good!
My family finished them in one week!
Sarah @IHeartNaptime
Love that! So glad your family loved the homemade Twix bars!
René
My family loves these bars! Wonderful just as they are.
Jess
Gosh I feel like I’ve made a different recipe to others who have recently posted, absolutely delicious! Followed step by step and has turned out beautifully. Thank you!
Sarah @IHeartNaptime
So glad you enjoyed the Twix bars!
paula mcdowell
wayyy too sweet! did not really taste like a Twix, but easy to make. recommend to try making it but personally would not make it again. :)
Sarah @IHeartNaptime
Thank you for the review Paula, everyone’s tastes are a bit different.
Sharon
Can you make this in a 9×13 pan
Sarah @IHeartNaptime
Yes but you will need to double the ingredients.
Claudia Pacheco
Hi, I made them but the caramel is not quite hard. When I cut it le middle layer was a little runny.
Sarah @IHeartNaptime
Sorry to hear this Claudia. Sounds like the caramel needs to be cooked a little longer.
Diana R
These taste good. But agree that the shortbread wasn’t quite Twix flavored. But easy to make and good directions
Sarah @IHeartNaptime
Thank you for the review of the Twix bars Diana!
J
The short bread didn’t come together and the butter never fully incorporated in the caramel. I was constantly stiring.
Sarah @IHeartNaptime
Hi, sorry to hear that this didn’t turn out as expected. Was your butter too soft or too hard in the shortbread layer? Softened is best! The caramel should come together if you follow boiling and stirring for 4 minutes and then 2 minutes off of the heat. I like to keep a timer handy when making caramel.
Meghan
I have made a lot of caramel in my life… and it has never been so buttery. I literally soaked it off the top with paper towels. Is it really a 1/2 cup butter?
Just hoping for calcification. I’m really looking forward to cutting into these!!
Sarah @IHeartNaptime
Hi Meghan, yes. We have never had that issue during testing, but you must keep stirring constantly for the caramel to come together without any separation.
Kat
These were delicious! I did cook the caramel to 238 F which took exactly 4 min as stated and the texture was perfect. This is a keeper!
Sarah @IHeartNaptime
So happy to hear that you loved the Twix cookies!
Karen
Is there something else I can use besides corn syrup?
I want to make them now lol
Sarah @IHeartNaptime
Hi, you could try another syrup like brown rice syrup, maple syrup, agave etc, it has not been tested, though, so I am not sure how it will set up.
Diane
My thoughts exactly! How about honey?
Vanessa
Tasted great and was a big hit!
Jamielyn Nye
So glad you enjoyed the homemade twix bars!
JRB
Chocolate overpowered the caramel and the shortbread was dull in flavor. May try again and make some modifications. ;-)
Sarah @IHeartNaptime
Thanks for the review, everyone’s taste always are a bit different, looking forward to hearing your modifications!