

This Jiffy corn pudding is a cozy holiday side dish made with just 5 ingredients. It bakes into a creamy, sweet casserole with a Southern-inspired flavor that’s perfect for Thanksgiving or Christmas dinner.

This post may contain affiliate links. Read disclosure policy.
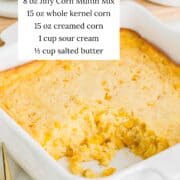
Jiffy Corn Pudding Casserole
Jiffy corn pudding is a holiday staple in our house. It’s a cross between corn pudding and the classic corn casserole resulting in a sweet, tender, and moist side dish that pairs well with oven roasted turkey or slow cooker spiral ham.
Made with corn muffin mix, canned corn, and creamed corn, this is a budget-friendly way to complete any holiday meal, whether as one of a few Thanksgiving side dishes or as part of a Christmas dinner menu!
Why I Love This Recipe
- Corn pudding uses only 5 simple pantry staples.
- It’s a timeless dump-and-bake recipe that is ready in under an hour.
Ingredient Notes

Find the full printable recipe with specific measurements below.
- Jiffy corn muffin mix: No need to follow the directions on the box. It’ll be used as an ingredient in this cornbread pudding recipe.
- Canned corn: Adding whole corn kernels gives the jiffy corn pudding some texture. Drain the cans before adding them to the mixture.
- Creamed corn: Do not drain the can. If you have some extra time, I have a great crockpot creamed corn recipe that would be great in this corn pudding recipe.
- Sour cream: Adds creaminess and moisture.
- Salted butter: Melted butter adds a buttery flavor, and the fat also adds extra moisture.
How to Make Jiffy Corn Pudding
Stir the corn muffin mix, drained corn, creamed corn, sour cream and melted butter together in a medium-sized mixing bowl.

Transfer to a prepared 8×8 casserole dish and bake, uncovered, in a preheated 350°F oven for 45-50 minutes until golden.

Recipe Tips
- If time permits, let the corn pudding casserole with Jiffy rest for up to 10 minutes before baking. This rehydrates the cornmeal in the cornbread for a smoother texture without any graininess.
- The outer edges will be slightly crisp and golden, but if you notice they’re browning too quickly, cover the edges with foil. The center of the corn pudding casserole may take longer to bake through.
- You’ll find it hard to slice, so I like to spoon bread casserole onto everyone’s plates using a large serving spoon.
- Be sure to prepare the baking dish with nonstick cooking spray. You want it to lift easily out of the dish when serving.
- Serve warm alongside other holiday staple recipes like green bean casserole and cranberry sauce.

More recipes with corn include hot corn dip, easy corn chowder and chili and cornbread skillet.
More Cornbread Recipes


Jiffy Corn Pudding Recipe
Video
Ingredients
- 1 box Jiffy Corn Muffin Mix (8 ounces)
- 15 ounces whole kernel corn , drained (1 can)
- 15 ounces creamed corn , not drained (1 can)
- 1 cup sour cream
- ½ cup salted butter , melted
Instructions
- Prepare oven and pan: Preheat oven to 350°F. Coat 8×8 square baking dish with cooking spray.
- Mix all ingredients: In a medium sized mixing bowl, combine the box of Jiffy corn muffin mix, 1 can of corn, drained, 1 can of creamed corn, 1 cup sour cream and 1/2 cup melted butter.
- Bake in oven, uncovered, for 45-50 minutes.
Last step: Please leave a comment and rating after you make the recipe.
Notes
Nutrition
Nutrition provided is an estimate. It will vary based on specific ingredients used.
Substitutions and Variations
- Gluten-free corn casserole: Use a gluten-free corn muffin mix, like Bob’s Red Mill, to make this a gluten-free corn pudding casserole.
- Add-ins: To add a little spice to the mix, toss in some chopped jalapenos or green chiles. Sprinkling some cayenne pepper also works.
- A cheesy topping: Sprinkle some freshly grated cheddar cheese on top of the casserole during the last 15 minutes of baking.
Recipe FAQs
They are very similar, but not the same. Corn casserole sets a bit better because it contains eggs and uses a cornbread mix. Whereas corn pudding uses a muffin mix and has a creamier texture.
Absolutely! Get a head start on your menu planning and prepare this corn pudding casserole up to 48 hours in advance. Mix everything and add it to the dish. Cover with plastic wrap and keep it in the fridge until you’re ready to bake it.
Let it sit at room temperature for about 30 minutes before, or tack on a bit of extra baking time.
You can, which is a great way to save some oven space. Mix the ingredients and add the batter to a prepared crockpot. Cover with a lid and cook on high for 3 hours.
Every slow cooker is different, so keep an eye on it at around the 2-hour mark.
Keep leftovers stored in an airtight container for up to 2 days. That is, if you’re lucky enough to have any! You can also freeze leftovers for up to a month.

Wendy
Simply delicious!! Thanks for a great recipe 😊
Sarah @IHeartNaptime
So glad you love the Jiffy corn pudding!
Nelda
I love corn pudding . I add the cheese and I add an ingredient of one small can of green chilies. This makes it even morn creamy and what a comfort food. If we cook for a funeral this is what I cook and always have someone wanting the recipe!
Sarah @IHeartNaptime
That sounds delicious Nelda! So glad you love this jiffy corn pudding!
CatMom
I used Greek yogurt instead of sour cream, and it’s still yummy!
Sarah @IHeartNaptime
So glad the Jiffy corn pudding worked so out well for you!
Amber
My family loved this recipe! I only had 2/3 cup of sour cream on hand but it still turned out great. I added cheese to the top to counter the sweet of all the corn. Highly recommend!!!
Sarah @IHeartNaptime
Sounds delicious! So glad you love the corn pudding!
Sharon
My family loves this recipe. So do I easy and it turns out great every time
Sarah @IHeartNaptime
So happy to hear this! Thank you!
Diana
We really enjoyed it. I used to make it in the crockpot but switched because it was too liquidy. This recipe did not disappoint! 😋
Jamielyn Nye
So glad you enjoyed the corn pudding!
Jeanne
The original recipe on the Jiffy box is 1 stick butter, 1 can whole kernel corn (didn’t say anything about draining), 2 cans cream corn (you can’t drain cream corn), 1 c sour cream, 1 egg and 1 pkg corn muffin mix. I’ve been making this for years and never drained the corn and it always comes out perfect with this original recipe from the Jiffy box.
Sarah @IHeartNaptime
Of course enjoy it how you like, thanks for the note.
Alisha
Turned out great! – Alisha, recipe tester
Sarah @IHeartNaptime
So glad you enjoyed it!