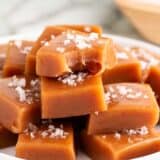
Sweet, salty and perfectly soft and chewy apple cider caramels that are loaded with fall flavor. This delicious treat is a must-make this season!

Table of Contents
Favorite Fall Candy
This recipe is a fun fall twist on my favorite homemade caramels. They’re just as soft and delicious, but are packed with a punch of fall flavor thanks to the added apple cider, cinnamon, nutmeg and cloves. It almost reminds me of a caramel apple, but in candy form!
If you’ve never made your own caramel from scratch before, this is a great recipe for you to follow. I’ve included helpful tips and tricks that I’ve learned along the way that result in the most perfect apple cider caramels you could dream of.
I’m not going to lie, these might be my new favorite fall treat! Boy were they delicious. Anyone who you gift these to (including yourself!) will be a very lucky person!

Cooking Caramel on the Stove
Although making homemade caramel on the stove takes a bit more work than my easy microwave caramels, it’s definitely worth the extra effort! It isn’t hard, but it can be a little time consuming. Making caramels requires your undivided attention, otherwise you’ll end up with a very sad and burnt batch of caramels.
Below are some helpful tips to follow when making this recipe:
- Use a candy thermometer. This is KEY when making homemade caramels. Insert the thermometer in the pan with the caramel mixture and keep an eye on the temperature the whole time. You want the temperature to reach 244°F before removing the pan from the heat. Make sure it doesn’t get any hotter than that, or else it will burn!
- Cook on low heat. Simmering the mixture on low helps prevent the caramel from burning. It takes a little longer for the temperature to rise, but it gives you way more control.
- Keep stirring. Continuously stir the mixture the ENTIRE time while cooking so that the caramel doesn’t stick to the bottom of the pan and burn.
HOW TO TEST IF YOUR CARAMEL IS READY
Although we’re using a candy thermometer, I also like to use this easy method to double check that the caramel is ready. Simply scoop out a teaspoon of the caramel from the pan and drop into a small glass of ice water. If it’s ready, it should form a firm ball. If the texture is still liquidy, keep it on the heat for another minute or so and try again.

Tips for the Best Apple Cider Caramels
- Apple cider. Make sure you get apple cider, not apple juice. It will make a difference. Apple cider isn’t clear like apple juice and still has all the apple pulp in it. It will make for a much better flavor, I promise! You can even make homemade crockpot apple cider if you have the time.
- Butter the pan. Before you pour the caramel mixture into the pan to set, make sure to add a sheet of parchment paper and then coat with butter or nonstick spray. You don’t want your caramels to stick!
- Salt. To boost the flavor even more, sprinkle some sea salt over the top. I especially love maldon flake sea salt…it’s the best!
- Cutting into pieces. A buttered or plastic knife works best to cut the caramel. You may cut into square or rectangular pieces, depending on your preference.
Wrapping and Storing
These apple cider caramels make a great neighbor gift idea or holiday dessert for a fall or winter party. Simply cut them into squares or rectangles, then wrap each piece in wax paper or cellophane (cut into 3×6-inch squares).
They will stay fresh in an airtight container or in the refrigerator for up to 3 weeks. These caramels are the perfect make-ahead gift that taste just as fresh and delicious as the first day you made them!
Recipe FAQs
Store caramels at room temperature for up to 3 weeks. If you like your caramels with a chewy texture, you can store them the refrigerator.
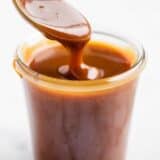
If you would like to use this as a dip for apples that could work too! For a sauce, you will want to stop at the ‘thread stage’ which is 230°F. Once it gets to 244°F, the ‘firm ball’ stage, it will solidify as it cools.
Yes, you will want to dip the apples into the apple cider caramel instead of pouring it into a pan. It will make the best gourmet apples!

More Fall Treats You’ll Love:
- Caramel Apple Pie Bars
- Toffee Caramel Dip
- Caramel Popcorn Balls
- Snickers Caramel Apple Pie
- Caramel Apple Cider
HUNGRY FOR MORE? Subscribe to my newsletter and follow on Facebook, Pinterest and Instagram for all the newest recipes!
Apple Cider Caramels
Video
Ingredients
- 2 cups apple cider
- 1 cup heavy whipping cream , divided
- 1 ¼ teaspoons ground cinnamon
- ¼ teaspoon nutmeg
- pinch ground cloves
- 1 ½ cups granulated sugar
- 3 Tablespoons water
- ⅓ cup light corn syrup
- ½ cup butter , cubed
Optional: Maldon flake salt, for sprinkling
Instructions
- In a saucepan, boil apple cider for 20-30 minutes or until it is reduced down to 1/3 cup. Set it aside to cool.
- Line a 8×8" pan with parchment paper. Coat with a bit of butter or cooking spray and set aside. In a small bowl, combine 2/3 cup whipping cream, cinnamon, nutmeg, cloves and reduced apple cider. Set aside.
- In a heavy-bottomed saucepan, combine the sugar, 1/3 cup whipping cream, water, and corn syrup. Cook over low heat until the sugar dissolves (about 5-10 minutes). Insert a candy thermometer and simmer until the syrup reaches 230°F.
- Remove pan from heat and whisk in the cider and cream mixture. Add the butter and combine until fully incorporated. Return the pan to heat and re-insert candy thermometer. Cook over low heat, stirring frequently, until the temperature reaches 244°F. Once temperature reaches 244°F, cook for 2 more minutes.
- Remove the pan from heat and pour the caramel into the prepared pan. Let the mixture cool completely at room temperature or in the refrigerator.
- Once cooled, cut the caramels into squares or rectangles and wrap each caramel in wax paper. Store in an airtight container or in the refrigerator for up to 3 weeks.
Nutrition
Nutrition provided is an estimate. It will vary based on specific ingredients used.
Did you make this recipe? Don’t forget to give it a star rating below!

Categorized as: American, Candy + Fudge, Christmas, Desserts, No-Bake, Nut-Free, Stovetop, Vegetarian

Jamielyn Nye is the founder and recipe creator at I Heart Naptime. She is also the author of the I Heart Naptime Cookbook. Here you will find easy family-friendly recipes for every occasion.


I love this recipe. I make them every year. Have always gotten compliments on flavor.
So happy to hear that! Thanks for your comment and review, Melissa :)
At first I was really confused about the apple cider instructions! Apple cider in the Netherlands (and in Great Britain by the way) is an alcoholic apple beverage. Took me a while to realize you just meant not-clear apple juice. But I figured it out! It took a really long time to get the caramel to cook to 244 degrees, but the caramel looks and smells perfect! I am Dutch so did not use Heavy Whipping Cream but Dutch ‘slagroom’ (regular whipping cream) and I couldn’t find corn sirup so I used agave sirup. I’m really curious how they will turn out once set! Some comments below speak of the caramel not being really firm. So, if you cook them for longer (and hotter) they will become more firm? Will try that if this batch doesn’t turn out that well.
Correct! If you want a more-firm caramel, you can cook to a higher temperature. You can also have these firm up in the refrigerator, too. :)
Are there any adjustments for high altitude? I’m at 5000 feet above sea level. Also, have you tried this with homemade cider? Thanks!
Hi! We do not have the information for the high altitude, but this looks like it could be of help! We haven’t made them with homemade cider, but I bet it would be delicious! :)
Thanks for sharing this recipe! Where did you get the big jug of corn
syrup??
Hello
Is that actually apple cider or is it the apple juice? We buy that brand a lot and I have never noticed apple cider, only apple juice, is all. I want to make sure I get the right stuff…
I think the apple juice from the Simply brand would work for this recipe, but not juice box apple juice! :)
These caramels are awesome! Perfect cider flavor. I will say that I’m glad I had some background knowledge with caramel making before trying this recipe so I sort of knew what I was looking for and what to expect. :) Thanks for the great post!
Do you think this recipe would work for making caramel apples?
I would love to see caramel apples made with this.
Making these right now; they look amazing! I’m a caramel snob and have a favorite recipe I have been using for years that uses brown sugar, never tried using fresh cream and white sugar so I’m curious to see if there is a difference in taste. I recently used my regular caramel recipe and added cinnamon to it and they taste like a cinnamon roll. Love caramel!
I love caramel too! My grammas recipe will always be my favorite, but these apple cider caramels are fun for a change!
Using organic cream with GMO corn syrup… that’s very… unique.