

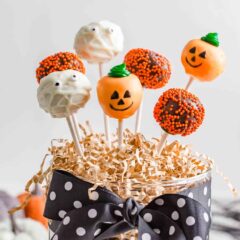
These easy Halloween cake pops are bite-sized treats made with moist cake, creamy frosting, and a chocolate coating. Decorate as pumpkins, mummies, or with festive sprinkles!
I love making festive cake pops for every holiday, and Halloween is no exception. Halloween Oreo balls are another favorite!

This post may contain affiliate links. Read disclosure policy.

Why I Love These Easy Halloween Cake Pops
These Halloween cake pops start with soft vanilla cake mixed with frosting and rolled into cake balls, then dipped in chocolate and decorated as pumpkins or mummies.
They’re such a fun treat to serve, and I like that guests can enjoy them right away or wrap one up to take home. When I’m in the mood to mix things up, I’ll also make Halloween Rice Krispie treats, strawberry ghosts and Halloween chocolate brownies for an extra variety of festive sweets Halloween desserts.

Recipe Ingredients

Find the full printable recipe with specific measurements below.
- White cake mix: Grab a box of white cake mix and bake it according to package directions.
- Chocolate melting wafers: These candy melts will be used to coat some of the Halloween cake balls.
- White chocolate melting wafers: Ghirardi is my favorite brand to use.
- Buttercream frosting: You’ll need softened salted butter, powdered sugar, vanilla extract, and heavy cream (or milk).
- For the pumpkins: Orange melting wafers, green frosting, edible black ink pen.
- Optional: Sprinkles, jimmies, etc.
Variations
- Cake: I typically have a stash of homemade vanilla cake mix I like to use. However, if you prefer chocolate cake pops, I have the best chocolate cake recipe for that.
- Frosting: You could also use vanilla frosting instead of buttercream frosting. Or, store-bought frosting works too.
How to Make Halloween Cake Pops
Once your cake is baked and slightly cooled, crumble into fine crumbs. Mix in frosting a few of tablespoons at a time until cake holds together.
Scoop mixture, roll into a ball, and place on a plate. Repeat with the entire mixture, and freeze balls for 10 minutes.

Melt chocolate and white chocolate in two separate microwave-safe bowls for 30-second intervals.
Dip each stick into chocolate and insert dipped part into center of cake pop. Place in freezer until chocolate is set.

Meanwhile, pour the melted white and dark chocolate into tall glasses. Divide and dip the cake pops to coat with whatever chocolate you’re using, spin it to remove excess, and sprinkle the dark chocolate ones with jimmies.
Set the Halloween cake pops with sprinkles and undecorated white chocolate coated cake pops aside to harden.

For the pumpkins, melt the orange candy melts and dip the remaining balls in the chocolate. Allow them to harden with the rest of them.
Now, we decorate!

Halloween Cake Pop Decorating Ideas
- For the pumpkins, add a little green frosting on top for the stem, and draw a face with the edible pen.
- For the mummies, melt a few extra white candy melts and add them to a zip-top bag. Cut one of the corners and drizzle white chocolate back and forth across the cake pop. Stick on candy eyes before it sets, or wait until it sets to draw them on.
- To switch up the decorations, add a little green to your mummy cake pops to make some of them Frankenstein cake pops. Or use candy eyeballs or gel food coloring on your pumpkins instead of the pen.
Recipe Tips
- Cool the cake completely: Warm cake can soften the frosting and make the cake balls harder to shape. I like to bake the cake the day before to spread out the prep.
- Crumble finely: Break up any large pieces before mixing in the frosting. Fine crumbs help the cake balls roll smoothly and hold their shape.
- Go easy on the frosting: Add a little at a time, just until the mixture holds together when squeezed. Too much can make the cake balls soft and more likely to fall off the sticks.
- Only work with about 5 pops at a time. You don’t want the others to soften too much as they wait for their turn to be dipped and decorated.
- To make a cake pop stand, use a styrofoam block or a glass full of uncooked rice. This will hold the Halloween cake pops up right as they set. It takes about an hour.
Halloween Cake Pops FAQs
Can I make these without sticks?
Yes! Roll the mixture into cake balls, dip them in the melted coating using a fork, and place on a parchment-lined baking sheet to set. Decorate as directed.
Do Halloween cake pops need to be refrigerated?
No, these can be kept in an airtight container in a cool place at room temperature for up to 4 days. If your kitchen is warm, refrigerate them to keep the coating from softening.
How do I prevent the coating from cracking?
Avoid dipping frozen cake balls into very hot coating. Keep the cake balls chilled but not frozen solid, and let the melted coating cool for a few minutes before dipping.
Why do my cake pops fall off the sticks?
The cake balls may be too large, too soft, or have too much frosting. Dip each stick in melted chocolate, insert it about halfway into the cake ball, and chill until set before coating the whole pop.

More cake pop recipes to try: Oreo cake Pops, Valentine cake pops, Easter cake pops or Grinch cake pops.
More Halloween Recipes

Halloween Cake Pops
Video
Equipment
Ingredients
- 15 ounce box white cake mix , cook according to package directions in a 9×13" pan
- 5 ounce chocolate melting wafers
- 10 ounce package white chocolate melting wafers ,I prefer Ghiradelli
Buttercream Frosting
- 1 stick salted butter , softened
- 2-2 ½ cups powdered sugar
- 1 teaspoon vanilla extract
- 1 Tablespoon heavy cream or milk
For pumpkins
- 10 ounces orange melting wafers
- green frosting
- Black edible ink pen
Optional: Sprinkles, jimmies or other desired decorations
Instructions
Make Buttercream Frosting
- In a medium bowl, whip the butter. Add in 1 cup of powdered sugar. Mix until combined. Add 1 teaspoon vanilla and 1 1/2 cups powdered sugar, a little at a time. Add 1 Tablespoon of heavy cream or milk to make the frosting thick and creamy. It should hold a point.
Make Cake Pops
- In a large bowl, crumble the prepared cake into fine crumbs (make sure it has cooled slightly before crumbling). Add 2 spoonfuls of buttercream frosting to the cake. Combine with your hands or a spoon. Gradually add more frosting until the cake holds together if squeezed (no need to use all the frosting). You don't want it too crumbly or it won't hold together.
- Using a cake pop press or medium cookie scoop and scoop cake mixture. Roll into a ball and place onto a plate. Repeat until all the cake mixture has been formed into balls. Freeze balls for about 10 minutes.
Dip in chocolate
- Right before they are ready to be taken out of the freezer, melt the dark chocolate and the white chocolate in two separate microwave safe bowls. Begin by heating for 30 seconds and then stirring.
- Dip each lollipop stick into the chocolate and then into the center of the cake pop. Return to the fridge or freezer until chocolate is set. Pour chocolate into a glass cup or skinny jar and then dip cake pops, one by one. Gently tap the stick on the side of the melting dish to let the excess drip off. You can also spin or twirl the cake pop to remove the excess.
- Before the chocolate starts to harden, add Halloween sprinkles, jimmies or other decorations. If decorating with more chocolate, let the chocolate covering harden on the cake pop.
For pumpkins
- Dip cake pop in orange chocolate. Allow to harden and then add a little green frosting on top and draw a pumpkin face with the edible pen.
For mummies
- Wait for the first layer of chocolate to harden, then I used a ziplock bag to cut and drizzle more white chocolate melting wafers.
- Push the cake pop stick into a styrofoam block or use a glass filled with rice to hold them upright. The chocolate will be set in about an hour. Store for 3-4 days in an airtight container in a cool place.
Last step: Please leave a comment and rating after you make the recipe.
Notes
Nutrition
Nutrition provided is an estimate. It will vary based on specific ingredients used.

Ellie
These cake pops are so cute and delicious! I followed the instructions and tips and they turned out perfectly!
Sarah @IHeartNaptime
So glad you enjoyed them!
Kristyn
These are the cutest cake pops!! My kids love cake pops. These will be a hit at our Halloween parties!!
Sarah @IHeartNaptime
So glad you enjoy them!
Raley
These were so fun! The kids loved making them together.
Sarah @IHeartNaptime
So glad you had fun making them!
Sarah
We loved these adorable cake pops! So easy to make, too!
Sarah @IHeartNaptime
So glad you enjoyed them!