
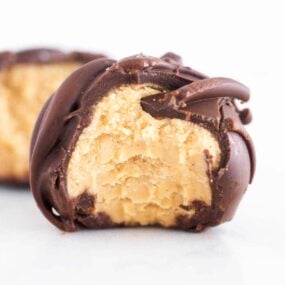
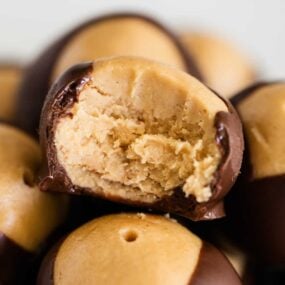
These chocolate cake pops are made with a moist and fudgy chocolate cake dipped into a melted chocolate candy shell. The best bite-sized dessert that’s better than Starbucks!

This post may contain affiliate links. Read disclosure policy.
Copycat Starbucks Chocolate Cake Pops Recipe
Chocolate cake pops are simple to make with a moist chocolate cake and rich chocolate frosting center then coated in a layer of hardened dark chocolate! It’s a triple chocolate dessert recipe that’s better than Starbucks and easy to make at home!
A simple cake pop is so fun to customize and decorate for any occasion. Everyone loves portable food on a stick, making them perfect for birthday parties, baby showers or turn them into Halloween cake pops, Easter cake pops or Valentine’s day cake pops!
Ingredient Notes
- Chocolate boxed cake mix: I find it easiest to use a box cake mix but you can use a homemade cake if preferred. Try my gluten free chocolate cake recipe if needed.
- Frosting: I used my chocolate buttercream frosting, but a can of frosting works, too! You will need half of a 16 ounce can. You could use vanilla frosting if you like.
- Chocolate melting wafers: Chocolate candy melts work too. I prefer these over chocolate chips which doesn’t melt as smoothly. For a Starbucks copycat, stick with chocolate although you could use white candy melts.
- Sprinkles: For a copycat Starbucks cake pop recipe, decorate them with white sprinkles (white nonpareils) after dipping.
How to Make Starbucks Chocolate Cake Pops

Make the chocolate buttercream frosting and bake the cake according to package instructions. Allow it to cool completely before continuing on.

- Mix. Crumble the baked cake into fine cake crumbs using only the smooth center. If any of the edges are hardened and or browned, discard them. Add a few spoonfuls of buttercream to your crumble and combine them together with your hands or a spoon.
- Roll. You want the consistency that will allow you to roll a bit up into a ball without it falling apart. If it is too crumbly, add a bit more frosting until it holds together. Using up all of the mixture, roll into individual balls and place on a plate.
- Add the stick. Melt chocolate in the microwave in 30-second increments until completely melted. Dip the end of the stick into the melted chocolate and push it into the cake pop. Once the chocolate on the end of the lollipop stick sets, it will help keep it in place. Place them in the freezer to set for about 20 minutes.
- Dip the cake pop in chocolate coating. Melt chocolate in a deep bowl or dish to be able to coat the cake pop fully. Once it’s coated, gently tap, twirl, or spin the cake pop to remove excess chocolate.
- Decorate. While the chocolate hasn’t hardened yet (in other words, work quickly!), add sprinkles, jimmies, or other decorations. To add a chocolate drizzle, let it set then drizzle with chocolate. Allow to set at room temperature for an hour then enjoy!
The frosting to cake ratio is key: How much buttercream frosting you use will depend on how moist your cake is. I make half a batch of frosting and then only use about half of that. If it is really moist, I will use even less than that. You want enough so that it doesn’t crumble when formed into a ball. But too much frosting leads to a mixture that is too soft and doesn’t taste like cake.
Tips for Success
- Mix with your hands. This is the best way to incorporate the frosting. It’s messy but you can lick your hands when done.
- Deep narrow cup for dipping. To make life easier, it’s best to use a deep and narrow cup for dipping. Something like a tall glass or a measuring cup.
- Keeping cake pops upright. Use a styrofoam holder or rice in a jar to keep them standing upright to set. Since they don’t need to go back into the fridge or freezer to set, it’s important to find a way to keep them standing up.
- Make-ahead prep. Make the cake and frosting the day before for easy prep. Cool the cake overnight at room temperature and keep the buttercream in the fridge. Bring to room temperature before you begin and you’re all set to go when the time comes.
- Size of cake pop matters. Don’t make them too big. If you’ve ever made this mistake before you’ll know what I’m talking about. The weight will either make it so that it slides down the stick or it will just fall off completely.
- Skip the stick. If you’re in a pinch and have made them too big after all, or just because you want to, skip making Starbucks cake pops and make cake balls.
Storage
Once the Starbucks-inspired chocolate cake pops set, you can store them in an airtight container at room temperature up to a day or two, but then move to the refrigerator to store up to a week.

More chocolate dessert recipes to make include brownie truffles and Oreo balls!
More Sweet Chocolate Desserts


Chocolate Cake Pops
Equipment
- 20 cake pop sticks
Ingredients
- 15 ounce box chocolate cake mix , bake according to package directions in a 9×13" pan
- 10 ounce package dark chocolate melting wafers , I prefer Ghiradelli
Buttercream Frosting
- ½ cup salted butter , softened
- 2-2 ½ cups powdered sugar
- 2-3 Tablespoons natural unsweetened cocoa powder , more or less, to taste
- 1 teaspoon vanilla extract
- 1 Tablespoon heavy cream or milk
Optional: Sprinkles, jimmies or other desired decorations
Instructions
Make Buttercream Frosting
- In a medium bowl, whip 1/2 cup salted butter. Add in 1 cup of powdered sugar. Mix until combined. Add 2-3 Tablespoons cocoa powder, 1 teaspoon vanilla and additional powdered sugar, a little at a time. Add 1 Tablespoon of heavy cream or milk to make the frosting thick and creamy. It should hold a point.
Make Cake Pops
- Bake cake and once the cake has cooled, crumble the prepared cake into fine crumbs. If the edges of the cake have browned I like to remove the edges. Add 2 spoonfuls of buttercream frosting to the cake. Combine with your hands or a spoon. Gradually add more frosting until the cake holds together if squeezed. You don't want it too crumbly or it won't hold together.
- Using a medium cookie scoop, scoop out 1 scoop of cake mixture. Roll into a ball and place onto a plate. Repeat until all the cake mixture has been formed into balls.
Dip in chocolate
- In two small microwave safe dishes, melt a few of the dark chocolate wafers. Begin by heating for 30 seconds and then stirring. Add more wafers and repeat until all the wafers are melted.
- Dip the end of the cake pop stick into the melted chocolate and then push the stick into the cake pop. Then push the stick into the cake pop. Repeat until all cake pops have a stick. Place the plate of cake pops in the freezer for about 20 minutes.
- Right before they are ready to be taken out of the freezer, melt the chocolate. A deep, 2 cup measuring cup will allow you to dip the cake pop in the chocolate, or in a shallow dish, you can spoon the melted chocolate over the cake pop.
- Once coated in chocolate, gently tap the stick on the side of the melting dish to let the excess drip off. You can also spin or twirl the cake pop to remove the excess.
- Before the chocolate starts to harden, add sprinkles, jimmies or other decorations. If decorating with more chocolate, let the chocolate covering harden on the cake pop. Then, using a spoon or fork, drizzle with the additional melted chocolate if desired.
- Push the cake pop stick into a styrofoam block or use a glass filled with rice (or beans) to hold them upright. The chocolate will be set in about an hour. Store for 3-4 days in an airtight container in a cool place.
Last step: Please leave a comment and rating after you make the recipe.
Notes
Nutrition
Nutrition provided is an estimate. It will vary based on specific ingredients used.

Jennifer
It’s hard to not eat every single one of these cake pops when I make them! I LOVE them and so does my husband!
suzy
Every once and a while we try at hand at making fun desserts and these were perfect!