
This cake balls recipe is easy to make with cake mix, frosting and chocolate melting wafers. The perfect bite-sized dessert for parties and special occasions yet simple enough for everyday!

This post may contain affiliate links. Read disclosure policy.
Easy Cake Balls Recipe
Cake balls are so simple to make, yet guaranteed to put a smile on everyone’s face! Just like Oreo balls and sugar cookie truffles they are great for birthday parties, baby showers, wedding showers, and all kinds of special occasions.
This recipe for cake bites can be made with any flavor combination. I often use my homemade vanilla cake mix and recipe for cream cheese frosting but if you like cake pops on a stick, check out my Oreo cake pops or chocolate cake pops!
Why You’ll Love This Recipe
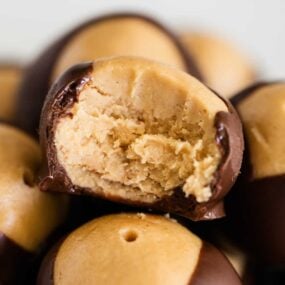
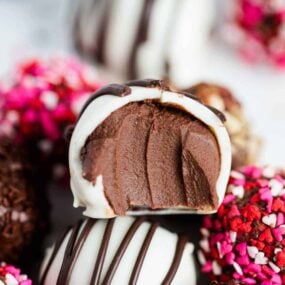
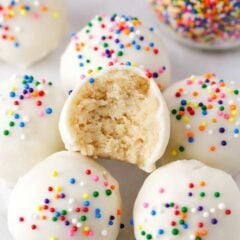
Cake balls are a fun, bite-sized way to enjoy cake and frosting all rolled into one. Simply mix crumbled baked cake with frosting until a soft dough forms, roll into balls, then dip in melted candy coating or chocolate. Decorate with sprinkles or candies to match any occasion for a fun, truffle-like treat that’s simple to make and easy to customize.
Recipe Ingredients

Find the full printable recipe with specific measurements below.
- Box cake mix: Use your preferred mix here. Alternatively, you can bake your favorite from-scratch recipe.
- Frosting: You can use 1/2 of a 16-ounce can or make half a batch of your own. I love this homemade buttercream frosting and chocolate buttercream frosting (if using a chocolate cake mix).
- Chocolate melting wafers: I prefer Ghiradelli, but you can use your favorite candy melts. Find them in the baking aisle of many grocery stores, bulk stores, or order online.
- Optional: Sprinkles or other decorations.
How to Make Cake Balls
These little truffle bites are simple to make and they’re perfect for getting the kids to help out in the kitchen! They’ll love rolling the balls and decorating them with their favorite sprinkles.

- Bake the cake. Use a 9 x 13-inch pan and bake according to the package directions. Leave it to cool. Discard any brown edges.
- Make the dough. Crumble the cooled cake in a large bowl and add 2 tablespoons of frosting. Combine everything using a spoon or your hands. Gradually add more frosting until the dough mixture sticks together when you squeeze it.
- Roll into balls. Use a medium cookie scoop to portion the dough onto a cookie sheet and then roll each portion into a ball using your hands.
- Chill them. Pop the balls into the freezer for a few minutes to firm up slightly. Don’t go overboard. If they’re too cold, it’ll help set the melted candy coating a little too fast!
- Dip in the coating. Melt the chocolate wafers in the microwave and then dip the cool cake balls one at a time into the chocolate and swirl them around to cover them completely.
- Decorate & serve. Place the coated cake balls back onto a parchment-lined cookie sheet and decorate with sprinkles before the chocolate hardens. If you want to drizzle on more chocolate, wait for the first coat to dry.

Expert Tips
- Your dough should be soft, but not sticky. If it feels a little dry, add a touch more frosting until you have the right consistency for rolling.
- Is your chocolate coating too thick for dipping? Stir in a teaspoon of vegetable oil, coconut oil, or canola oil to loosen it up and microwave 15 more seconds.
- Dip 5 cake balls at a time and leave the rest in the freezer. They need to be cold when you’re dipping them, so they hold together.
- This recipe is easily doubled if you’re making these sweet treats for a crowd.
- Tap the cake ball with a fork on the edge of the bowl to remove excess chocolate and then use a toothpick to outline the bottom of the ball when set down.
- Cake balls make a fun party favor for a birthday party, bridal shower to baby shower! Package in a cute box or cellophane bag and gift a few to some neighbors or friends to brighten their day.

Cake Ball Flavor Ideas
With so many different flavors combos of mixes and frostings available, you can make all kinds of cake ball creations! Make all of it from scratch or use a mix of homemade and store-bought.
- Vanilla with vanilla frosting.
- Chocolate cake with chocolate frosting or peanut butter frosting.
- Carrot cake with cream cheese frosting.
- Funfetti cake and vanilla frosting.
- Yellow cake with vanilla frosting.
- Lemon cake and lemon frosting.
- Red Velvet cake mix and cream cheese frosting.
- Spice Cake with cream cheese frosting.
- Strawberries and Cream: Strawberry cake with cream cheese frosting.
You can also use different candy melts like milk chocolate, white chocolate, or pink chocolate to give your pops varying looks.
Sprinkles are also a great way to customize the look of your cake balls.

Looking for more sweet treats? Try funfetti cake mix cookies, chocolate-covered pretzels, chocolate covered Oreos or rocky road candy!
More Sweet Dessert Recipes


Cake Balls
Video
Ingredients
- 1 (15-ounce) box cake mix , use flavor of choice and add ingredients on box
- 1 cup frosting , plus more if needed
- 16 ounces chocolate melting wafers , I prefer Ghiradelli
Optional: Sprinkles or other desired decorations
Instructions
- Mix and bake the cake batter according to package directions in a 9×13-inch baking dish. Bake until a toothpick inserted in the center comes out clean. Let cool completely. Discard any brown edges of the cake.
- In a large bowl, crumble the prepared cake into fine crumbs (make sure it has cooled completely before crumbling). Add 2 spoonfuls frosting and combine with your hands or a spoon. Gradually add more frosting until the cake holds together when squeezed. You don't want it too crumbly or it won't hold together.
- Using a medium cookie scoop, portion the dough onto the baking sheet. Roll into balls with your hands. Freeze 10 to 15 minutes, or until slightly firm. You don't want them frozen.
- Line a baking sheet with parchment paper.
- In a microwave-safe bowl, melt the chocolate in the microwave in 30-second intervals, stirring in-between each, until smooth.
- Use a fork to dip the balls into the chocolate. Tap on the edge of the bowl to get the smooth finish. You can also spin or twirl the cake pop to remove the excess. Use a toothpick to help slide the ball back onto the baking sheet.
- Before the chocolate starts to harden, add sprinkles or other decorations. If decorating with more chocolate, let the chocolate harden on the cake ball before drizzling with the additional melted chocolate. Store in the refrigerator until ready to serve.
Last step: Please leave a comment and rating after you make the recipe.
Notes
Nutrition
Nutrition provided is an estimate. It will vary based on specific ingredients used.
Recipe FAQs
I use a fork to gently lower the cake balls into the coating. A fork works well for letting extra coating run off the ball when you lift it back out of the bowl. I also use a toothpick to help move it off the fork onto the baking sheet.
It’s so easy to do! All you have to do is dip the end of a lollipop stick into some melted chocolate and stick that end through the truffle ball while the coating is still wet and then let the pops freeze for 20 minutes in the freezer. There you go, instant pops!
You can mix the cake and frosting to make the dough and store it in the fridge for up to 2 days. Once you’re ready to finish the recipe, take the dough out of the fridge and scoop and dip it as you normally would.
Keep your cake balls in an airtight container in a cool place for 3 – 4 days. For longer storage, they will keep well in the refrigerator up to 10 days.
Yes, cake balls can be stored in the freezer. It’s a great way to keep them fresh plus they taste great when cold. Store in a freezer safe bag up to three months and then thaw before serving.

Charlie
No I Haven’t Made Cake Balls Just Yet!!! They Look Absolutely Delicious To Eat For Dessert After Dinner Any Day Of The Week!
Kristyn
These are the prettiest cake balls!! And, they taste so good!! They are super easy to pop in your mouth & perfect for any occasion!!
Mel
These were so fun for my daughter’s birthday party! So cute and DELICIOUS!
Krissy
The recipe was so easy to follow and the kids absolutely loved them! I can’t wait to try out other variations. SO FUN!
I Heart Naptime Community
I’m so glad you enjoyed the cake balls Krissy!
April
Love cake balls! They’re so fun to make and even more fun to eat. :)
Abeer
I love making these with all the little ones in the family. It’s so much fun and delicious too.
Jamielyn Nye
My kids love making them too! Glad you enjoyed the cake balls!
Andie
This is the perfect dessert recipe for parties and get togethers!! So yummy and so easy to make and eat