
Celebrate the season with these fun Halloween Oreo balls made into pumpkins, spiders, mummies, ghosts or sprinkles. An easy no-bake dessert idea with only 3 ingredients!

This post may contain affiliate links. Read disclosure policy.
No-Bake Halloween Oreo Truffles
These Halloween Oreo balls are one of my favorite treats to make this time of year! Decorated as ghosts, mummies, spiders, pumpkins, and topped with festive sprinkles, they’re just as adorable as my Halloween cake pops and just as fun to make, too.
I love easy, Halloween desserts, and these Oreo balls check all the boxes. They’re made with a creamy Oreo and cream cheese filling, then dipped in chocolate for the ultimate bite-sized Halloween treat.
Bring them to your next Halloween party along with a bowl of Halloween Chex mix or let the kids join in on decorating these or a Halloween gingerbread house! They’re always a hit and make a great edible craft.
For even more festive sweets, don’t miss these Halloween Rice Krispie treats, spider cookies and this Halloween dirt cake recipe.
Recipe Ingredients
Find the full printable recipe with specific measurements below.
- Oreos: I like to crush 1/2 whole Oreos and 1/2 without the filling to cut down on the sweetness, but they taste great either way.
- Cream cheese: This gives these Halloween treats their creaminess, as well as acts as a binder to keep the cookie crumbs together.
- Melting chocolate wafers: The chocolate holds the balls together and gives the type of spooky treat its base color.
- Decorations: Each sweet comes to life thanks to a few items, like mini candy eyes, M&Ms, black licorice string, seasonal sprinkles, and pretzel sticks.
How to Make Halloween Oreo Balls
Each of the different Halloween Oreo ball variations start out with the same base instructions below.

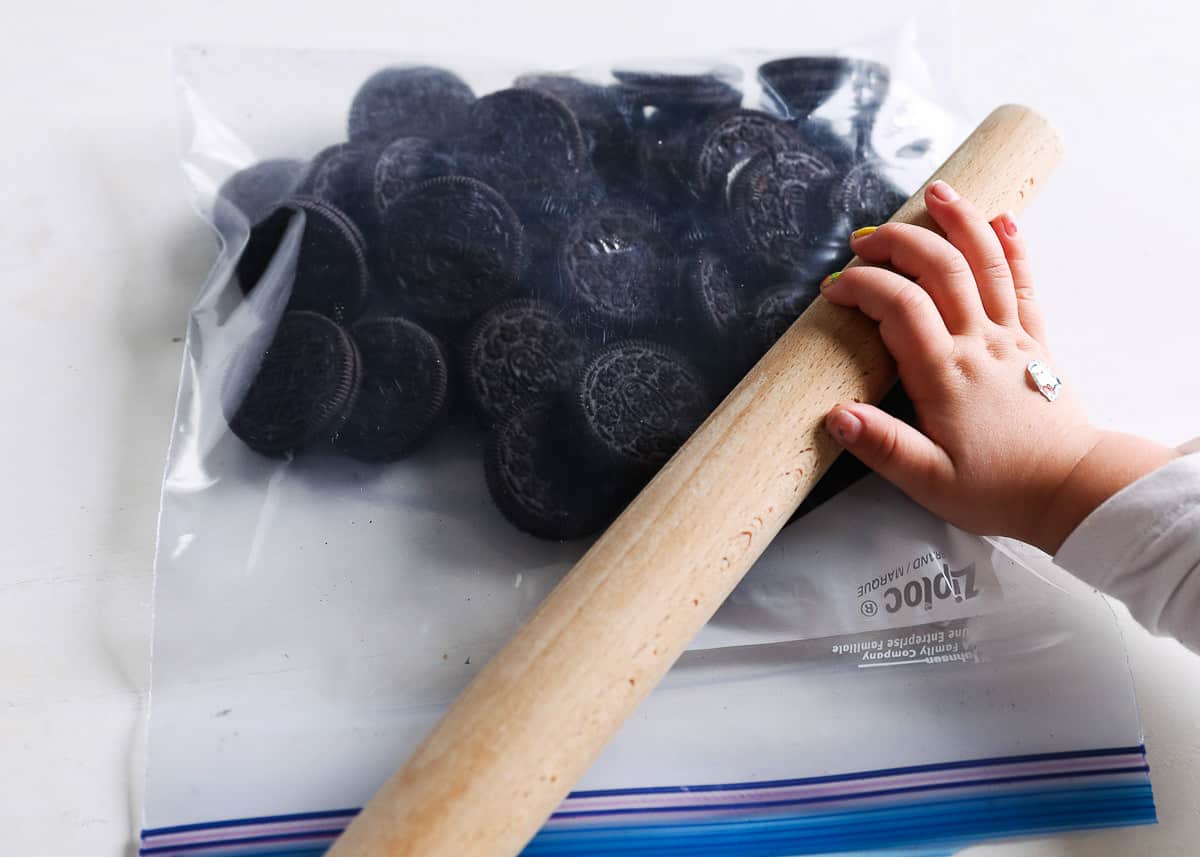
- Crush. Crush Oreos, including filling, into a crumb-like texture. This can be done with a food processor or by putting the Oreos in a zip-top bag and crushing them with a kitchen mallet or rolling pin.
- Mix and scoop. In a large mixing bowl, using a hand mixer, combine crushed Oreos and softened cream cheese. Then using a small cookie scoop, scoop out dough and roll Oreo mixture between your hands to form balls. Place on the parchment lined cookie sheet. Freeze for 10-15 minutes or until they are slightly firm.
- Melt. In a microwave safe bowl, melt the chocolate by following the package instructions. Stir until the consistency is smooth.
- Dip. Drop the Oreo balls into the chocolate and roll it around in the dish coating the entire ball. Using a fork, lift the ball out and tap the fork on the edge of the bowl to remove excess chocolate. Transfer to baking sheet.
5 Cute and Spooky Halloween Oreo Balls
Once you’ve made the base recipe, try decorating the Oreo balls with any of the 5 Halloween variations below. Each of these are super cute, some spooky and most importantly – easy! They’re made with only a few extra ingredients and look so festive. Everyone will go crazy over this fun Halloween Oreo ball recipe!
Sprinkles
This is definitely the easiest variation. All you need are some fun seasonal sprinkles (I used these Halloween sprinkles). Once you dip the cookie balls in melted chocolate (use whichever color you’d like), immediately add the sprinkles on top. Make sure to act fast before it hardens!
TIP: Using a cookie sheet will help to contain the excess sprinkles. Then you can pour them back into the container so there’s no waste. And less mess :)

Ghost
Next comes the Halloween ghost truffles. Instead of dipping them into the bowl of melted white chocolate, spoon it on top and over the edges. This way it partially coats them and pools at the bottom, which gives them that realistic “ghostly” covering. Then apply the mini chocolate chip eyes with a tiny bit of melted chocolate.
Make sure to let the chocolate totally set before moving the ghost. Because of the way it is allowed to pool on the parchment, it takes a little longer to harden. Moving it before then ruins the shape of the ghost.
TIP: You can also press the mini chocolate chips into the face as the chocolate is hardening, but I like to wait so that I can pick the cutest side of the ghost for the face.

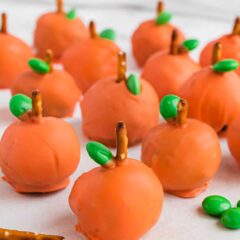
Pumpkin
These might be my favorite variation of these cute Halloween Oreo treats. You’ll need orange vanilla flavored candy melts for this, as well as green M&M’s and pretzel sticks (broken into 3 pieces).
Once you dip the cookie ball into the melted chocolate, immediately press a pretzel piece into the top to form the stem. To make the pumpkin leaf, dip a green M&M slightly into the melted chocolate and hold it on top next to the pretzel for about 20 seconds. You could even add a spooky face to make them into jack-o-lantern Oreo balls.
TIP: Don’t worry if they aren’t perfectly round! I actually thought the ones that were a little misshapen were the cutest and more realistic pumpkins.

Mummy
It’s not Halloween without a mummy decoration! Halloween mummy Oreo balls are so simple to make and look so spooky and festive. Dip the cookie balls in white chocolate, then let it harden completely.
Use a spoon to drizzle some extra white chocolate in a back-and-forth motion to create the “bandage strips” on the mummy’s face. Then apply the candy eyes with a tiny bit of melted chocolate.

Spider
For this version, it’s important to move very fast in order to be able to decorate while the chocolate is still soft. Once you dip the cookie balls into the dark chocolate, immediately press 6 licorice legs into the body of the spider. If it hardens before you’re finished, you can also apply the legs with a tiny bit of melted chocolate (hold for about 20 seconds). Then apply the candy eyes with some melted chocolate as well.
TIP: The black licorice laces are a bit expensive, so I bought these licorice wheels from Amazon and unrolled them and cut the lengths I needed.
Helpful Tips
- Type of chocolate. My favorite type to use for Halloween Oreo balls are Ghirardelli melting wafers. They’re high quality, have a smooth finish and taste super delicious.
- Melted chocolate. It needs to stay in a melted state the entire time you are coating the Halloween Oreo truffles. This is important because the chocolate changes color while cooling. To ensure a uniform color, make sure it stays melted. Also if the chocolate is too close to setting up, it acts like cement and sticks to the fork (which makes it difficult to slide onto the parchment paper). Check out these tips for how to melt chocolate.
- Be prepared. For best results, make sure to have all of the decorating accessories out and ready so that you can decorate FAST. There are several versions where you need to add the decorations while the chocolate is still wet. Act quickly with these fun Halloween treats before it hardens!

Don’t miss these festive Halloween recipes! These white chocolate strawberry ghosts, Halloween candy popcorn and mummy dogs add to the fun!
More Halloween Recipes


Halloween Oreo Balls
Video
Ingredients
Base
- 36 Oreo cookies (see notes)
- 1 (8-ounce) package cream cheese , softened
- 8 ounces chocolate melting wafers (dark chocolate for spider, white chocolate for mummy and ghost, orange for pumpkin, color of choice for sprinkle version)
Spider
- Black licorice laces , cut into 2 1/2”-3” pieces
- Mini candy eyes
Mummy
Ghost
Pumpkin
- Pretzel sticks , broken into 3 pieces
- Green M&M's
Sprinkle
- Seasonal sprinkles
Instructions
Base
- Crush Oreos. Line a baking sheet with parchment paper. In a blender or food processor, pulse 36 Oreo cookies (with filling) into fine crumbs. You can also place the Oreos in a zip-top bag and use a rolling pin to crush them.
- Combine Oreos and cream cheese. In a large bowl, mix together the Oreo crumbs and 8 ounces cream cheese with an electric mixer. If it isn't coming together, get your hands in there and mix it up.
- Shape into balls. Using a small cookie scoop, portion the dough onto the baking sheet. Roll into a ball with your hands. Freeze 10 to 15 minutes, or until slightly firm. You don't want them too cold.
- Dip. In a microwave-safe bowl, melt the chocolate (color will depend on which one you are making) in the microwave in 30-second intervals, stirring in-between each, until smooth. Use a fork to dip the Oreo balls into the chocolate (unless making ghosts). Tap on the edge of the bowl to get the smooth finish. Use a toothpick to help slide the ball back onto the baking sheet.
Spider
- Before the chocolate hardens, press 6 licorice legs into the Oreo balls or body of the spider. If the chocolate hardens before all the legs are attached, you can dip the ends of the licorice laces into the melted chocolate and hold them in place about 20 seconds, or until the chocolate hardens. Using a toothpick, put a tiny bit of melted chocolate on the back of the candy eyes and adhere them to the spider.
Mummy
- Let the chocolate harden. Drizzle some white chocolate over each Oreo ball in a back-and-forth motion to create the “bandage strips” on the mummy’s face. Using a toothpick, put a tiny bit of melted chocolate on the back of the candy eyes and adhere them to the top of the Oreo ball to finish the mummy’s face.
Ghost
- Instead of dipping the Oreo balls into the melted chocolate with a fork, spoon it over the top and over the edges so that it partially coats the Oreo ball, but leaves some exposed. Let the chocolate pool on the parchment, creating a white “ghostly” covering. Let the chocolate harden. Using a toothpick, put a tiny bit of melted chocolate on the bottom of the mini chocolate chips and adhere them to the front of the Oreo ball to make the ghost’s eyes.
Pumpkin
- Before the chocolate hardens, press 1 pretzel piece into the top of each Oreo ball, forming the pumpkin stem. To make the pumpkin leaf, dip the green M&M slightly into the melted orange chocolate and hold it in place, about 20 seconds, to adhere it to the top of the pumpkin.
Sprinkles
- Before the chocolate hardens, add seasonal sprinkles. Let harden completely.
- Store in the refrigerator until ready to serve.
Last step: Please leave a comment and rating after you make the recipe.
Notes
Nutrition
Nutrition provided is an estimate. It will vary based on specific ingredients used.
Recipe FAQs
While all chocolate will melt, the one that will melt and stay shiny (not chalky when it resolidifies) contains 32 percent, or higher, cocoa butter. I like to use the melting chocolate wafers because I know I can trust how the chocolate will turn out.
No worries! You can create a double-boiler with a small pot and a heatproof bowl (I like stainless). Place the bowl over a pot with boiling water, being careful not to let the water touch the bottom of the bowl. Place the chocolate in the bowl and let sit 1-2 minutes, or until the edges begin to melt. Stir until almost smooth. Carefully remove from heat and stir until completely smooth.
Absolutely! If stacking in layers in a freezer-safe container, I would suggest using parchment or wax paper between each to keep the balls from sticking. Let thaw at room temperature before serving. You can freeze these treats up to 2 months.
Yes, since they have cream cheese in the base, you will want to store them in an airtight container in the fridge.

Belinda
Love the recipe ideas. Going to try a few
Suzy
We loved them! Turned out super cute and the kids has a great time helping!
wilhelmina
These make for such a fun and delicious treat! They are perfect for Halloween and I plan to make the pumpkins for Thanksgiving too!