
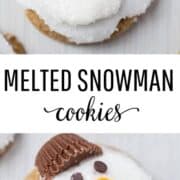
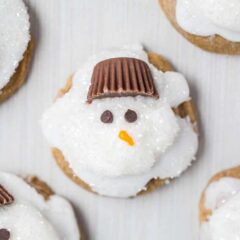
These melted snowman cookies are made with a gingerbread cookie base, marshmallow belly, peanut butter cup hat and chocolate chips. Such a cute winter treat!
If you love cookie recipes with the warm taste of ginger, try ginger molasses cookies, gingerbread whoopie pies or these gingerbread bars.

This post may contain affiliate links. Read disclosure policy.
Table of Contents
Gingerbread Snowman Cookies
If you’re looking for fun holiday baking recipes to enjoy with your kids, these easy melted snowman cookies are one of our favorite Christmas cookies! They taste similar to gingerbread man cookies but with the adorable melted snowman face on top.
My kids loved helping me make gingerbread snowman cookies. They aren’t usually fans of gingersnap cookies, but they gobbled these right up. I don’t like my ginger cookies too gingery, if you know what I mean. They have just the right amount of spice and are super soft.

Snowman Cookies Ingredients
- Butter: Unsalted butter that has been softened to room temperature.
- Sugar: Brown sugar, white granulated sugar and molasses for classic gingerbread flavor.
- Baking staples: Large egg, all-purpose flour, vanilla extract, baking soda and salt.
- Warm spices: Ground ginger and ground cinnamon
- Glaze: Powdered sugar and water.
- Snowman decorations: Large marshmallows, mini Reese’s peanut butter cups, mini chocolate chips, orange food coloring and sprinkles.
Recipe Variations
- Dairy free: Use dairy free butter and dairy free decorations.
- For an easier option: Purchase pre-baked cookies or slice and bake cookies, melt the marshmallow on top and follow decorating instructions.
- More cookie options: Instead of a gingerbread snowman cookie, use Christmas sugar cookies or for a chocolate melting snowman use my hot chocolate cookies.
- Glaze: Use my powdered sugar glaze or cream cheese glaze.
How to Make Melted Snowman Cookies

- Make the dough. Start by beating the butter and sugar until creamy. Then mix in the egg, molasses and vanilla until smooth. In a separate bowl, whisk together the dry ingredients. Then slowly add dry mixture to wet mixture and stir until combined.
- Bake in oven. Scoop the dough onto a parchment lined baking sheet using a medium cookie scoop. Bake at 350ºF for 7-8 minutes, or until the centers are set. Remove from oven and place a marshmallow on top of each cookie. Place back in oven and cook an additional 2 minutes.
- Press marshmallow flat and cool: Move cookies to a cooling rack and then using a spatula, press down on the marshmallow until it slightly flattens. Cool completely.
- Decorating the snowman cookies: Make the icing by whisking together powdered sugar and water then spoon the icing over the marshmallow and immediately add the Reese’s cup hat and chocolate chip eyes. Add the nose by tinting remaining icing orange.

Tips for Success
- Make sure the cookies have cooled completely before decorating. You don’t want the decorations to melt!
- Once you’ve spooned the icing on top, immediately add the hat and eyes. They won’t stick once the icing hardens.
- I also added sprinkles to give my cookies that shimmery snow look. This is optional, but it makes them look extra festive!
- Instead of piping on the nose, you could also use an orange sprinkle.
- These cookies will stay fresh for up to 3 days. Just make sure to store in an airtight container.

More fun holiday treats to try include Snowman Oreo balls, Rolo pretzels and M&M Christmas cookies.
More Festive Christmas Treats


Melted Snowman Cookies
Ingredients
Cookies:
- ¾ cup unsalted butter , softened
- ½ cup granulated sugar
- ½ cup light brown sugar
- 1 large egg
- 3 Tablespoons molasses
- 1 teaspoon vanilla extract
- 2 ¼ cups all-purpose flour
- 1 ½ teaspoons ground ginger
- 1 teaspoon ground cinnamon
- 1 teaspoon baking soda
- ½ teaspoons salt
Icing:
- 1 cup powdered sugar
- 1 Tablespoon warm water
Decorations:
- 12 large marshmallows , cut in half
- Miniature Reese’s peanut butter cups , cut in half
- mini chocolate chips
- orange food coloring , for noses
- sprinkles , optional
Instructions
- Prep. Preheat oven to 350ºF. Line a baking sheet with parchment paper or a silicone mat and set aside.
- Cream. Cream 3/4 cup butter with 1/2 cup brown sugar and 1/2 cup granulated sugar in a large bowl. Add in one egg, 3 Tablespoons molasses and 1 teaspoon vanilla extract then mix until smooth.
- Whisk dry ingredients. In a separate bowl, whisk together 2 1/4 cups flour, 1 1/2 teaspoons ginger, 1 teaspoon cinnamon, 1 teaspoon baking soda and 1/2 teaspoon salt. Slowly add to the sugar mixture, and stir until combined.
- Scoop and bake. Using a medium scoop or spoon, place the dough onto the baking sheet. Bake for 7 to 8 minutes, or until the center is no longer doughy.
- Place marshmallows. Remove from oven and place the marshmallow on the top of the cookies then place back in the oven for 2 minutes.
- Cool. Remove from oven and allow to cool on a cooling rack. Press the marshmallows down with a spatula, to flatten slightly.
- Add decorations. Once the cookies have cooled, mix together 1 cup powdered sugar and 1 Tablespoon water in a medium size bowl. You want the icing to be pretty thick, yet still smooth. Add more water or powdered sugar if needed. Then spoon the icing on top of the marshmallow. Immediately put the Reese’s on top of the cookie and then chocolate chips for the eyes.
- Draw on nose. Mix the orange food coloring into the icing and then place in a zip top bag. Snip the very tip of the bag and draw on a nose.
- Store. Store in an airtight container. Stays fresh for 3 days.
Last step: Please leave a comment and rating after you make the recipe.
Nutrition
Nutrition provided is an estimate. It will vary based on specific ingredients used.

Pam O.
There seems to be a discrepancy in the measurements of butter and sugars between the ingredients list and the directions. Which one do I follow?
Sarah @IHeartNaptime
Sorry about that! The ingredients were correct and I have adjusted the directions.
Denay DeGuzman
These snowman cookies are the most adorable thing ever!!! I’m adding this recipe to our family’s Christmas baking menu. I’m so excited to make them!
Denay DeGuzman
These snowman cookies are the most adorable thing ever!!! I’m adding this recipe to our family’s Christmas baking menu.
Beth
Ok, this just won The Most Adorable Cookies I’ve Seen Award! I’m with you and enjoy my gingerbread to be not too gingery but I do like how cute these are!!
Taylor
These are the absolute cutest! So fun to bring for a holiday party!
Janice
These are just too cute I love snowman anything… Can wait to make them with my grandchildren thanks wuth love Janice