This soft and chewy homemade caramel candy recipe are a treat you’ll reach for again and again. This easy candy recipe is perfect for gifting to friends and family!
Need more candy recipes? A few favorites include rocky road candy, chocolate fudge and buckeyes!

Table of Contents
Best Soft Caramel Candy
I particularly have a soft spot for anything caramel-flavored, like these Rolo cookies, my chocolate fudge caramel brownies or my homemade Twix bars.
I can still remember the first time I had candy made from a homemade caramels recipe. I was hooked and have been making this caramel candy recipe ever since!
Why You’ll Love These Caramel Candies
- Family favorite: This is my go-to recipe and makes the absolute best soft caramel. Every bite is perfection!
- Perfect texture: This caramel candy has incredible flavor that is melt-in-your-mouth delicious. It’s buttery, chewy and so soft!
- Easy to make: The best caramels take a little patience but the ingredients and steps are easy to follow. For an even easier option, though, make these microwave caramels!
Ingredients
Making homemade caramel candy does take a bit of time, but the ingredient list is relatively short and simple.

Find the full printable recipe with specific measurements below.
- Sugar. Make sure to use white sugar for this recipe. If you use light brown sugar, you’ll end up with butterscotch, not caramel!
- Corn syrup. Although some people say you can use either dark or light corn syrup, I prefer to use the light syrup. It has a more mellow flavor, whereas the dark one has a molasses taste.
- Salt. Any type of salt should work fine. However, I am a little partial to sea salt, especially with caramel!
- Butter. This helps give the caramel that warm, rich flavor. Make sure to use salted butter. I like to add it when it’s room temperature.
- Heavy whipping cream. Heavy cream is best for a homemade caramel recipe. You can find this in the refrigerated dairy section, next to the half and half.
- Vanilla extract. If you have been hoarding away your really good vanilla extract, use it for these homemade soft caramels! You don’t need a lot (1 tsp), but it’ll go a long way.
How to Make Homemade Caramel Candy
This caramel candy makes a large batch which is perfect for holiday gifting!

- Simmer. Start by adding sugar, syrup and salt in a large saucepan over medium heat. Stir until mixture is boiling and sugar crystals have dissolved completely. Slowly mix in the cream and keep stirring (don’t let it stop boiling).
- Add. Then mix in the butter and stir it into the mixture. Keep mixture at a boil for about 15-20 minutes, stirring constantly.
- Check temperature. Keep a close eye on the temperature to see when it reaches the soft ball stage. Once it reaches 245°F immediately remove caramel sauce from heat and pour into a buttered 9×13″ baking dish.
- Cool. Allow the caramel to sit on the counter until it hardens (preferably overnight).
- Cut. Once the caramel has set, use a buttered or plastic or sharp knife and begin cutting. For a rectangular shape, cut into 12 vertical rows and then cut 4 caramels from each row.
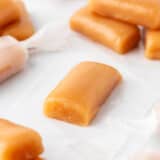
- Wrap. Using wax paper, candy wrappers or cellophane, cut into 3×6-inch squares and wrap each piece inside similar to a tootsie roll.
Caramel Recipe FAQs
If you overcook the caramels or the pan gets too hot, they can become hard. Keep a close eye on the caramel to make sure it doesn’t burn or overcook.
Make sure to wrap the homemade caramels in wax paper and store them in a covered container.
If your caramels become too hard, you can try placing them back in the saucepan and add a few Tablespoons of water and stir until the temperature reads 244°F.
If they are too soft, then the mixture didn’t get hot enough. Place the mixture back in the saucepan with a 2 Tablespoons of water and cook until it reach 244°F.
Wrapped caramels will stay soft in a covered containers at room temperature for about 2 weeks.

Expert Tips
Here are some helpful tips for you to follow to get the best caramel recipe and texture possible:
- Be generous when buttering your pan. The last thing you want is to finish the recipe and have half of your caramels stuck to the baking dish!
- Stir continually. You will definitely get your arm workout in while you make this recipe! It’s important to stir constantly so your caramel doesn’t burn or get stuck to the pan.
- Have a candy thermometer on hand. You want the mix to get to 245 degrees f before it’s removed from heat. Don’t let it get any hotter than this or it will burn!
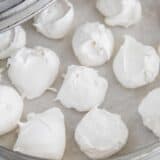
- Test to see if the caramel is done. Even with a candy thermometer on hand, you’ll want to make sure the soft caramel mixture is ready. Scoop out a teaspoon of the mixture from the pan, then drop it into a glass of ice water. If it forms a soft ball, it’s done. If not, keep it on the heat for another minute or so, then do cold water test again.
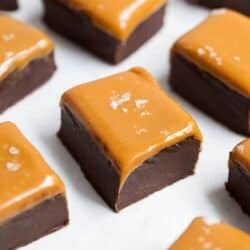
- Optional topping: After your caramel candy has set for 20-30 minutes sprinkle with flakey sea salt then let set completely. After caramels have set completely, you could also drizzle with chocolate if desired.
5 star review
“I’ve made these caramels several times. They are easy to make and delicious . You can package them in different ways to make this homemade treat even more special. Find precut papers or make your own from parchment, then place in a nice box or bag, add a ribbon.”
– Judy

Other must make holiday treats are this homemade hard candy, peanut brittle and this recipe for Christmas crack!
More Candy Recipes
Browse all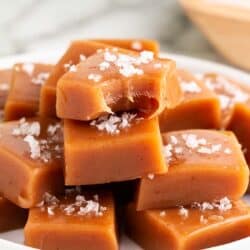


HUNGRY FOR MORE? Subscribe to my newsletter and follow on Facebook, Pinterest and Instagram for all the newest recipes!
Caramel Candy Recipe
Video
Equipment
Ingredients
- 2 cups granulated sugar
- 2 cups light Karo syrup
- ¼ teaspoon table or fine salt
- 2 cups (1 pint) heavy whipping cream , at room temperature
- ½ cup salted butter , cubed
- 1 teaspoon vanilla extract
Instructions
- Line a 9×13-inch baking dish with parchment paper or generously butter and set aside so it is ready. Fill a small glass with ice water.
- In a large, stainless steel pot, whisk together the sugar, Karo syrup, and salt over medium-high heat until bubbling the sugar has dissolved. In a very slow trickle, whisk in the cream, being careful not to stop boiling. Whisk in the butter.
- Whisking constantly, keep the mixture at a boil 15 to 20 minutes, or until the temperature on a candy thermometer reads 240°F to 245°F (firm ball stage). To be certain the caramel is ready, drizzle 1 teaspoon into the ice water. Roll it between your fingers and if it forms a firm (yet pliable and little sticky) ball, it’s ready. If it’s still liquid, keep boiling and whisking.
- Immediately remove from heat and whisk in the vanilla. Then pour into the baking dish. Don't let it overcook or the caramels will be too hard. Let sit on the counter to cool and until set. Usually, I will make in the evening and let sit overnight.
- Once set, use a buttered or plastic knife to cut into 12 vertical rows, Cut 4 caramels from each row. Cut wax paper into 3×6-inch squares and then wrap the caramel inside. Caramels will stay soft for 2 to 3 weeks.
Notes
Nutrition
Nutrition provided is an estimate. It will vary based on specific ingredients used.
Did you make this recipe? Don’t forget to give it a star rating below!

Categorized as: American, Candy + Fudge, Christmas, Desserts, No-Bake, Nut-Free, Vegetarian

Jamielyn Nye is the founder and recipe creator at I Heart Naptime. She is also the author of the I Heart Naptime Cookbook. Here you will find easy family-friendly recipes for every occasion.


I’m glad you gave the instructions for the cold water test. Candy thermometers can differ wildly in readings. I’ve found the best way to test it is to put it in boiling water and see if it registers 212 degrees. If it does, your thermometer is accurate. If not, you’ll need to adjust your cooking time for how much it was off. I have a good candy thermometer, but I still use the cold water test to make sure.
I have never made carmels and these turned out perfect and to die for! I can’t wait to send them to my parents. I buy them their favorite caramels every year for Christmas, but not any more. These taste better! They are buttery and melt in your mouth. Not too sweet at all. I added toasted pecans and they are perfect.
These are some of my favorites! I’m so glad you liked them too :)
Used this recipe several times to use when making turtles. Its perfect. I do suggest low balling the temperature if you like your caramel on the softer side. To all those whose caramel was too hard, DONT TOSS IT AWAY!!!! All you have to do is reheat it in a saucepan (cut in half). Once it softens add a couple tablespoons of water or cream and bring back to a slightly lower temperature. Then follow steps as you did before ;)
I believe I’ve made your recipe before, and cannot wait to make more. would I need to change anything before dipping in chocolate?
Just make sure the caramels are completely cooled before dipping in chocolate :)
I cooked mine to 242F and after sitting overnight they’re a bit too firm. Not soft enough. I’m at 3500 feet above sea level so from what I know I’m supposed to decrease by 1 degree for each 500 feet. Should I try re-melting the mixture in a pot and add a couple tbsp of water and bring to a temp of 237F??
Love it
I made this to give out at Christmas and it was such a hit, I was requested to make it again the next year.
I can’t wait to try this recipe! I think I’m going to add some pecans. My mother used to make these and she called them caramel kisses. My daddy loves them. It’s same recipe except she put chopped pecans in the mixture before she poured it out in the pan. You’re right butter butter, butter, your pan! I learned the hard way when I helped her.
Excited to try this recipe. Can maple syrup be partially sub’d for Karo syrup?
I have not tried it with maple syrup. It may not thicken as well and it will alter the flavor a bit. If you try it, let us know how it turns out!
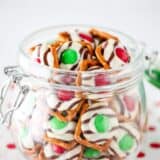
These are so delicious! I used them to make caramel wrapped pretzels and got so many compliments! The caramel is so smooth!
That is great to hear! I am glad that you used them with pretzels too. Thanks for the great review!
I made it WITHOUT a candy thermometer, so it got hard… lol it was 100% my fault, but I’m still gonna use it. (I own4 thermometers so yea, no excuses)
I made it for cookies, so It may turn out perfectly. (I use toffee for a different recipe, so this may work. I’ll report back when I’m finished LOL! I’ll make it properly next time. The flavor is perfection though thanks for the recipe.
Oh no, I am sorry to hear that! Glad that you can use it next time. Thanks for sharing your results and how they turned out!
Love the recipe very easy too make.
Thanks for the 5 star review on these homemade caramels!
Forgot to add that once I poured the caramel into a 9×13 pan I sprinkled salt on top! Wish I had added a bit more, but it was perfect.
So glad you enjoyed the homemade caramels! Yes, love adding flaked sea salt on top. So yummy!
Delicious!! Exactly what I was looking for! I’m so surprised I made it right 🙂 I’m definitely going to make these again!!!
Made this loved the ease of it an was so yummy will be making more
Great recipe! I made sure to read through both sets of instructions, before and after the ingredient list. I followed each step carefully. I have never made caramel before and this recipe came out perfectly. The caramel is delicious and silky.
I found 2 minutes in the refrigerator before cutting made it easier to cut and the caramel released from the parchment paper more easily.
Out of this world delicious!!!!!