
Learn how to roast garlic and start adding it to all your soups, sauces, stews, and more. It delivers a delicious caramelized nutty flavor boost that only roasted garlic can offer!

This post may contain affiliate links. Read disclosure policy.
Table of Contents
Roasting Garlic is Easy!
Learning how to roast garlic is a useful culinary skill that you’ll use to elevate the flavor in so many dishes! It’s just as easy as learning how to mince garlic and knowing how to do either is a trick every home cook should have up their sleeve.
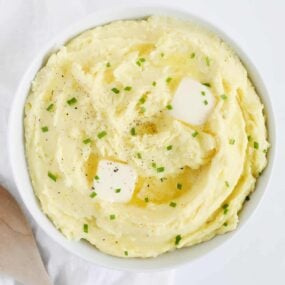
It’s a way to infuse a dish with the nutty, buttery aroma and flavor that can transform condiments, sauces, and dips like garlic aioli. It can level up your morning scrambled eggs and potato side dishes like garlic mashed red potatoes. It becomes so buttery soft that you can even spread it and make compound butter like this garlic herb butter with it!
You don’t have to be a garlic lover to recognize that mouthwatering aroma of roasted garlic. In fact, the roasting process helps to mellow out the flavor and dials down the pungency so you’re left with a mild caramelized sweet flavor without the taste of raw garlic. It’s brilliant!
Why You’ll Love Roasting Garlic
- It’s easy. There is minimal prep to be done and just 2 ingredients. The oven does all the work!
- Great for batch meal prepping. Roasting whole bulbs can be done ahead of time and stored in the fridge or freezer for later!
- Mouthwatering and impressive. The smell alone lets everyone know that something special is going on in the kitchen.
- You’ll never run out of ways to use it. Roasted garlic is so versatile! Spread it on a toasted baguette for a snack, add some to your homemade pizza, and toss some into your marinara sauce, your soups, and your salads.

You Need Just 2 Ingredients!
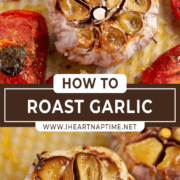
- A whole head (or whole heads of garlic): Remove any loose leaves from the peel of the bulb. With a sharp knife, cut about 1/4 to 1/2 an inch off the top, exposing the individual cloves of garlic.
- Olive oil: A nice neutral-tasting oil helps with the roasting process and getting it to caramelize.
How to Roast Garlic in the Oven
This recipe is written for one whole bulb of garlic, however, it’s just as easy to make a batch.
- Prepare the bulb. Preheat the oven to 400 degrees and lay a piece of aluminum foil on top of a baking sheet. Place the bulb onto the prepared sheet with the cut side facing up. Create a foil packet surrounding the garlic with the foil by pulling up the sides. Do this before adding the oil that way it doesn’t run all over the place.
- Drizzle the oil on top of the head of garlic and loosely contain the bulb and seal any openings.
- Roast for 40-45 minutes. It should be golden brown and tender.
- Let the roasted garlic cool to the touch and then with your hands, squeeze out the cloves onto a dish to use immediately or into an airtight container for storage.
How to Roast Garlic in Bulk
It’s super simple and efficient to make multiple bulbs at a time, using this same roasted garlic recipe. Grab a muffin tin and place the bulbs exposed side up. You can make as many as you can fit in as many trays as you have!
Drizzle each one with olive oil and cover the muffin tins with foil. Bake for 35-40 minutes until done.

Tips & Variations
- Avoid bitterness. Your best defense is to make sure you’re using fresh garlic. The age of your bulb can determine the flavor outcome. If you are still finding it bitter, it may be because you have your heat too high. Lower it and roast it for a little while longer.
- Without foil. If you have no foil, you can use parchment paper. Ensure all the openings are sealed. If you are using a muffin tin to make a bunch, you can use a second muffin tin, and turn it upside down on top to cover them.
- Parchment paper. If choosing to use parchment paper, be sure to trim any loose ends so that they don’t touch the element.
- Butter. If you prefer butter you can use it instead of olive oil. Or use both.
- Seasoning. A sprinkle of salt, pepper, thyme, or rosemary, can boost the flavor. This is especially tasty when you’re eating it on its own.
Ways to Use Roasted Garlic
Now that you know how to roast garlic you can use this method whenever you want!
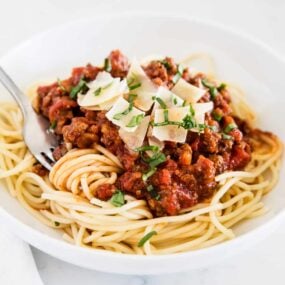
- Use it in roasted garlic tomato sauce and by following the recipe you can learn how to roast garlic and tomatoes at the same time! Your pasta dishes like this easy lasagna recipe will never be the same!
- Add a garlicky punch to this creamy white bean hummus and use it to dip veggies, crackers, and bread!
- Swap minced garlic for roasted in this roasted salsa recipe. It would pair so nicely with the smoky char of the roasted tomatoes.
- Boost the flavor of this creamy garlic white pizza sauce and make it a slice to remember.
Storage
Once you’ve squeezed the cloves out of the bulb, store them in an airtight container in the fridge for up to 5 days.
FAQs
There are a few ways. You can freeze the whole cloves in an airtight freezer-friendly container for up to 3 months. Or, you can mash them first and flatten them into a thin layer and freeze them that way. Finally, you can freeze mashed garlic in ice cube trays for individual portions. This is great for when you need just a bit for a single recipe.
Leave it at room temperature for 10-15 minutes. It thaws quickly!
If you prefer to roast separated cloves you can! Keep the skin on, and wrap a bunch in foil, drizzle with olive oil, and seal, just as you would a whole bulb. Roast for 15 minutes before checking on them. They will be done a lot faster this way.
The foil helps to protect it from being exposed to high heat too quickly. Making sure it’s completely sealed will help the outer edges from burning. Also, you don’t want to have your oven any higher than 400 degrees F. If you have the time, you could even turn it down a bit and roast it for a little while longer.

More Recipes to Use It In
Adding roasted garlic to any of the below recipes would really take them up a notch!


How to Roast Garlic
Ingredients
- 1 large head garlic
- 1-2 teaspoons olive oil
Instructions
- Preheat the oven to 400°F. Lay a large sheet of aluminum foil flat on a baking sheet.
- Remove any loose outer, papery layers from the head of garlic. Cut 1/4 to a 1/2 inch off the top, exposing the individual cloves. Place, cut-side up, on foil. Pull the sides of foil loosely up around the garlic to create a bowl.
- Drizzle oil over the top. Pull the foil loosely around the garlic and seal any openings.
- Roast 40 to 45 minutes, or until the cloves are lightly browned and feel soft when pressed.
- Let cool to touch. Use your fingers to squeeze the roasted garlic cloves out of their skins.
Last step: Please leave a comment and rating after you make the recipe.
Notes
- Remove the cloves and freeze whole in an airtight container for up to 3 months. Thaw at room temperature 10 to 15 minutes.
- Mash the roasted garlic and place in a freezer-safe bag. Spread it into a thin layer before freezing to make it easy to use small portions when needed. Freeze up to 3 months.
- Place mashed garlic into a small ice cube tray and freeze up to 3 months.
Nutrition
Nutrition provided is an estimate. It will vary based on specific ingredients used.
