This copycat Olive Garden breadsticks recipe makes soft, buttery and chewy homemade breadsticks that are irresistible with a garlic butter topping!

This post may contain affiliate links. Read disclosure policy.

Copycat Olive Garden Breadsticks
I’ve been wanting to make copycat Olive Garden breadsticks for a while now that are a little closer to the original than my easy breadsticks recipe. I say I’ve accomplished my mission because these are pillowy-soft and taste even better than the original!
We love recreating the restaurant experience right a home with these other copycat recipes that go perfect with the breadsticks: Olive Garden chicken gnocchi soup or pasta e Fagioli with a side of Olive Garden salad and their signature Olive Garden dressing! It’s soup and salad with a side of breadsticks right here in my own kitchen.
Ingredients You’ll Need
Find the printable full recipe with measurements in the recipe card below.
- Warm water: About 105-110°F. Too hot kills the yeast, too cool won’t activate it. Warm to the touch, not steaming.
- Active dry yeast: This is what we use here, but instant yeast works in equal amount and will rise a bit faster. Either way, proof it first to confirm it’s alive.
- Granulated sugar: Feeds the yeast and adds a touch of sweetness. Honey works too.
- All-purpose flour: Unbleached is best for flavor. Bread flour also works if that’s what you have.
- Fine sea salt: For flavor and to control the yeast.
- Extra-virgin olive oil: Goes into the dough for a soft, tender crumb.
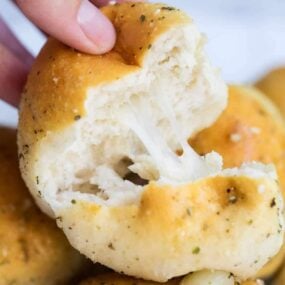
- Salted butter: Melted, for brushing the tops. The buttery finish is what makes these taste like the restaurant version.
- Garlic powder and garlic salt: Whisked into the melted butter for that signature garlicky topping(a pinch of Italian seasoning is a nice optional add too).

How to Make Olive Garden Breadsticks
They’re simple enough to whip up when the cravings come calling and believe me, they will. Having a basket of these copycat Olive Garden breadsticks is a surefire way to be full before dinner and not be the least bit sorry about it!
- Proof the yeast. Mix the warm water, sugar, and active dry yeast and let it sit and foam up for 5 minutes. For details on how to proof yeast, I’ve got you covered.
- Knead the dough. In a large bowl or the bowl of a stand mixer, combine all-purpose flour and salt. Stir in the yeast mixture along with the olive oil and start kneading. Use your hand or a dough hook, it’s up to you.
- Let it rise. Add 1/2 cup of flour at a time until the dough is smooth. It should no longer be sticky. Cover the bowl with saran wrap and allow it to rise in a warm place for 15-30 minutes.
- Roll into logs. Transfer dough to a lightly floured surface and divide it into 16 pieces, rolling them into 8-10″ logs. Place them on prepared baking sheets about 2 inches apart. Allow them to rest for 10 minutes.
- In the oven, they go! Bake for 10 minutes then remove them from the oven to brush with the melted butter, garlic powder, and garlic salt mixture. Bake for 3-5 more minutes until lightly golden brown on the bottom.
- Finish off with another brushing of that delicious garlic butter!
Recipe Tips
- Bread recipes rely on properly measuring flour! Use the spoon and level method for best results.
- Don’t skip the rest after rolling. Those 10 minutes before baking are what give the breadsticks their pillowy texture. Skip it and you’ll end up with denser, flatter results.
- Roll them evenly, end to end. Uneven thickness means the thin ends overcook before the middles are done.
- Brush the butter twice. Once part way through baking and again right when they come out of the oven. That final brush is what gives them a restaurant-style finish.
- To get the tops of the breadsticks a little browner, bake a few extra minutes or move them to the top rack for the last couple minutes.
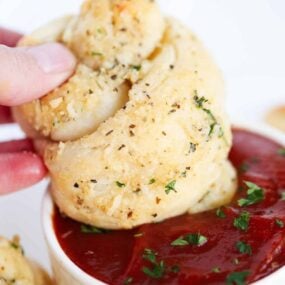
Dipping Sauces
Serve these warm with marinara sauce for classic dipping. A creamy garlic sauce, white pizza sauce, or ranch dressing are all great too.

These Olive Garden breadsticks are perfect alongside other copycat favorites like zuppa toscana or Olive Garden crockpot chicken. They’re also a classic pairing with spaghetti and meatballs for an easy weeknight dinner.
More Easy Bread Recipes

Olive Garden Breadsticks Recipe
Ingredients
- 1 ½ cups warm water , about 105°F-110°F
- 1 Tablespoon active dry yeast
- 1 Tablespoon granulated sugar , or honey
- 3 ¼ cups (422 grams) all-purpose flour , plus more for rolling
- 2 teaspoons fine sea salt
- 1 Tablespoon extra-virgin olive oil
- 4 Tablespoons salted butter , melted
- ¾ teaspoon garlic powder
- ¾ teaspoon garlic salt
Instructions
- In a small bowl, mix the water, yeast, and sugar until just combined. Cover with plastic wrap and let sit 5 minutes, or until it begins to foam.
- In a stand mixer fitted with a dough hook, combine 1 cup flour and salt. Stir in yeast mixture and olive oil. Add 1/2 cup flour at a time until the dough is smooth, but not sticky. Cover the bowl with plastic wrap and allow the dough to rise for 15 to 30 minutes.
- In a small bowl, stir together the butter, garlic powder. and garlic salt. Set aside.
- Preheat the oven to 400°F. Line two baking sheets with parchment paper or a silicone mat. Lightly flour the counter or a breadboard and divide the dough into 16 pieces (about 1.5 ounces per piece). Roll each piece into a log about 8 to 10 inches long. Place on baking sheets about 2 inches apart. Let breadsticks rest about 10 minutes before baking.
- Bake 10 minutes. Remove from oven and brush the tops with the butter mixture. Bake an additional 3 to 5 minutes, or until the bottom of the breadsticks are lightly browned. Brush any leftover butter over the top when they come out of the oven.
- Remove from oven and allow to cool a couple minutes before serving. Serve while warm.
Last step: Please leave a comment and rating after you make the recipe.
Notes
Nutrition
Nutrition provided is an estimate. It will vary based on specific ingredients used.

Eileen
Thank you for sharing your recipe ❤️ watching you from Gettysburg PA. ⭐️⭐️⭐️⭐️⭐️
EAM
So good! Made these a couple of times and they were a hit. Just wondering are you able to make the dough a day ahead of time and bake them the next day? If so how would you do that?
Sarah @IHeartNaptime
Hi, we haven’t tested it that way, but you might be able to put the dough in the fridge after the first rise. The next day, remove from fridge and bring to room temperature before proceeding with the topping and baking. Let us know if you try!
Jackie L.
Great Bread Sticks – very easy to make. They turned out perfect.
Sarah @IHeartNaptime
So glad you love the Olive Garden breadsticks!
Maggie
I have plans on trying this.
But I wonder if I could add some string cheese sticks in the shaping process to make them cheese breadsticks…?
Sarah @IHeartNaptime
Hi Maggie, we haven’t tested that, but let us know if you try!
Sue
Should I guess a temperature of 350 degrees?
Sarah @IHeartNaptime
Hello, in the recipe card in step 4) preheat oven to 400°F. Enjoy!
Melinda
Made these about two weeks ago and had them with homemade lasagna. They turned out great and were a hit when I served them to our guests! Thank you for an amazing recipe!
Sarah @IHeartNaptime
So glad everyone loved the copycat Olive Garden breadsticks!
CJ
Is there a gluten free version?
Sarah @IHeartNaptime
Hi CJ, we have not tested this recipe with any gluten free flours. If you try let us know!
Tara O’Neil
I didn’t see where to add the olive oil in the directions. I’m guessing I should have put it in with the dough?
I Heart Naptime Community
Hi Tara! In a stand mixer fitted with a dough hook, combine 1 cup flour and salt. Stir in yeast mixture and olive oil :)
Loriann
Oh, my goodness! These are dangerously delicious, and they bake up so easy and fast. Perfect instructions – perfect results! These will be on repeat at my house! Thank You!
I Heart Naptime
Thank you for the great review! This is our go-to recipe. I am glad they baked up perfectly for you.
agnes
I love an olive garden copycat, these always go fast. Thank you!
Jan
I noticed this Olive Garden Breadstick recipe does not suggest too lightly oil bowl before placing dough to rise.
Is this correct, do not grease bowl first?
Jamielyn Nye
You can if you’d like to, but you do not have to for this dough.
Fran Capfield
Finally! A recipe that is even better than the original!
I Heart Naptime
Yay! I’m so glad you think so, Fran!
Cheryl
these breadsticks are a game changer! thank you so much for sharing this recipe!
I Heart Naptime
You are so welcome, Cheryl!