
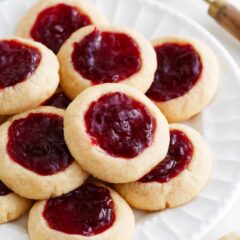
You only need 7 ingredients to make these easy raspberry thumbprint cookies. They are classic for the holidays made with a rich, buttery shortbread cookie and sweet jam!

This post may contain affiliate links. Read disclosure policy.
The Best Raspberry Thumbprint Cookie Recipe
Raspberry thumbprint cookies are easy to make and just like a linzer cookie are so eye-catching on a cookie tray! They’re a simple shortbread cookie dough rolled in sugar and then baked with your favorite jam that fills the thumbprint groove in the middle!
As much as I adore these as Christmas cookies they are great year round. The kids love to help make them, each putting their own fingerprint on theirs.
No mixer is needed, a short chill time and the entire batch is ready to eat in under 1 hour plus they are not only good to eat right away, but they store and travel well which makes them the perfect edible gifts!
Recipe Ingredient

Find the full printable recipe with specific measurements below.
- Unsalted butter softened: Bring it to room temperature about 30 minutes ahead of time. You don’t want it warm or almost melting, just soft enough to cream.
- Granulated sugar: Sweetens the cookie dough. Keep some extra for coating the outside of the cookies before baking, if desired.
- Large egg yolk: Keep the egg white stored in the fridge for tomorrow’s breakfast. Add it with the rest of your eggs.
- Vanilla extract: Adds even more aromatic flavor.
- All-purpose flour: Measure the flour correctly to avoid dense or dry cookies!
- Fine sea salt: Enhances the flavors of each ingredient and brings them together.
- Raspberry jam: You can also use whatever preserves you’ve got on hand or your favorite flavor of jam for these jam thumbprint cookies.
How to Make Raspberry Thumbprint Cookies
In a large bowl, cream the butter and sugar until light and fluffy, and then mix in the egg yolk and vanilla.

In a separate medium bowl, whisk together the flour and salt then a little at a time, add the dry ingredients to the wet ingredients, mixing until just combined but well incorporated.

Use a small cookie scoop to scoop out the dough. Use the palms of your hands to roll into a 1-inch cookie dough ball. Place on a prepared cookie sheet and use the back of a small spoon or your thumb to make an impression in the center of the dough.

Add about 1/2 teaspoon of jam (or whatever filling you’re using) to each indentation.Bake at 350°F for 10-12 minutes, until the edges are lightly golden. Remove and allow them to cool for about 5 minutes on the sheet before transferring them to a cooling rack.

Tips and Variations
- Alternative to the raspberry preserves could be apricot or blueberry jam. I use strawberry jam in peanut butter and jelly cookies and that would work here, too!
- Replace the vanilla extract with almond extract like I do in this almond cookies recipe.
- Add a different filling such as lemon curd, chocolate ganache, or dulce de leche.
- Make sure to line your baking sheet with a silicone baking mat or parchment paper to prevent sticking but also to prevent the cookies from spreading.
- This can also happen when your butter is too warm and you haven’t chilled your dough or the flour wasn’t measured correctly. Using too much or too little can have drastic results!
- When rolling the dough in your hands, do so until it is nice and smooth. Then, gently add an indent to the center. Don’t rush it.

Storing and Freezing
- Store: Keep cookies stored in an airtight container either on the counter or in the fridge for up to 1 week.
- Freeze: Flash-freeze them so they’re solid first. Then, store them in a freezer bag or freezer-safe container for up to 3 months. You can also separate the layers with parchment paper so they don’t all freeze together. Thaw them on the counter when you’re ready to eat them!

Other classic cookie recipes we love include classic shortbread cookies, butter cookies and this raspberry cookie recipe
More Holiday Cookie Recipes


Raspberry Thumbprint Cookie Recipe
Video
Ingredients
- 1 cup unsalted butter , softened
- ⅔ cup granulated sugar , plus more for rolling if desired
- 1 large egg yolk
- 1 teaspoon vanilla extract , or almond extract
- 2 ¼ cups all-purpose flour
- ½ teaspoon fine sea salt
- ½ cup raspberry jam (or your favorite flavor), at room temperature
Optional: Glaze
Instructions
- Preheat the oven to 350°F. Line a baking sheet with parchment paper.
- Cream butter and sugar. In a large bowl, cream together 1 cup softened butter and 2/3 cup sugar until light and fluffy. Mix in one egg yolk and 1 teaspoon vanilla extract.
- Combine dry ingredients. In a medium bowl, whisk together 2 1/4 cups flour and 1/2 teaspoon salt. Gradually add to the wet ingredients and mix until just combined.
- Using a small cookie scoop, roll the dough into 1-inch balls. Roll the balls into extra sugar, if desired. Place the dough balls on baking sheet.
- Using your thumb or the back of a small spoon, make an indentation in the center of each dough ball. Freeze 5 minutes.
- Spoon jam. Add approximately 1/2 teaspoon jam into each indentation.
- Bake 10 to 12 minutes, or until the edges are lightly golden brown.
- Remove from the oven and let cool on the sheet 5 minutes, or until jam is set. Transfer to a wire rack to cool completely. Drizzle with glaze if desired.
Last step: Please leave a comment and rating after you make the recipe.
Notes
Nutrition
Nutrition provided is an estimate. It will vary based on specific ingredients used.

Mindy
Terrific recipe! I followed the recipe exactly, but instead of rolling the balls in (optional) granulated sugar, I mixed together a small batch of glaze (powdered sugar, tad of milk, and a splash of vanilla extract). After mixing and achieving a smooth consistency (not too runny, not too thick), I put the glaze mixture into a disposable bag, snipped a tiny hole in the corner of the bag, and drizzled the white icing glaze in squiggles over the top of each cookie. Totally optional, but makes them extra special and fun. These are so pretty on a Christmas cookie plate!
Kelly
So good and so fun to make with your kiddos.
Natasha
They’re so fun and easy to make! I’ve also tried blueberry jam and they’re great too, it’s so versatile that I can make it using different fillings.
Toni
My kids really enjoyed these treats! I will definitely make it again and again!
Kristyn
These have always been a hit at our house! We have tried a few different flavor jams in the middle & they are always so yummy!