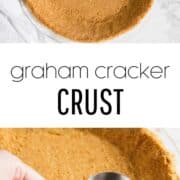
This graham cracker pie crust is made with just 3 ingredients in under 15 minutes. Works baked or no-bake for everything from cheesecake to icebox pie. Once you try homemade, you won’t go back to the box.

This post may contain affiliate links. Read disclosure policy.

This is the Perfect Graham Cracker Crust
I love a graham cracker pie crust because it works for just about any dessert, any time of year. Whether you’re making key lime pie with Greek yogurt, 7-layer bars, banana cream pie, or a no-bake cheesecake, this crust fits right in.
I enjoy making a homemade pie crust every now and then, but sometimes you just need something faster. This is my go-to when I want something easy that still tastes like you put in real effort. Once you make this graham cracker crust from scratch, the store-bought version just doesn’t cut it anymore.
Homemade Graham Cracker Crust Ingredients

Find the full printable recipe with specific measurements below.
- Graham cracker crumbs: You can use whole graham crackers ground into crumbs, or grab premade crumbs from the baking aisle. Either works, but crushing your own gives you a fresher flavor in the finished crust.
- Sugar: Just a little extra sweetness never hurt, but the sugar also helps the butter bind the crumbs together as it bakes.
- Salted butter: This is the binder that helps hold the crust together, and the salt adds balances the sugar with a sweet and salty flavor profile. If using unsalted butter, add a pinch of salt.
Graham Cracker Crumbs
Making your own graham cracker crumbs is easy. You’ll need about 10 to 12 whole graham crackers to equal 1 1/2 cups of fine crumbs. I love Nabisco but any brand works. Just add them to a blender or food processor and pulse until fine and crumb-like, or toss them in a zip-lock bag and roll with a rolling pin.
How to Make Graham Cracker Crust
This recipe takes less than 15 minutes to make, which is always a win in my book.

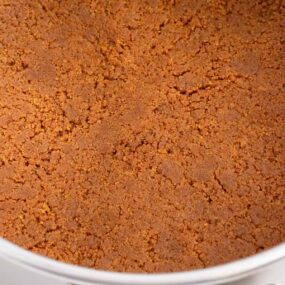
- Mix the graham cracker crumbs, sugar, and melted butter in a bowl until well combined. The mixture should look like wet sand.
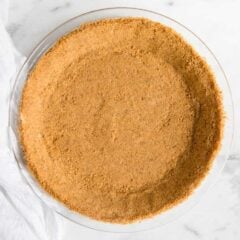
- Press into a 9-inch pie plate or springform pan. Use the bottom of a measuring cup to firmly pack the crumbs on the bottom, then use your fingers to press them up the sides.
- Bake or chill. For baked pies and cheesecakes, bake at 375°F for 6-8 minutes until just set. For no-bake desserts, skip the oven and refrigerate for at least 20 minutes to firm up. Either way, let the crust cool completely before adding your filling.
Recipe Tips
- Melted butter: This is what holds everything together. Once you mix the crumbs, sugar, and butter it should look like wet sand and feel easy to mold. If it seems too dry, add a little more butter a teaspoon at a time.
- Use a measuring cup: Press the crumbs into your pan using the flat bottom of a measuring cup. This compacts everything into a firm, even crust. Use your fingers for the sides and smooth out any bumps as you go.
- Best pan: A 9-inch pie plate or springform pan works best. This recipe also fits a tart pan. Avoid non-stick metal pans with sloped sides since the crust tends to slide down. Glass or ceramic pie plates with straight edges hold the shape much better.
- Need more crust? This recipe easily doubles for a 9×13 pan or thicker crust.

Variations
One of the best things about this crust is how easy it is to customize. Swapping the type of cracker or cookie can completely change the flavor profile.
- Honey graham crackers are the classic choice and what I use in this recipe. The mild sweetness pairs well with just about any filling, from cheesecake to key lime pie.
- Cinnamon graham crackers add a warm spice flavor that works really well with apple or pumpkin fillings. It’s a small swap that makes a big difference in the fall.
- Chocolate graham crackers are a great match for peanut butter, Nutella, or chocolate-based fillings. Try them with a Reese’s no-bake cheesecake for a next-level crust.
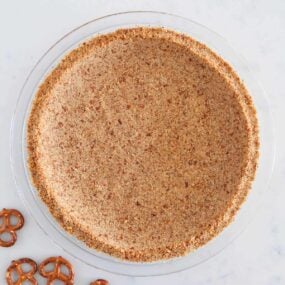
- Digestive biscuits are the closest substitute if you’re outside the US and can’t find graham crackers. Use the same ratio but add an extra teaspoon or two of butter since they tend to be a bit drier.
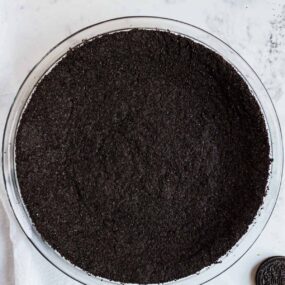
- Other cookies work too. Vanilla wafers, gingersnaps, shortbread, and Oreos all make great crusts. If you’re using a sweeter cookie, cut the sugar back by a tablespoon or so. Check out my Oreo pie crust and gingersnap crust for two more versions we love.
Using a Graham Cracker Crust
Once you have this crust down, the possibilities are endless. Some of my favorites include cheesecake, lemon icebox pie, s’mores pie, and this key lime pie bars recipe.

Need more pie crust recipes? Try this all-butter pie crust or lattice pie crust!
More Pie Crust Recipes
Graham Cracker Pie Crust
Ingredients
- 1 ½ cups finely crushed graham crackers (10-12 graham crackers)
- ¼ cup granulated sugar
- 6 Tablespoons salted butter , melted
Instructions
- Prep. If the crust needs to be pre-baked, preheat the oven to 375°F.
- Combine. In a medium bowl, stir together 1 1/2 cups graham crackers, 1/4 cup sugar, and 6 Tablespoons butter until well combined.
- Shape into crust. In a 9-inch pie plate or springform pan, pour the crumb mixture and firmly press into the bottom using a 1/4 measuring cup. Use your fingers to press the crumb mixture firmly onto the sides.
- Bake. Bake 6 to 8 minutes or if using for a different recipe, bake as directed in the instructions. Allow crust to cool before filling. If using for a no-bake recipe, chill crust before filling.
Last step: Please leave a comment and rating after you make the recipe.
Notes
Nutrition
Nutrition provided is an estimate. It will vary based on specific ingredients used.

Sharon Rif
Good but I used vanilla wafers for crust
Kimberly
I can already think of at least a dozen fillings I want to put into this delicious crust!
Ashley F
One of our go-to crust! It’s so easy to make and comes together quickly!
Stpehanie
I used this recipe to make a cheesecake and it was perfect! Thanks!
Jamielyn Nye
I’m so glad you enjoyed it!
Holly
Was looking for a better recipe than my Betty Crocker cookbook. Turns out, this is the exact same recipe. Any ideas why mine ended up in a mush in the bottom of the pie plate? The sides slid down while cooking.
Jamielyn Nye
Hi Holly! I haven’t had an issue with it sliding down while baking. My only guess is that your butter was too warm when you began.
Krista
Love how easy this is! Cannot wait to try it out!
Melanie Bauer
Sounds amazing! Love how easy and tasty this recipe is, need to put this on my menu!
Jamielyn
Hope you enjoy! Homemade crust is the best!
Lisa
To make it more diabetic friendly can you cut out the sugar completely? I’ve got a recipe of Cheesecake that is no bake for diabetics….it’s really yummy and fast.
Jamielyn
You definitely could, it just won’t taste as sweet!
Erin | Dinners,Dishes and Dessert
YUM!!! I love this delicious version!!!
Catalina
Easy and delicious! This will be my new favorite for sure!
Katerina @ diethood .com
This is perfect!! I LOVE it!
Chrissie Baker
I adore this recipe. It’s super easy to do and quickly. One of my favorites.
Jamielyn
So glad you enjoy it! Homemade crust is so much better than store bought!
Dorothy Reinhold
Sooooo much better than store bought! Now I am thinking of what I would to fill it with!!
Jamielyn
I totally agree! Homemade is so much better!
Brandy O’Neill
Sounds great! Definitely using this recipe with the next pie I make!
Jamielyn
Hope you enjoy! :)