

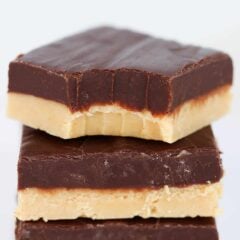
This chocolate peanut butter fudge combines the two classic flavors in a 4-ingredient recipe made in the microwave. It’s rich, creamy and easy to make for the holidays!

This post may contain affiliate links. Read disclosure policy.
Easy Chocolate Peanut Butter Fudge
Every year I sit down with my kids and go over all the best holiday desserts they want to see on our family’s Christmas dessert board and every year we include some of our favorite candy and fudge recipes.
This chocolate peanut butter fudge recipe is always a top request as well as peanut butter balls and buckeye candy. This fudge is the perfection of combination of my peanut butter fudge and my easy microwave fudge!
And just like my 3-ingredient fudge it’s all done in the microwave, which is perfect for getting the kids involved!
Why This Recipe Works
- Easy no bake recipe. No need to boil anything, use a candy thermometer, or even turn on the oven for this peanut butter chocolate fudge recipe! It’s simple treat yet so decadent!
- The ultimate flavor combination. Creamy and sweet peanut butter chocolate fudge is the best of both chocolate and peanut butter, a classic combination!
Recipe Ingredients

Find the full printable recipe with specific measurements below.
- Sweetened condensed milk: A signature ingredient in most easy fudge recipes. It’s what gives it a chewy texture and a lot of sweetness.
- White chocolate melting wafers: We combine this with the nut butter to give it sweetness and to help it set once it chills. On its own, it would be very savory and nutty.
- Chocolate melting wafers: You can also use chocolate chips for the top layer.
- Creamy peanut butter: Use a commercial brand like Jiff or Skippy. The natural kind separates and is quite runny, making it harder to set.
How to Make Chocolate Peanut Butter Fudge
Place the white chocolate and chocolate wafers in 2 separate microwave-safe bowls. Pour half the sweetened condensed milk over the white chocolate and the rest of it over the chocolate.

Add peanut butter to the white chocolate bowl. Then place that bowl in the microwave for 1 minute at 50% power. Stir for 15 seconds. Microwave for another 15-30 seconds until it reaches a smooth consistency.

Pour the peanut butter mixture into a prepared pan. I use an 8 x 8 square pan which is the perfect size for this recipe. Smooth it out with a spatula and move quickly because it will thicken fast. Place it in the fridge to firm.

Microwave the other bowl of chocolate. Pour that fudgy chocolate mixture overtop the bottom layer and once again, smooth with a spatula.

Place it in the fridge once more to firm up for a couple of hours. Slice into 36 squares and dig in!

Expert Tips
- Line your baking dish or pan with wax paper, parchment paper, or foil and leave a bit hanging over the sides. This will help lift the fudge if you prefer to take it out to slice on a cutting board first.
- Use a sharp knife to slice your squares. Wipe it clean between each cut for clean edges. You may need to run the knife under hot water then wipe dry first.
- For clean layers, make sure the creamy peanut butter fudge has set first before adding chocolate on top. Otherwise, the layers will blend into each other.
- Learn how to melt chocolate in a variety of ways. Everything from the microwave to the double boiler, so you can decide what works for you. There are even tips on which chocolate responds best to which method.
- Add nuts in the chocolate layer like I always do in my Kraft fantasy fudge.
- Garnish with chopped Reese’s peanut butter cups or chopped peanuts. Finish it with some coarse sea salt or a drizzle of caramel sauce.

I’ve got even more fudge recipes for you! Try this rocky road fudge recipe, eggnog fudge, snickerdoodle fudge, or white chocolate fudge next.
More Homemade Candy Recipes


Chocolate Peanut Butter Fudge
Video
Ingredients
- 1 ¼ cup (8 ounces) white chocolate melting wafers
- ⅓ cup creamy peanut butter
- 1 (14-ounce) can sweetened condensed milk , divided in half
- 1 ½ cups (10 ounces) chocolate melting wafers or chocolate chips
Instructions
- Prep. Line an 8×8-inch pan with parchment paper or foil.
- Peanut butter layer. In a microwave-safe bowl, add 1 1/4 cups white chocolate, 1/3 cup peanut butter, and 1/2 the can of condensed milk. Microwave 1 minute at 50% power. Stir 15 seconds. If lumps remain, microwave another 15 to 30 seconds. Stir until smooth.
- Pour into pan. Pour evenly into the pan and make a smooth layer with a rubber spatula. Try to move quickly as it tends to thicken fast. Place in the refrigerator 30 minutes, or until firm.
- Chocolate layer. In another microwave-safe bowl, add 1 1/2 cups chocolate and the remaining 1/2 of the condensed milk. Microwave 1 minute at 50% power. Stir 15 seconds. If lumps remain, microwave another 15 to 30 seconds. Stir until smooth. Pour the fudge over the peanut butter and make a smooth layer with a rubber spatula.
- Refrigerate. Refrigerate 1 to 2 hours, or until firm. When ready to serve, slice into 36 1-inch squares.
Last step: Please leave a comment and rating after you make the recipe.
Notes
Nutrition
Nutrition provided is an estimate. It will vary based on specific ingredients used.
Recipe FAQs
This is most likely due to not using enough sweetened condensed milk. This is a tested recipe, so be sure to follow the measurements listed.
You also want to make sure to stir it well, so that everything is evenly distributed throughout the mixture.
Under cooking the sugar can make it so that not enough water evaporated. Using natural peanut butter can also make it too soft.
The obvious reason would be that you haven’t left it long enough to set. The not-so-obvious reason comes down to the ingredients used. You want to make sure to use full-fat sweetened condensed milk. Not evaporated milk, coconut milk, or any other type of milk.
Fudge needs the perfect amount of fat. For example, using milk chocolate chips rather than semi-sweet chips may result in softer fudge.
Keep fudge stored in an airtight container at room temperature on the counter for 5 days. You can also store up to 3 weeks in the fridge.
To store in the freezer, transfer any fudgy to a freezer bag and separate the layers with parchment paper so they don’t stick together. To enjoy again, place the pieces on the counter until soft enough to bite into.

Debbie
Delicious! Made exactly as recipe calls for
Sarah @IHeartNaptime
SO glad you loved the chocolate peanut butter fudge!
Cindy
Will white chips work in place of white melting candy?
Jamielyn Nye
Yes they will, just watch them carefully because they tend to burn easier.