This homemade vanilla ice cream is smooth, creamy and easy to make with a rich vanilla flavor. I scream, you scream, we all scream for ice cream because it’s truly the best summer treat!
This vanilla ice cream is perfect to scoop into cone or serve in a bowl! Make it more indulgent by making it into a Reese’s ice cream or S’mores ice cream.

Table of Contents
The Best Homemade Ice Cream
One of my favorite frozen desserts to make is homemade vanilla ice cream. I love to make it during the summer, but honestly we love to eat it all year long. :) It’s the perfect refreshing treat to cool off with on a hot summer day, or when you’re craving a sweet treat.
This recipe is super easy to make and contains NO eggs! It tastes just as creamy as the old-fashioned version, but is quicker and requires less work (no simmering on the stovetop beforehand). You do need an ice cream maker to follow the recipe, but if you don’t have one make this no churn ice cream instead.
Homemade Ice Cream Recipe Ingredients
This homemade ice cream recipe only needs a few simple ingredients to get started!

Find the full printable recipe with specific measurements below.
- Heavy cream: This gives the ice cream a rich flavor. Avoid over-churning the ice cream or the heavy cream will taste more buttery than cream.
- Whole milk: The mixture of the cream and milk gives a richer blend of flavor as well as a creamy and soft texture.
- Sugar: Every ice cream needs that extra sweetness! Sugar is just that for this recipe.
- Salt: Balancing out the flavors gives it a nice boost of salty and sweet flavor.
- Vanilla extract: Added for flavor and tints the soft ice cream to a creamy color.
How to Make Perfect Vanilla Ice Cream
This homemade vanilla ice cream is made using a machine to help it churn, stay cold, and do most of the work.

- Prepare machine. Prep your ice cream machine according to package directions. Some machines require you to freeze the bowl first and for others, you will need to have ice and rock salt.
- Mix together. Combine heavy cream, milk, sugar, salt, and vanilla in a bowl or the base of the ice cream container you plan to use.
- Churn. When you’re ready to make the ice cream, pour the mixture into your ice cream maker bowl. Follow the instructions for your specific machine. Turn on the machine and let it churn until it looks like frozen yogurt (about 25 minutes). Store in an airtight container in the freezer to become firm.
- Serve. Scoop into a bowl when ready to serve. Add desired toppings and enjoy.
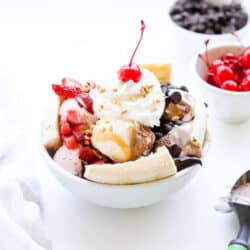
Favorite Toppings and Variations
There are so many toppings that taste amazing with vanilla ice cream! Because of its neutral flavor, it pairs well with just about anything.
- Fruity: Try topping it with fresh berries or lemon curd! Fresh strawberry sauce or strawberry jam or even blueberry sauce or peach pie filling taste amazing.
- Nuts: Pecans, almonds or peanuts pair well with caramelized bananas.
- Chocolate. For a rich dessert, add homemade brownies, chocolate chips or chocolate chip cookie crumbles.
- Classic: Hot fudge, sprinkles and a maraschino cherry is my kids favorite. Although, whipped cream and caramel sauce are a close second.
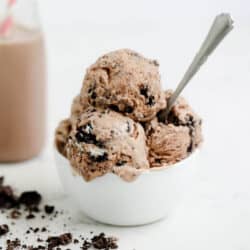
- Mix-ins: Stir in up to 2 cups of crumbled waffle cone, Oreo crumbles or Reese’s peanut butter cups. Any other candy of choice works, too!

Tips for Making Homemade Ice Cream
Homemade ice cream is simple, fresh, and delicious! It has all the right ingredients to make it creamy and flavorful in every bite. Here are some easy tips to follow to make the best vanilla ice cream every time!
- Freeze the bowl. Most ice cream makers require that you freeze the bowl the night beforehand, so don’t forget! It needs to be COLD before getting started.
- Full-fat ingredients. Using whole milk and heavy whipping cream makes a world of a difference. The higher fat content creates a super creamy and rich result. Trust me, it’s worth the extra calories!
- Churning time. It usually takes my Cuisinart ice cream maker about 20 minutes to churn the mixture. Each machine is different, so it may take a little less or a little more time. Keep an eye on it and as soon as the mixture resembles frozen yogurt, that’s when you know it’s ready. You don’t want it to over-churn!
- Vanilla bean. Pure vanilla extract tastes delicious, but if you want to ramp up the flavor, try using vanilla bean paste instead. It can be a bit expensive, so this may be a good swap to make for special occasions. :)
- Mix in’s. This recipe also tastes delicious with your favorite toppings mixed into the vanilla base. Churn the mixture until it’s reached the consistency of frozen yogurt, then mix in the extras until smooth. We love adding in crushed Oreos, chopped Reese’s cups, or fresh smashed berries.
- Plan time to freeze. For a consistency that’s scoop-able and firm, you’ll want to freeze the mixture for at least a few hours. If you like soft serve, you can enjoy it immediately after churning.
- Scooping. Run your ice cream scoop under hot water before scooping the dessert out of the container.
- Doubling. You’ll end up with about 1.25 quarts of ice cream when making this recipe. You can double the recipe for a larger amount, although you’ll need to make 2 separate batches.
Recipe FAQs
Eggs do help create rich and flavorful ice cream. They also prevent ice crystallization and help to have a smooth and creamy texture. This recipe does not include eggs but it still has other ingredients that give that creamy texture.
Egg yolks! Again, it is not something that we added to this recipe but it is used to have very creamy ice cream. Using heavy cream will also help with that.
Homemade ice cream is fresh ice cream that is smooth, creamy, and tastes fresher with ingredients you know and add yourself whereas store-bought ice cream has unhealthy levels of fat, and flavors that are combined that can be unknown.
Flavor! The flavor from the homemade ice cream is richer and you don’t have the artificial ingredients or fake thickeners to alter the color, flavor, and texture.

5 star review
“This was my first time making ice cream. It was outstanding! Not too sweet, good vanilla flavor. Recipe is a keeper!”
-Anne
Storage Instructions
After churning the ice cream, I love to pour the mixture into a bread loaf pan to store. I find it’s a perfect size and is super easy to scoop out of. You can use any container, just make sure to cover it with a lid or wrap it tightly with plastic wrap to reduce freezer burn. It will stay fresh in the freezer for up to 3 months. When ready to enjoy, let thaw on the counter for a few minutes and then scoop with an ice cream scoop.
More Frozen Treats


HUNGRY FOR MORE? Subscribe to my newsletter and follow on Facebook, Pinterest and Instagram for all the newest recipes!

Homemade Vanilla Ice Cream
Video
Ingredients
- 2 cups heavy cream
- 1 cup whole milk
- ¾ cup granulated sugar
- Pinch salt
- 2 teaspoons vanilla extract
Depending on machine: Ice and rock salt
Optional toppings: strawberries, brownies, crushed oreos, hot fudge, caramel sauce
Instructions
- Prep your ice cream machine according to package directions. Some machines require you to freeze the bowl first and others you will need to have ice and rock salt.
- Combine heavy cream, milk, sugar, salt and vanilla in a bowl or the base of your ice cream container you plan to use.
- When you're ready to make the ice cream, pour mixture into your ice cream maker bowl. Follow instructions for your specific machine. Turn on machine and let it churn until it looks like frozen yogurt (about 25 minutes). Store in an air tight container in the freezer to become firm.
- Scoop into a bowl when ready to serve. Add desired toppings and enjoy.
Notes
Nutrition
Nutrition provided is an estimate. It will vary based on specific ingredients used.
Did you make this recipe? Don’t forget to give it a star rating below!
Categorized as: 4th of July, 5 Ingredients Or Less, American, Desserts, Freezer-Friendly, Frozen Desserts, Gluten-Free, Kid-Friendly, No-Bake, Nut-Free, Vegetarian

Jamielyn Nye is the founder and recipe creator at I Heart Naptime. She is also the author of the I Heart Naptime Cookbook. Here you will find easy family-friendly recipes for every occasion.


Omg it’s amazing but I used coconut milk and heavy whipping cream
Thanks Lauren! I’m glad you enjoyed the ice cream!
Made it added bananas!! Delicious
Sounds delicious Erika! Glad you enjoyed the ice cream :)
Bought new ice-cream maker. First time I have ever made ice-cream. Recipient was simple and turned out great!!