

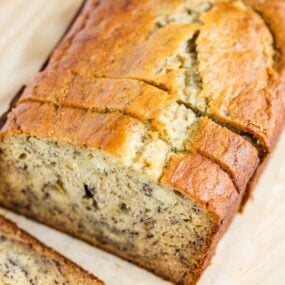
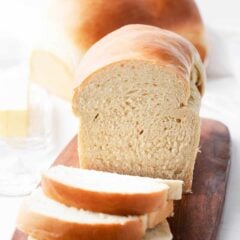
This is the BEST easy homemade bread recipe that’s simple to make with super soft and tender results. A slice of this fluffy white bread is perfect for sandwiches and freezes well.

This post may contain affiliate links. Read disclosure policy.
Easy Bread Recipe
There really is nothing better than a warm slice of homemade bread with butter and strawberry jam on top. I learned to make this bread recipe when I was 12 and have been making it ever since. The evaporated milk is the secret. It adds the best flavor and that perfectly tender texture.
Don’t let yeast intimidate you, this bread is foolproof. There’s nothing better than a warm loaf of homemade bread with dinner, or sliced for a sandwich at lunch. Once you’ve made this one, try my homemade French bread, artisan bread, sourdough bread, or no knead bread, too.
“I tried various recipes when I decided to make homemade bread for my family instead of buying it from the store. This one is by far the best! The loaves are soft and fluffy every time. The whole family enjoys it and my kids say it tastes better than store bought. I use regular milk and it turns out perfect.”
Ingredients

Find the full printable recipe with specific measurements below.
- Warm water: The water temperature is key. If it’s too hot, it will kill the yeast. I like to keep it around 105°F.
- Active dry yeast: You’ll need about 2 1/2 teaspoons for two loaves. Check the expiration date, old yeast won’t rise. This recipe uses commercial yeast, not sourdough starter.
- Granulated sugar: This adds the perfect sweetness.
- Butter: The butter adds the perfect flavor.
- Salt: The salt will bring all the flavors together.
- Evaporated milk: This is the secret ingredient that really adds the perfect flavor and tenderness. You can substitute with 2% or whole milk if needed.
- Flour: I’ve made this recipe with bread and all-purpose flour, both will work well. Be careful not to add too much, add slowly at the end.
Variations
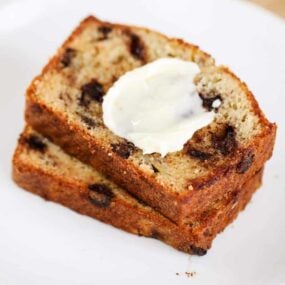
- Cinnamon swirl bread: Your family will love the cinnamon sugar swirl!
- Raisin bread: Follow the cinnamon swirl bread instructions and add up to 2 cups raisins.
- Whole wheat flour bread: I love to make this variation to use with avocado toast.
- Homemade bread bowls: These are perfect for soup, dips and more!
How To Make Homemade Bread
Follow these step by step instructions and tips on how to form your homemade bread for best results.

- Proof the yeast: Let the yeast bubble up in warm water. You want the yeast mixture to be foamy and dissolved before you add to the flour.
- Mix together: Add a little more flour and keep mixing until the dough comes off the edge of the mixer. You know it’s done when your finger no longer sticks to the dough.
- First rise: While you’re letting the dough rise, cover the bowl with a warm towel and set by a window. You can also turn the oven to 175°F and then turn it off. Then place the bowl inside the oven and let it rise there. Make sure the dough has doubled in size before touching it.
- Shape the dough: When the dough is ready to be formed, punch the dough and then cut in half to make two loaves on a lightly floured surface. Press the dough down removing any air bubbles and start kneading for a couple minutes. Form a loaf and tuck the ends under.
- Second rise: Stick the two loves in bread pans and then let the dough rise until it has doubled in size or formed the perfect size bread.
- Bake: Then it’s ready to bake! Bake until golden brown and then butter the tops.

Expert Tips
- Weather affects the dough: Humidity can make dough sticky. Add flour 1/4 cup at a time until it no longer sticks to the mixer or your finger.
- Temperature affects the rise: A cool house slows the rise. In winter I warm the oven 2-3 minutes, turn it off, and let the dough rise inside.
- Use a thermometer: A thermometer takes the guesswork out of the water temp. It should feel like warm bath water, around 105°F.
- A stand mixer helps: You can knead by hand, but a stand mixer with a dough hook saves real time and effort.
- Cover with a towel: Use a flour sack towel over the bowl while the dough rises.
- Bread pans: Makes two loaves, so you’ll need two 8×4″ bread pans. Ceramic, glass, or cast iron work too. For one loaf, halve the ingredients.
- Bread machine: I haven’t tried it, but readers have had success. Follow your machine’s directions for ingredient order, and adjust for instant yeast. Cut ingredients in half to make one loaf.

Ways to Use Homemade Bread
Use your bread in some of these favorite recipes!
- To make a buttery grilled cheese sandwich.
- Toasted with chicken salad or egg salad on top.
- For breakfast as french toast or french toast sticks.
If you have leftover bread that has gone a little hard, don’t pitch it! It’s perfect for making homemade croutons, breadcrumbs, crockpot stuffing or overnight French toast casserole. It’s a great way to stretch the bread even further.

Love homemade bread recipes? Try these other favorites such as naan bread, dinner rolls or these easy breadsticks!
More Homemade Bread Recipes

Homemade Bread Recipe
Video
Equipment
- 2 8×4-inch bread pans
Ingredients
Proofing Yeast
- 2 ½ teaspoons active dry yeast
- ½ Tablespoon granulated sugar
- 2 cups warm water , at 105°F
Bread
- ¼ cup (57 g) melted butter , plus 1 Tablespoon for brushing on top
- ¼ cup (50 g) granulated sugar
- ½ cup (133 g) evaporated milk , or room temp milk
- 2 teaspoons salt , or 1 Tablespoon kosher salt
- 6-7 cups (850 g) bread flour , or all-purpose flour
- 1 Tablespoon butter
For serving: Butter and Jam
Instructions
Proofing the Yeast
- In a small bowl, add the yeast and sugar. Pour the warm water over the yeast mixture and let it sit 5 to 10 minutes, or until nice and bubbly. If it doesn't foam, toss it and start over. The water was either too hot or the yeast was not fresh (check the expiration date to be sure it isn't old).
Bread
- In the bowl of a stand mixer fitted with a paddle attachment, mix together the butter, sugar, evaporated milk, and salt on medium low. Mix in the yeast mixture just until combined.
- Swap out the paddle attachment for a dough hook. With the mixer on low, add 3 cups flour until combined. Add 1 cup flour at a time and stir until combined. After adding a total of 6 cups flour, add 1/4 cup flour at a time until the dough is no longer sticking to the sides. Then knead 3-5 minutes. It’s ready when the dough is soft and no longer sticky.
- Lightly coat the ball of dough and the sides of the bowl with cooking spray or a little oil to prevent sticking. Cover the bowl with a warm towel. Set by a window and let rise 1 hour, or until doubled in size. When it has risen over the bowl, punch it down, and transfer to a floured surface.
- Spray 2 8×4-inch bread pans with nonstick cooking spray.
- Knead the dough 2 to 3 minutes. Cut into 2 equal pieces. Using a rolling pin, roll one piece into a rectangle. Starting at the shorter side, roll the dough up and tuck the ends under. Place into a bread pan. Repeat with the remaining piece.
- Preheat oven to 375°F and place the rack in the middle of the oven.
- Let the loaves rise until double in size, about 45 minutes, while oven preheats. Bake 25 to 35 minutes, or until golden on top and cooked through to 185°F in the center. If the tops are browning too fast, tent the top with foil.
- Remove from the pans to a cooling rack. Brush the tops with butter. Slice once slightly cooled. Enjoy with butter and jam, if desired.
Last step: Please leave a comment and rating after you make the recipe.
Notes
Nutrition
Nutrition provided is an estimate. It will vary based on specific ingredients used.

Tina
Love this bread and the recipe is so easy!! Thanks!
Jamielyn
I’m so glad Tina! It is my favorite. :)
Kathleen Freese
I made this recipe for the first time today and it turned out so delicious that I’m going to make it again and again. In fact, I’m going to make it within the next few days in order to use up the opened can of evaporated milk that I learned can only be stored for 3 days in the fridge. Who cares….what a great excuse to make some more of this delicious bread and share it with my neighbours. I’ve been looking for a good bread recipe and as far as I’m concerned, I’m done searching….this one is the best by far! One question I do have. Can olive oil be used instead of the melted butter and shortening throughout the recipe?
Jamielyn
I’m so glad that you loved this recipe Kathleen! It is definitely one that I make all the time. Yes, if you prefer olive oil, you can definitely use it instead!
Jessica
My sister and I have never made homemade yeast bread before and I found your recipe and decided it was time to try it together today! It turned out amazing!!!! The color was beautiful and the taste was in amazing!!!! I think our husbands and children will be expecting it weekly now!!!
Jamielyn
I’m so glad it turned out so well for you and your sister! This is definitely a fail proof recipe and it is amazing!! My family expects it almost weekly too. :)
bannexa
Hello I made this recipe yesterday and let me tell you that I made different bread recipes before but this recipe is THE BEST BREAD RECIPE EVER…Thank you so much for sharing this recipe my kids love this bread I made them toast this morning…Thank you againg may the LORD continue to blessed you and your family
Jamielyn
I’m so glad your family loved it! It is our favorite bread recipe. Have a wonderful weekend. :)
Rachel
Thanks, that looks awesome! Can’t wait to try it!
Jamielyn
It is amazing! Definitely give it a try soon! :)
bannexa
Hello !!! Thank you so much for sharing this recipe bread looks beautiful…my question is in your ingredients list you have listed 1TB of shortening and 1TB of butter but on the instructions it says comine melted butter with milk and sugar do you mean melted shortening or do we melt both butter and shortening I want to make this delicious bread today thank you God Blessed
Jamielyn
Hi! The shortening is just for coating the bowl before the first rise. The melted butter is mixed with the milk and sugar! :)
Magda
Mil gracias, es un pan riquisimo y a prueba de principiantes.
Lynn
Can instant yeast be used instead of active dried?? thanks
Jamielyn
Yes, it should turn out the same and it will rise faster! :)
Flora
Thank you for this wonderful bread recipe! I just made it a few hours ago and no need to save the recipe because I have already memorized it.
Jamielyn
I’m so glad you loved it! It is my all time favorite bread recipe! :)
Tiffany B.
First of all I have never made homemade bread (without a bread machine). This recipe turned out fantastic! Even better than the bread machine and I have 2 loaves. First off I used 1/2 whole wheat flour and 1/2 all purpose flour, second we are lactose intolerant so I used 1 cup of almond milk and simmered it down to 1/2 cup. Everything else was kept the same and it was amazing! Thank you.
Jamielyn
Great substitutions, thanks for sharing Tiffany! I’m so glad my recipe turned out great for you! :)
K. McAughey
Thank you for posting, I only do a bread machine as well.
Anna
Hi
Just wondering if where your instructions say to kneed the dough (at step 5) after you have let it rise once and then make the rectangles. Is that extra kneed time supposed to be after you get it out of the mixer? Or should I be kneeling again after rising it? I made this last night (following directions exactly) and it was yummy but very dense?
I have just tried again and put the extra kneeding in after I got it out of my mixing bowl and it just feels so much better already! And I haven’t put it in the oven yet?
A lovely recipe regardless so thank you very much!!
Anna
Jamielyn
Hi Anna! I think you have it right the second time. Once you have let your dough rise the first time, sprinkle some flour on the counter and take the dough out of the bowl and knead it with your hands for 2-3 minutes on the counter. Then you cut the dough into two pieces and roll into two rectangles. Hope that helps! :)
Dianne McDonald
Hi! Can I use this recipe with my bread machine? thanks :)
Jamielyn
Hi Dianne! I’m not sure, I don’t have a bread machine so I have never tried it with this recipe. Sorry!
KikiB
Thank you so much for this wonderful recipe and helpful pictures and notes! I made this bread today and wow! it was so easy and worked so well. I have now printed the recipe out as I had written it on the back of an envelope and have had it floating around in my stuff for a while! I have a board of bread recipes to try, but now they seem obsolete. I make bread in my bread machine and love it but takes 3 hours and only get 1 loaf, this way I get 2 big loaves, which are perfect for sandwiches. Thank you, thank you thank you!!!! And the idea for cinnamon sugar is next in the list to do!
Jamielyn
I am so happy my recipe has worked so well for you! The cinnamon sugar bread is amazing too! Thanks for your nice comment, it made my day. :)
Michelle
I’ve made this recipe a few times and it is AMAZING! It came out perfect the first time I made it. I brought it to a party and everyone said it was the best homemade bread they’ve had! Definitely a keeper! :)
Stephanie
Just wanted to let you know that after trying a few bread recipes last fall, I tried this one and it stuck, and I’ve been making it weekly every since! I halve the recipe to make 2 mini loaves–one plain, and one cinnamon swirl :) fantastic recipe!
Jamielyn
I’m so glad you love this recipe! I need to start making one of them into a cinnamon swirl loaf, my kids would LOVE that! I usually make two regular and freeze one. Thanks for commenting Stephanie, you made my day! :)
Elizabeth Hallahan
Total bread newbie here – any chance on getting instructions for modifying this recipe into Cinnamon Swirl?
Jamielyn
Hi Elizabeth! I just make it like cinnamon rolls and spread melted butter on the dough and then sprinkle cinnamon sugar on top! :)
Amy @ Life to the Full
Just made your recipe today! I’m new to homemade bread making, so mine didn’t turn out as “pretty” as your pictures but the bread is still soooo tasty! Great recipe.
Jamielyn
I’m glad you tried it Amy! This recipe is my families favorite. Thanks for stopping back by to leave a comment! :)
Lindsy
Inhave been making bread for years handmade and bread machine! This is THE BEST recipe ever! It turns out perfect every time. I made one cin swirl loaf and one regular tonight and the cin swirl lasted 10 mins out of the oven. I cant wait tommake egg salad sandwiches tomorrow woth the other. How do you store your loaves once cooled?
Jamielyn
I’m so happy you like it!! Thanks so much for your comment! The cinnamon swirl loaves are my families favorite too! I usually just wrap them in plastic wrap, but you could buy those loaf bags with a twist tie!
LG
Hi, I like to make more than 2 loafs at a time since we’re bread lovers here and I don’t want to bake back-toback. To get atleast 4 loaves, would I need to double this recipe?
Jamielyn
Hi! I’ve never tried doubling my recipe since it is the perfect fit for my kitchen aid. I’m sure it would work, but you would need a really large mixer! Let us know how it goes if you try it! :)
Lindsy
I never have good luck doubling when using yeast so I just use both my mixer bowls and make 2 of these recipes in separate bowls to get 4 loaves.